Minecraft Villagers: Complete Guide to Jobs, Trades, and Tips
Minecraft villagers are much more than just NPCs wandering around villages. In 2026, they remain one of the richest systems in the game: 13 different jobs, dozens of trades spread over 5 levels of progression, the ability to breed them, and even a zombification mechanic to get permanent discounts on prices. Whether you play solo or on a multiplayer server with friends, mastering the villagers' mechanics gives you access to enchanted gear, plenty of emeralds, and otherwise unobtainable items like exploration maps or the mending enchantment.
This guide covers everything you need to know about Minecraft villagers: the complete table of jobs and work blocks, the most profitable trades, breeding, the zombification/healing technique, and multiplayer specifics.
All Minecraft Villager Jobs
Each Minecraft villager has a job determined by a work block placed nearby. An unemployed villager (in simple clothes, without a badge) can take any job if you place the corresponding block near them. However, a village nitwit (recognizable by their green outfit) can never take on a profession.
The Minecraft villager job system works on a simple principle: place the right block, the villager takes the job. Destroy the block, they become unemployed again. However, be careful: a villager with whom you have already traded at least once retains their job and offers permanently. It is therefore crucial to check the proposed trades before confirming the first trade.
The Minecraft villager job progresses through five levels: Novice (stone badge), Apprentice (iron), Journeyman (gold), Expert (emerald), and Master (diamond). Each level up unlocks up to two new offers while retaining the previous ones. Progression is achieved only by trading with the villager.
Here is the complete table of the 13 jobs available in 2026:
| Job | Work Block | Best Trades | Utility |
|---|---|---|---|
| Librarian | Lectern | Enchanted books (Mending, Protection IV, Efficiency V), name tags, lanterns | ★★★★★ |
| Armorer | Blast Furnace | Enchanted iron and diamond armor, shield | ★★★★ |
| Weaponsmith | Grindstone | Enchanted diamond sword and axe | ★★★★ |
| Toolsmith | Smithing Table | Enchanted diamond pickaxe, shovel, and axe | ★★★★ |
| Cartographer | Cartography Table | Exploration maps (monument, mansion), Globe banner patterns | ★★★★ |
| Cleric | Brewing Stand | Ender pearls, glowstone dust, bottles o' enchanting | ★★★★ |
| Fletcher | Fletching Table | Enchanted bow and crossbow, spectral arrows, emeralds for sticks | ★★★★ |
| Farmer | Composter | Bread, golden apples, cake, golden carrots | ★★★★ |
| Butcher | Smoker | Cooked meat (pork, chicken, rabbit), emeralds for raw meat | ★★★ |
| Mason | Stonecutter | Glazed terracotta, quartz, stone bricks | ★★★ |
| Fisherman | Barrel | Enchanted fishing rod, cooked fish, bucket of cod | ★★ |
| Shepherd | Loom | Colored wool, dyes, banners, paintings | ★★ |
| Leatherworker | Cauldron | Dyed leather armor, saddle (Master level) | ★★ |
The two non-trading statuses are the unemployed villager (convertible by placing a work block) and the village nitwit (permanently inactive, recognizable by their green outfit without any professional accessory).
Note that the appearance of villagers also varies according to their biome of origin: plains, desert, savanna, taiga, snow, and swamp. This difference is purely visual and has no impact on trades or behavior. A desert librarian offers exactly the same trade pools as a taiga librarian.
To reassign a job, the "reroll" trick is essential. Place the work block corresponding to the desired job, check the villager's offers (right-click without buying anything), and if they don't suit you, destroy the block and replace it. The villager regenerates random offers with each reassignment. This manipulation only works as long as you haven't made any trades with this villager.
The Best Minecraft Villager Trades
Not all Minecraft villager trades are equal. Some jobs offer a significantly better emerald/value ratio than others. Here are the trades to prioritize for efficient progression.
The librarian is the most valuable villager in the game. At the Novice level, they already offer a random enchanted book for emeralds and a book. The trick is to break and replace the lectern as long as the villager is a Novice (before any trade) to reroll their offers until you get the desired enchantment. This is the most reliable method to obtain Mending, an enchantment impossible to get via an enchantment table. At the Master level, the librarian sells name tags, otherwise unobtainable in survival without exploration.
The farmer is the best emerald generator in the game. They buy wheat, carrots, potatoes, and beetroots. A simple automatic farm powered by farmer villagers (who harvest the crops themselves) is enough to produce a constant flow of emeralds. At the Expert and Master levels, they sell golden carrots and golden apples, two essential items for curing zombified villagers and breeding horses.
The Fletcher is an often underestimated trade. At the Novice level, they buy 32 sticks for one emerald. Since sticks are made from wooden planks (an infinite resource), it's one of the most profitable trades in the game to quickly accumulate emeralds.
The cleric is the only villager to reliably sell Ender pearls, making them a valuable ally for preparing for the Ender Dragon fight. They also buy rotten flesh (which zombies drop in abundance) for emeralds.
The three smiths (armorer, weaponsmith, toolsmith) sell enchanted diamond equipment at the Expert and Master levels. By combining these trades with the zombification technique described below, you get a full set of enchanted diamond gear for the price of a few emeralds.
The cartographer is the only one to offer ocean exploration maps (underwater monument) and woodland maps (Evocation mansion), two structures difficult to locate otherwise. In Java Edition, they are also the only ones to sell the Globe banner pattern.
How to Breed Villagers
Breeding Minecraft villagers requires three conditions: beds, food, and willingness.
For beds, the calculation is simple: you need one unclaimed bed per additional villager desired. Specifically, to increase a village from 4 to 6 villagers, you need at least 6 beds, 2 of which are unused. The bed must be accessible (the villager must be able to stand on it), and the head of the bed must have at least 2 blocks of free space above it.
For food, villagers must be "willing" to breed. This state is achieved in two ways. Either by trading with them (each trade has a chance to make them willing) or by giving them food. A villager becomes willing when they have collected 3 bread, 12 carrots, 12 potatoes, or 12 beetroots in their internal inventory. Simply throw the food on the ground in front of them: they will automatically pick it up. Farmer villagers harvest and distribute food to other villagers, making the process partially automatic.
When two willing villagers are near each other and a free bed is detected, heart particles appear, and a baby villager is born. The baby grows into an adult villager after 20 minutes of real-time. They can then take a job if a free work block is available.
To build an efficient breeding setup, create a closed room with enough beds, access to food (either via a farmer who harvests or by manually throwing food), and an exit system so that babies don't get stuck in the breeding area.
Some useful clarifications on Minecraft villager breeding: baby villagers cannot trade or take on a job until they reach adulthood (20 minutes of real-time). The game checks the village capacity (number of beds with free space above) before allowing breeding, so if all beds are occupied, no baby will be born. On a multiplayer server, ensure that the chunk containing your breeding setup remains loaded (a player must be nearby, or the chunk must be forceloaded) for breeding and baby growth to work correctly.
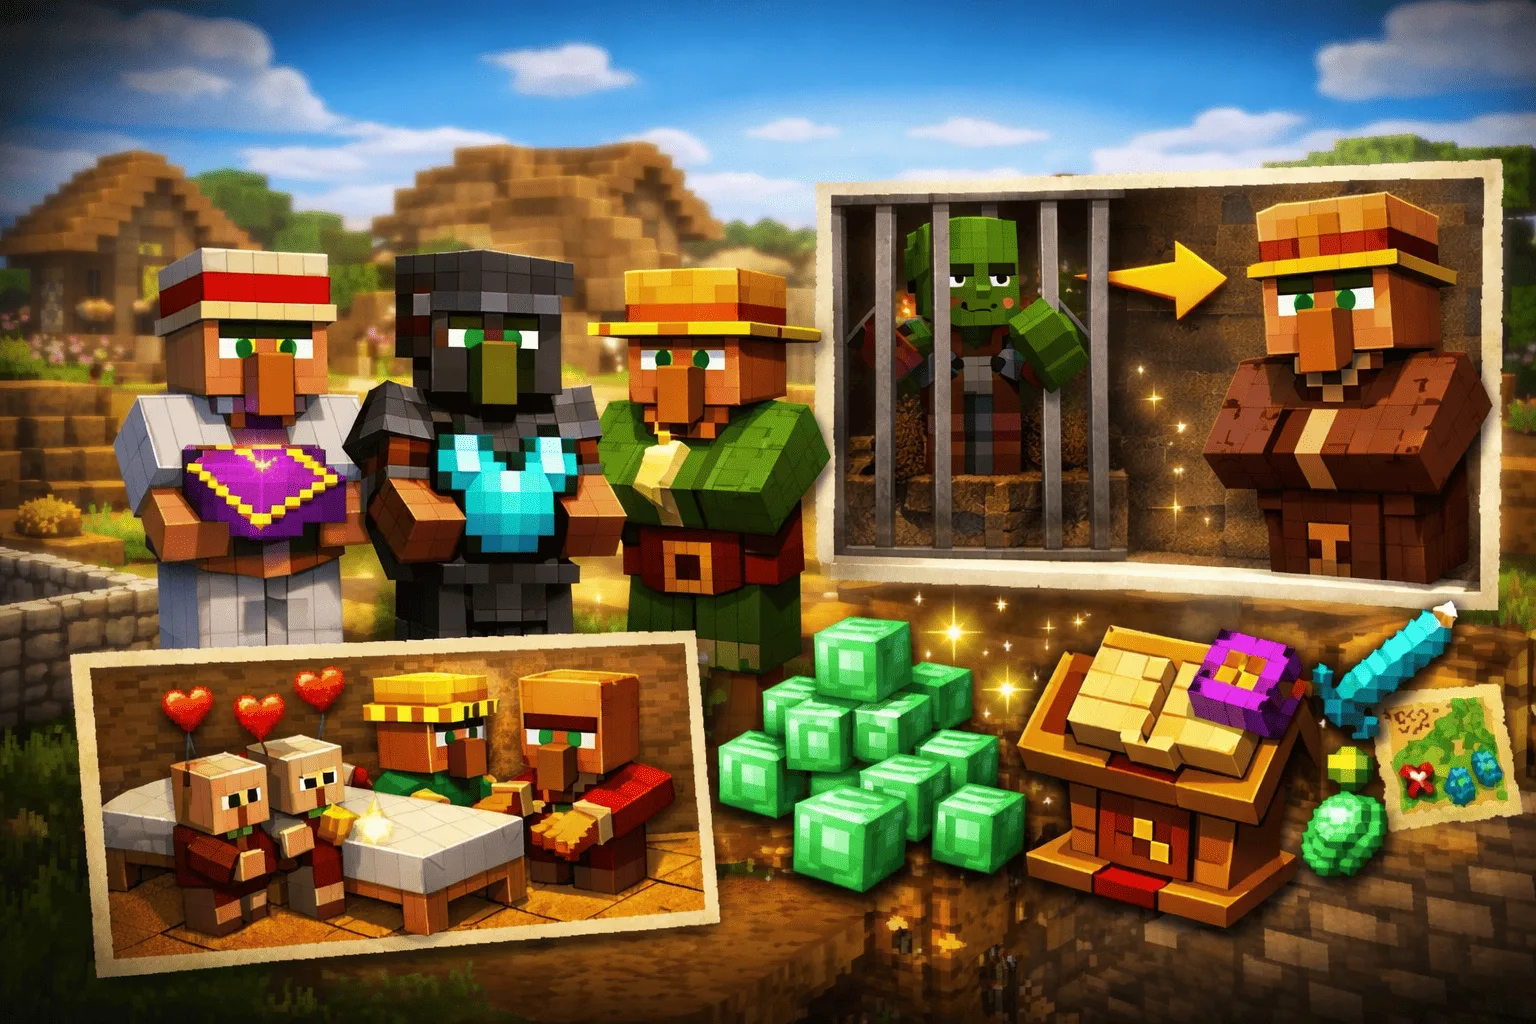
Zombify and Cure a Villager (Price Reductions)
Zombification followed by curing is the most powerful mechanic to get slashed prices from villagers. A villager cured after being transformed into a zombie villager offers significant discounts on all their trades, and neighboring villagers who learn the news via the gossip system also offer reduced prices.
The procedure involves several steps. First, set the difficulty to Hard. This is essential because the probability of conversion of a villager attacked by a zombie is 100% on Hard, 50% on Normal, and 0% on Easy. On a multiplayer server, use the command /difficulty hard or check our Minecraft Bedrock commands guide if you play on this edition.
Next, let a zombie attack the villager you want to zombify. The villager will transform into a zombie villager (green skin, torn clothes). Immediately immobilize them in a boat or minecart to prevent them from escaping or burning in the sun.
Then prepare the two items needed for curing: a splash potion of weakness and a golden apple. The potion is brewed in a brewing stand (water bottle + fermented spider eye + gunpowder to make it splash). The golden apple is crafted with an apple surrounded by 8 gold ingots. Throw the potion on the zombie villager (gray particles confirm the application), then interact with the golden apple in hand (right-click). Red particles and shaking indicate that the curing has begun.
The conversion takes between 3 and 5 minutes on Java Edition and about 100 seconds on Bedrock. During this time, the zombie villager remains hostile and must be kept out of sunlight. Placing iron bars or a bed nearby can speed up the process.
Once cured, the villager regains their original job and offers, but with significantly reduced prices. You can repeat the operation (zombify then cure the same villager) to accumulate discounts. On Java Edition, discounts accumulate effectively up to about 5 zombification/curing cycles, beyond which prices stabilize at their minimum (often 1 emerald per trade).
To maximize the advantage, combine this technique with the Hero of the Village effect (obtained after repelling an illager raid), which grants an additional temporary discount on all trades.
Some important precautions: isolate each villager individually to prevent negative gossip (related to being attacked) from spreading. And secure the area well to prevent other zombies from entering.
Villagers on Multiplayer Servers
On a multiplayer server, managing villagers involves additional challenges. Multiple players can interact with the same villagers, chunks must remain loaded for villagers to function, and raids pose an increased danger if the village is not protected.
Protecting villagers is the priority. On a Paper or Spigot server, the gamerule mobGriefing can be set to false to prevent zombies from breaking doors, but be careful: this also disables farmers' ability to harvest crops. A finer approach is to properly light the entire village (minimum light level of 1 on the surface since 1.18), surround the area with fences or walls, and maintain a sufficient population for iron golems to spawn naturally (at least 3 villagers and 3 beds within a 48-block radius in Java).
For trading halls, design is crucial in multiplayer. Each villager must have access to their work block to restock their offers (twice a day when working). The pricing system is based on demand (highly used offers see their prices increase), so it is recommended to space out trading sessions to allow prices to stabilize between restocks.
On a server with many players, villagers can impact performance. Villagers execute complex AI (searching for beds, work blocks, navigating between them) that consumes server resources. If you notice TPS drops, limit the number of villagers in the same chunk and avoid trading hall designs that force constant pathfinding calculations.
To host a server capable of handling an active village without lag, check out our Minecraft hosting offers with high-frequency processors optimized for Minecraft's single-thread calculations. And if you just want to test the villagers' mechanics before investing, our free Minecraft server is a good starting point.
Minecraft Villager FAQ
How do you change a villager's job?
Destroy their current work block and place a new one nearby. The villager will take on the job corresponding to the new block. This technique only works if you have never traded with this villager. After a first trade, the job and offers are permanently locked.
Why won't my villager take a job?
Four possible reasons: the villager is a nitwit (green outfit), it's a baby (they must grow up before taking a job), the work block is already claimed by another villager, or it's nighttime (villagers only change professions during the day on Java Edition).
How many jobs can you have in a village?
There is no limit. You can have as many villagers with the same job or different jobs as you want, as long as there are enough beds and work blocks.
Can villagers die?
Yes. Villagers can be killed by zombies (and transformed into zombie villagers on Hard), by illagers during raids, by lightning (transformation into a witch), by fall damage, lava, drowning, or by the player. Protect your most valuable villagers in closed and well-lit structures.
How do you get Mending from a librarian?
Place a lectern near an unemployed villager. Check their Novice offer. If it doesn't contain Mending, destroy the lectern and replace it to reroll the offers. Repeat until you get the desired enchantment. Do not make any trades before confirming the correct offer.
What is the difference between Java and Bedrock for villagers?
The basic mechanics are identical, but some differences exist. On Bedrock, curing a zombie villager is faster (about 100 seconds compared to 3 to 5 minutes on Java). The gossip system differs slightly between the two versions. And on Bedrock, villagers can sleep in beds located in underground caves, which is not always the case on Java.
How do villagers restock their offers?
A villager must access their work block during their working hours (daytime) to restock their offers. They can do this up to twice a day. If a villager is blocked away from their work block or if the block is destroyed, they will not be able to restock, and their offers will remain depleted.