
 Client area
Certbot: install a Let's Encrypt SSL certificate on your Linux VPS (Nginx & Apache)
A site without HTTPS in 2026 is a locked padlock in the browser, an SEO penalty, and visitors fleeing. The good news: on a VPS, obtaining a valid SSL/TLS certificate, recognized by all browsers and 100% free, takes less than five minutes thanks to Certbot, the official client of Let's Encrypt. In this guide, we will install Certbot on Debian/Ubuntu, generate a certificate for Nginx and Apache, configure automatic renewal, and review the errors we encounter most often in support, including those not mentioned in any official documentation.
No server yet? Our NVMe Linux VPS plans come with full root access and are a good fit for this tutorial.
Let's Encrypt and Certbot: how it works
Let's Encrypt is a non-profit certificate authority (CA) that issues free SSL/TLS certificates via the ACME protocol. Certbot, developed by the EFF, is the reference ACME client: it communicates with Let's Encrypt, proves that you control your domain, retrieves the certificate, and configures your web server all in one command.
The proof of control is done through a "challenge." The most common, HTTP-01, involves placing a temporary file accessible on port 80 of your server: if Let's Encrypt can read it from the outside, the domain is validated and the certificate issued. This is why a VPS with a dedicated public IP is the ideal environment; you control the web server, the ports, and the DNS end-to-end.
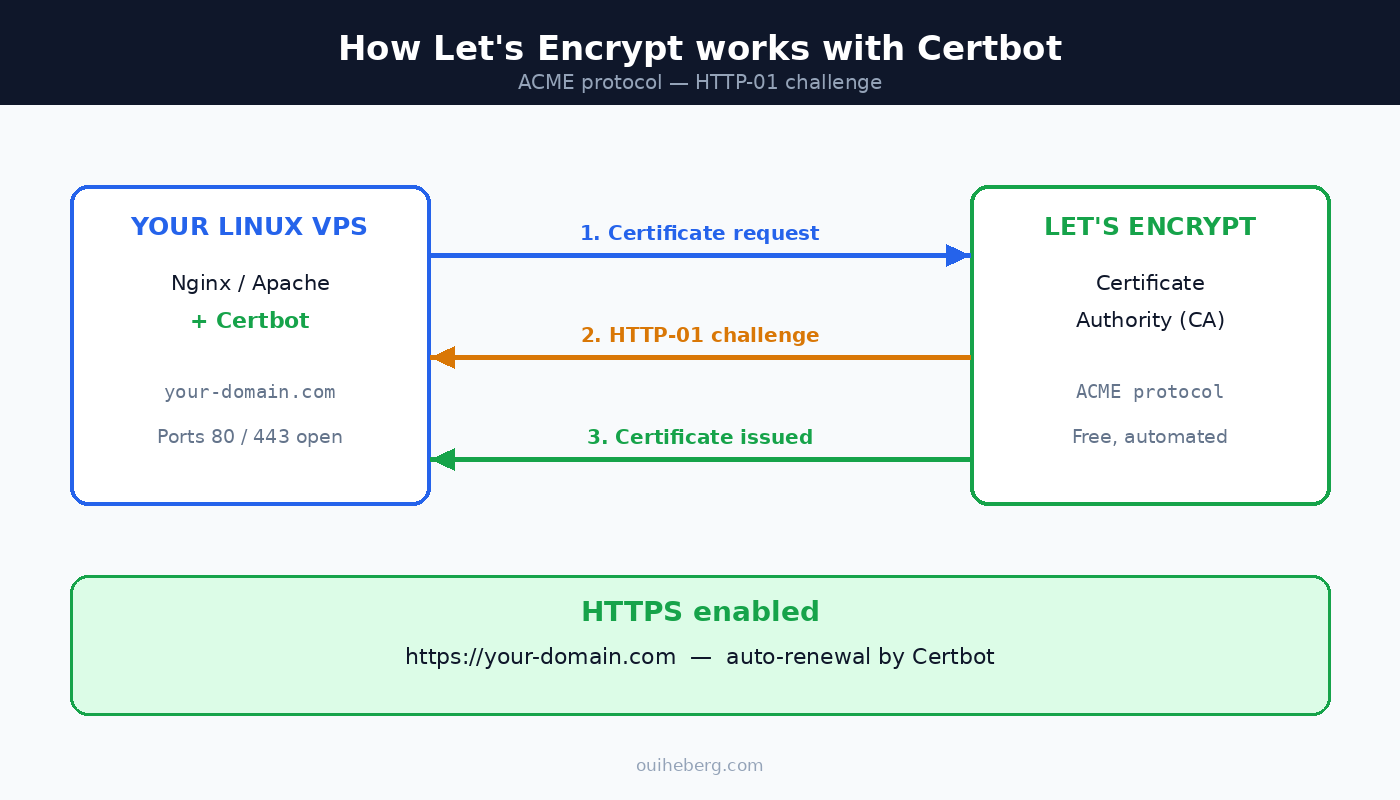
Important note: Let's Encrypt certificates last only 90 days, compared to one year for commercial certificates. This is not a limitation; it is a deliberate security choice: a compromised key has a short lifespan, and rotation forces automation. With Certbot's automatic renewal, you will never have to think about it again.
Prerequisites
Before running any commands, check these four points; 90% of issuance failures come from here:
- A Linux VPS running Debian 12/13 or Ubuntu 22.04/24.04 with root (or sudo) access.
- A domain name whose DNS
Arecord (andAAAAif you are using IPv6) points to the public IP of the VPS and whose propagation is complete. - A web server installed and already responding in HTTP. If not done, first follow our guide installing Nginx and PHP-FPM on a VPS.
- Ports 80 and 443 open in your firewall. Under UFW:
sudo ufw allow 'Nginx Full'(or'WWW Full'for Apache).
Are you on shared web hosting? This guide is for VPS servers. On cPanel hosting, SSL is managed in a few clicks: see how to create an SSL certificate on cPanel.
Step 1: install Certbot
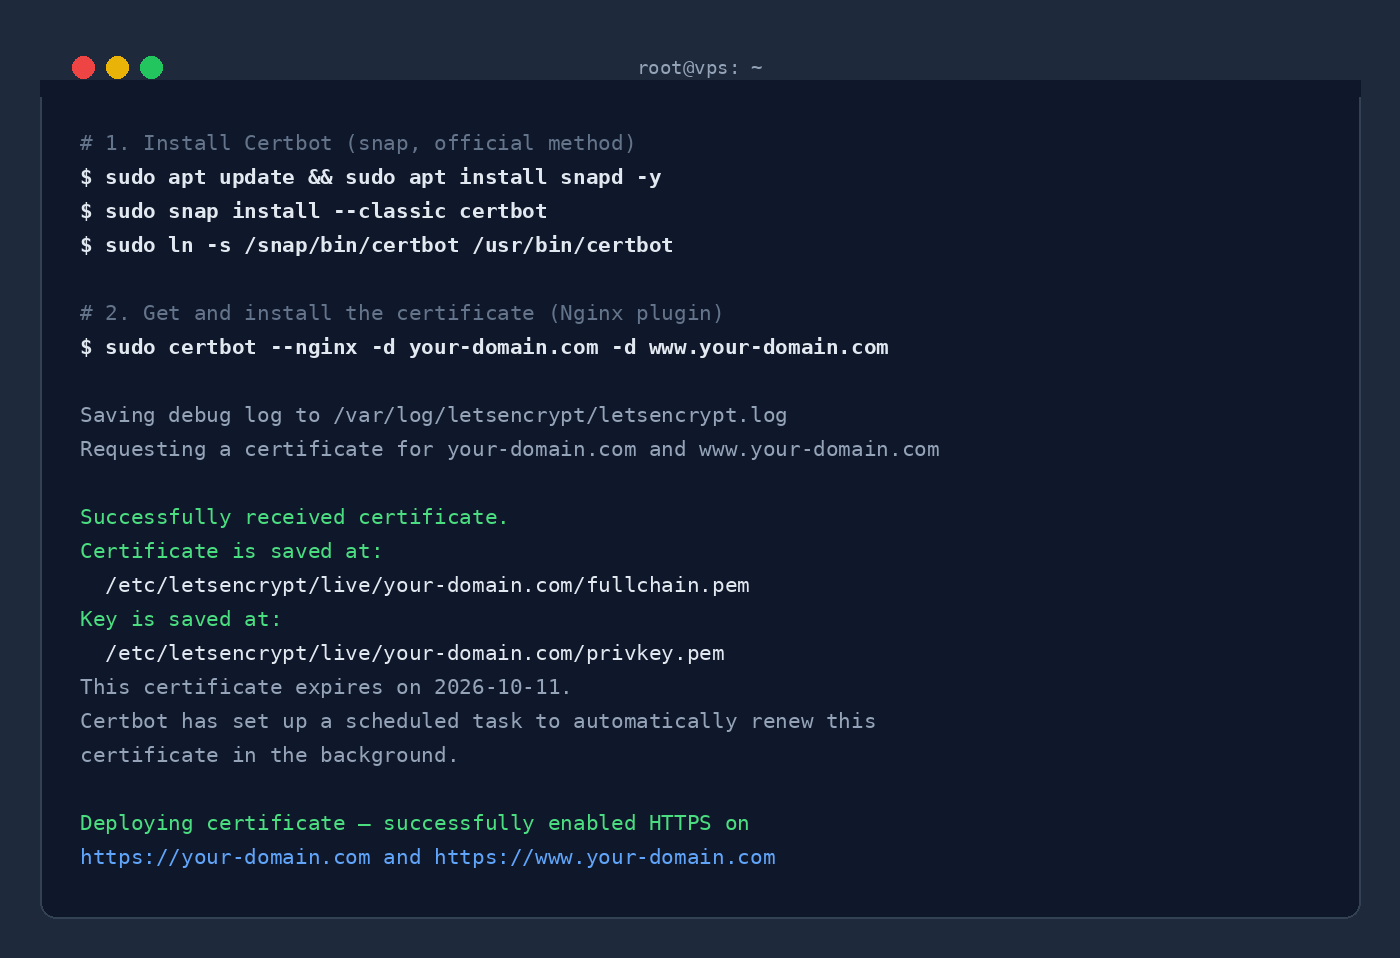
The method recommended by the EFF is installation via snap, which ensures a version that is always up to date (the apt package from Debian/Ubuntu sometimes lags several versions behind, which can cause issues during ACME protocol updates):
sudo apt update && sudo apt install snapd -y
sudo snap install --classic certbot
sudo ln -s /snap/bin/certbot /usr/bin/certbot
Check the installation: certbot --version should respond certbot 5.x. If you prefer to stick with the official repositories, sudo apt install certbot python3-certbot-nginx (or python3-certbot-apache) also works; just assume an older version.
Step 2: obtain and install the certificate
With Nginx
sudo certbot --nginx -d your-domain.com -d www.your-domain.com
The --nginx plugin does everything: domain validation, certificate issuance, modification of the server block of your configuration, and setting up the HTTP → HTTPS redirection (respond "2" when Certbot prompts you or add --redirect to the command to avoid the question).
With Apache
sudo certbot --apache -d your-domain.com -d www.your-domain.com
Without a web server (standalone mode)
For a mail server, a panel, or any application that manages TLS itself, Certbot can spin up its own temporary web server on port 80:
sudo systemctl stop nginx   # free up port 80 if needed
sudo certbot certonly --standalone -d your-domain.com
sudo systemctl start nginx
In all cases, your files are located in /etc/letsencrypt/live/your-domain.com/: fullchain.pem (certificate + intermediate chain; this is almost always what your applications expect) and privkey.pem (private key, never to be exposed).
Step 3: verify automatic renewal
This is the step that everyone skips and the number one cause of sites displaying "certificate expired" three months later. The snap installation creates a systemd timer that runs certbot renew twice a day; each certificate is renewed as soon as it enters its 30-day validity window.
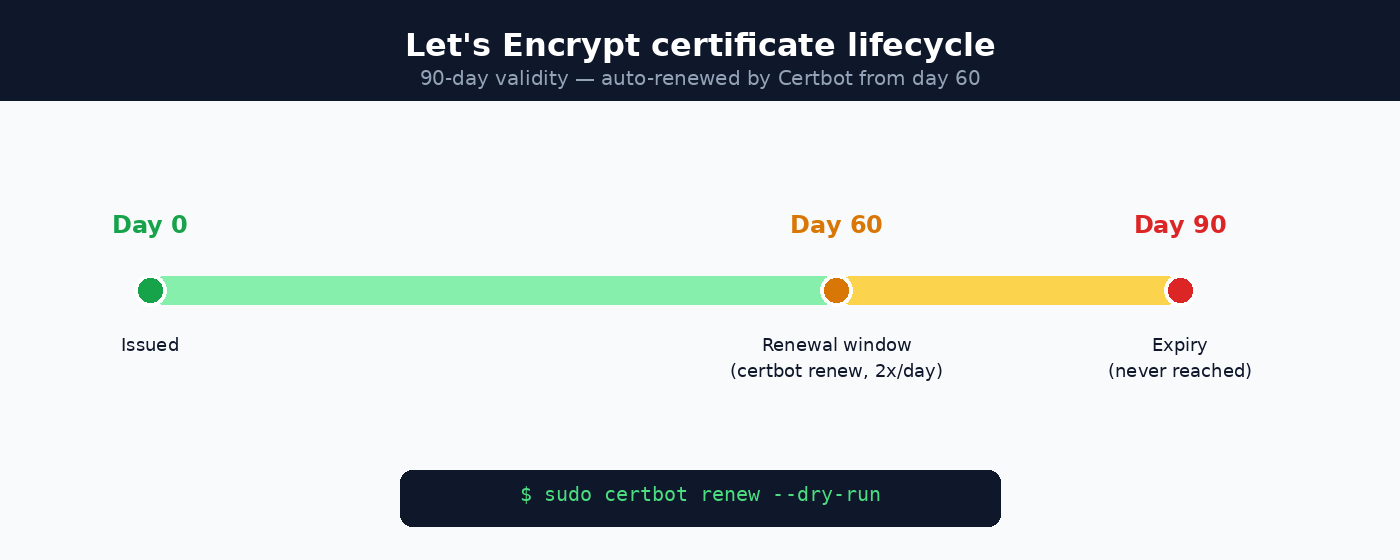
Check that the timer is active, then simulate a complete renewal without consuming your quota:
systemctl list-timers | grep certbot
sudo certbot renew --dry-run
If the dry-run ends with Congratulations, all simulated renewals succeeded, you can forget your certificate forever. Admin tip: if a service needs to be reloaded after renewal (Nginx reloads automatically via the plugin, but not a mail server, for example), use a deploy hook:
sudo certbot renew --deploy-hook "systemctl reload postfix"
Going further: wildcard certificate (*.your-domain.com)
A wildcard certificate covers all subdomains at once, which is convenient when you host app., api., and blog. on the same VPS. Let's Encrypt allows it, but only via the DNS-01 challenge: instead of a file on port 80, you prove domain control by creating a TXT record _acme-challenge:
sudo certbot certonly --manual --preferred-challenges dns \
  -d "your-domain.com" -d "*.your-domain.com"
The --manual mode requires recreating the TXT for each renewal: in production, use a DNS plugin (certbot-dns-cloudflare, certbot-dns-ovh, etc.) that automates the creation of the record via your DNS zone API.
The 5 most common errors (and their solutions)
1. "Connection refused" or "Timeout during connect" port 80 is closed or filtered. Check sudo ufw status and remember that HTTP-01 requires port 80 to be open even if your site will only serve HTTPS.
2. "DNS problem: NXDOMAIN" the A record does not exist yet or has not finished propagating. Test with dig +short your-domain.com: as long as the VPS IP does not appear, there is no need to relaunch Certbot.
3. The AAAA record trap a classic that we often see in support: Let's Encrypt prefers IPv6 when a AAAA record exists. If it points to an IP where your web server is not listening, validation fails even though the site works in IPv4. Fix the AAAA or configure Nginx to listen on [::]:80.
4. "too many certificates already issued" you have reached Let's Encrypt's rate limit (50 certificates per domain per week, and especially 5 exact duplicates per week). This is common when you repeatedly relaunch the command to "test." Always use --dry-run for your tests: the staging server does not have these limits.
5. Renewal fails while issuance worked typically, you changed the Nginx config in the meantime (removing the server block, redirecting port 80 elsewhere, tightening the firewall). The --dry-run after each major configuration change will save you from the unpleasant surprise 60 days later.
Best practices for solid HTTPS
The certificate is only half the job. For a proper TLS configuration: enforce a 301 redirect from HTTP to HTTPS (Certbot offers this), enable HSTS (add_header Strict-Transport-Security "max-age=31536000" always; in Nginx) so that browsers never try HTTP again, and check your score on SSL Labs; aim for A or A+. The TLS parameters generated by Certbot (options-ssl-nginx.conf) follow Mozilla's recommendations and already give an A in most cases.
Finally, HTTPS only protects the transport: also consider securing SSH access, the firewall, and your applications. Our guides securing phpMyAdmin with Nginx and deploying Laravel on a VPS show how to properly integrate SSL into a complete stack, and all our tutorials are available in the Linux documentation.
FAQ – Certbot and Let's Encrypt
Is Certbot really free? Yes, completely. Let's Encrypt is funded by donations and sponsors (EFF, Mozilla…). No limit on the number of domains, no hidden costs.
Is a Let's Encrypt certificate as "safe" as a paid certificate? The encryption is strictly identical (same TLS, same algorithms). Paid certificates differ only by organization validation (OV/EV) and contractual assurance, not by technical security.
Why only 90 days of validity? Deliberate security choice: limit the lifespan of a compromised key and force automation of renewal. With Certbot's timer, it's transparent.
Can I use Certbot on a Windows VPS? Certbot is designed for Linux. On Windows Server (IIS), use an ACME client like win-acme, or place the TLS on a Linux reverse proxy in front.
How long does the complete installation take? On a clean VPS with DNS already propagated: less than 5 minutes, including Certbot installation.
Conclusion
With Certbot, HTTPS is no longer an expense item or a quarterly chore: one command to issue, one timer to renew, and a --dry-run to sleep peacefully. The only real condition is to start from a healthy base: a server with a dedicated IP, root access, and ports that you control.
If you don't have your server yet, our Linux NVMe VPS are delivered in less than 60 seconds with Debian or Ubuntu pre-installed, a dedicated IP, and included DDoS protection; everything you need to follow this guide from A to Z.
With HTTPS in place, review the rest of your setup with our complete hardening guide.