
Do you want to play Minecraft multiplayer with your own rules, mods, and friends? The solution: create a Minecraft server. Whether you're on Java Edition or Bedrock Edition, this guide takes you from A to Z — from choosing the type of server to connecting your first players.
No programming skills are required. You'll need about 20 minutes with a host, or a small hour for self-hosting on your own machine.
What you will learn in this guide:
- Choose the right type of server (Vanilla, Paper, Forge, Fabric, Bedrock…)
- Create a Minecraft server via a host (quick method)
- Create a server by self-hosting (manual method)
- Configure server.properties
- Install your first plugins and mods
- Invite your friends to join the server
Which type of Minecraft server to choose?
Before launching anything, you need to choose the right type of server. This choice depends on your game edition (Java or Bedrock), the number of players, and what you want to do (vanilla, mods, plugins…).
Java vs Bedrock: key differences
Minecraft Java Edition is the original PC version. It offers the most possibilities on the server side: thousands of plugins, mods via Forge/Fabric, and a massive developer community. If you play on PC and want to customize your experience, this is the version to choose.
Minecraft Bedrock Edition is the cross-platform version: Windows 10/11 (Microsoft Store), consoles (PlayStation, Xbox, Switch), and mobiles (iOS, Android). The official Bedrock server (BDS) is more limited in customization, but it allows you to play with friends on any device.
Good news: it is possible to combine both. With the GeyserMC plugin, a Java server can accept Bedrock players. We'll talk more about this in the "Cross-play" section below.
- Java Edition → More mods, plugins, customization. PC only.
- Bedrock Edition → Cross-platform (PC, console, mobile). Less server customization.
- Java + GeyserMC → The best of both worlds: Java customization + Bedrock players accepted.
Vanilla, Paper, Spigot, Forge, Fabric: which to choose?
There are several server software options. Each has its specialty:
Vanilla — The official Mojang server. Zero plugins, zero mods. Pure Minecraft experience. Suitable for 2-3 friends who just want to play without installing anything. In practice, Paper is always a better choice, even for vanilla.
Paper — Optimized version of the Vanilla server, compatible with Spigot and Paper plugins. Fixes bugs, improves performance (better TPS), and supports thousands of plugins. It's the recommended standard in 2026 for any Java server.
Spigot — The predecessor of Paper. Still functional but less performant. Paper is backward compatible with Spigot plugins, so there's no longer a reason to choose Spigot directly.
Purpur — A fork of Paper with even more configuration options. For advanced administrators who want total control over every game mechanism.
Forge / NeoForge — To install mods that deeply modify gameplay (new blocks, dimensions, mechanics). Players must also install the mods on the client side. Forge has the largest mod catalog. NeoForge is its successor for Minecraft 1.20+.
Fabric — Lightweight alternative to Forge. Quick startup, excellent performance. Used by recent modpacks like Cobblemon Academy, Simply Optimized, or Fabulously Optimized.
Bedrock Dedicated Server (BDS) — The official server for Bedrock. Free, works on Windows and Linux. Limited customization options compared to Java.
In summary, for most cases:
- You want to play with friends without mods → Paper
- You want plugins (economy, protections, ranks) → Paper
- You want to install a modpack → Forge or Fabric (depending on the modpack)
- Your friends are on console/mobile → Bedrock or Paper + GeyserMC
Method 1: Create a server with a host
This is the simplest and fastest method. A host provides you with a ready-to-use server: no need to install Java, configure a firewall, or keep your PC on.
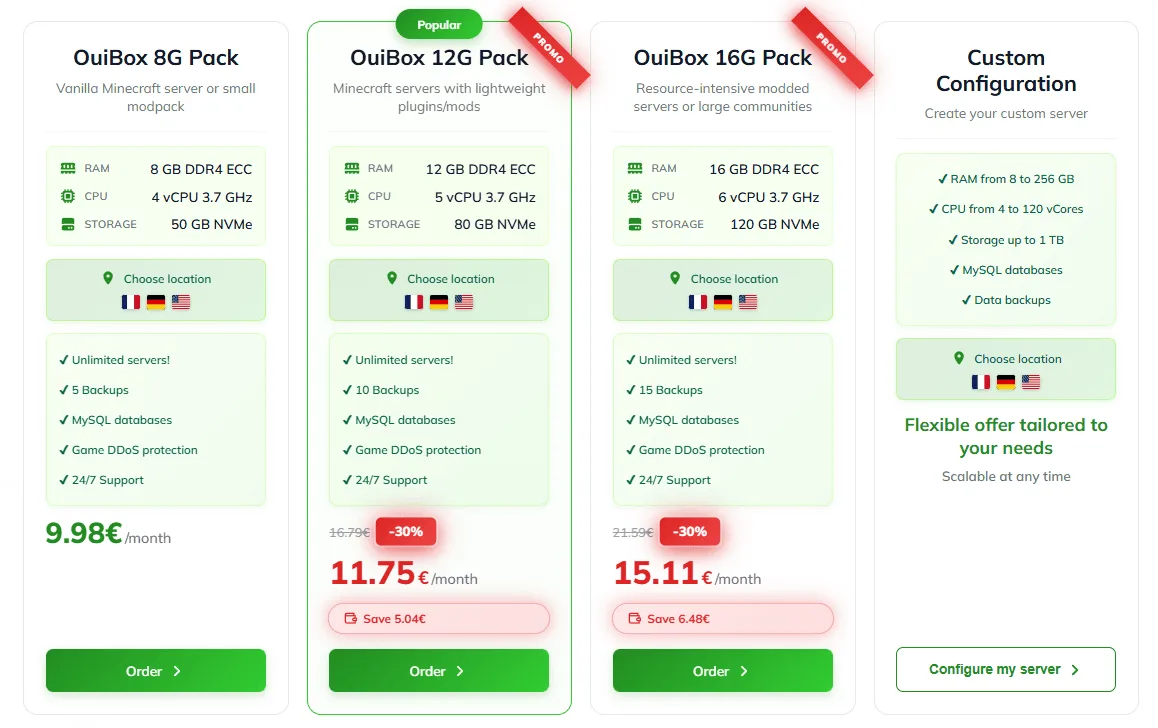
Step 1 — Choose a suitable offer
Visit the Minecraft server hosting page and choose an offer according to your needs.
To guide you:
- 2-5 players, vanilla/Paper → 3-4 GB of RAM is sufficient
- 5-15 players with plugins → 4-6 GB of RAM
- Light modpack (< 50 mods) → 6-8 GB of RAM
- Heavy modpack (Cobblemon, ATM, RLCraft) → 8-12 GB of RAM
- Large community server (20+ players) → 12 GB+ of RAM
The order is validated in a few minutes. You immediately receive access to your management panel OuiPanel.
Step 2 — Configure via the panel
Once your server is delivered, log in to OuiPanel. From the panel, you can:
- Choose your server version — Paper, Vanilla, Forge, Fabric, Purpur, Bedrock… Everything is done with one click in the "Version/Modpack" tab.
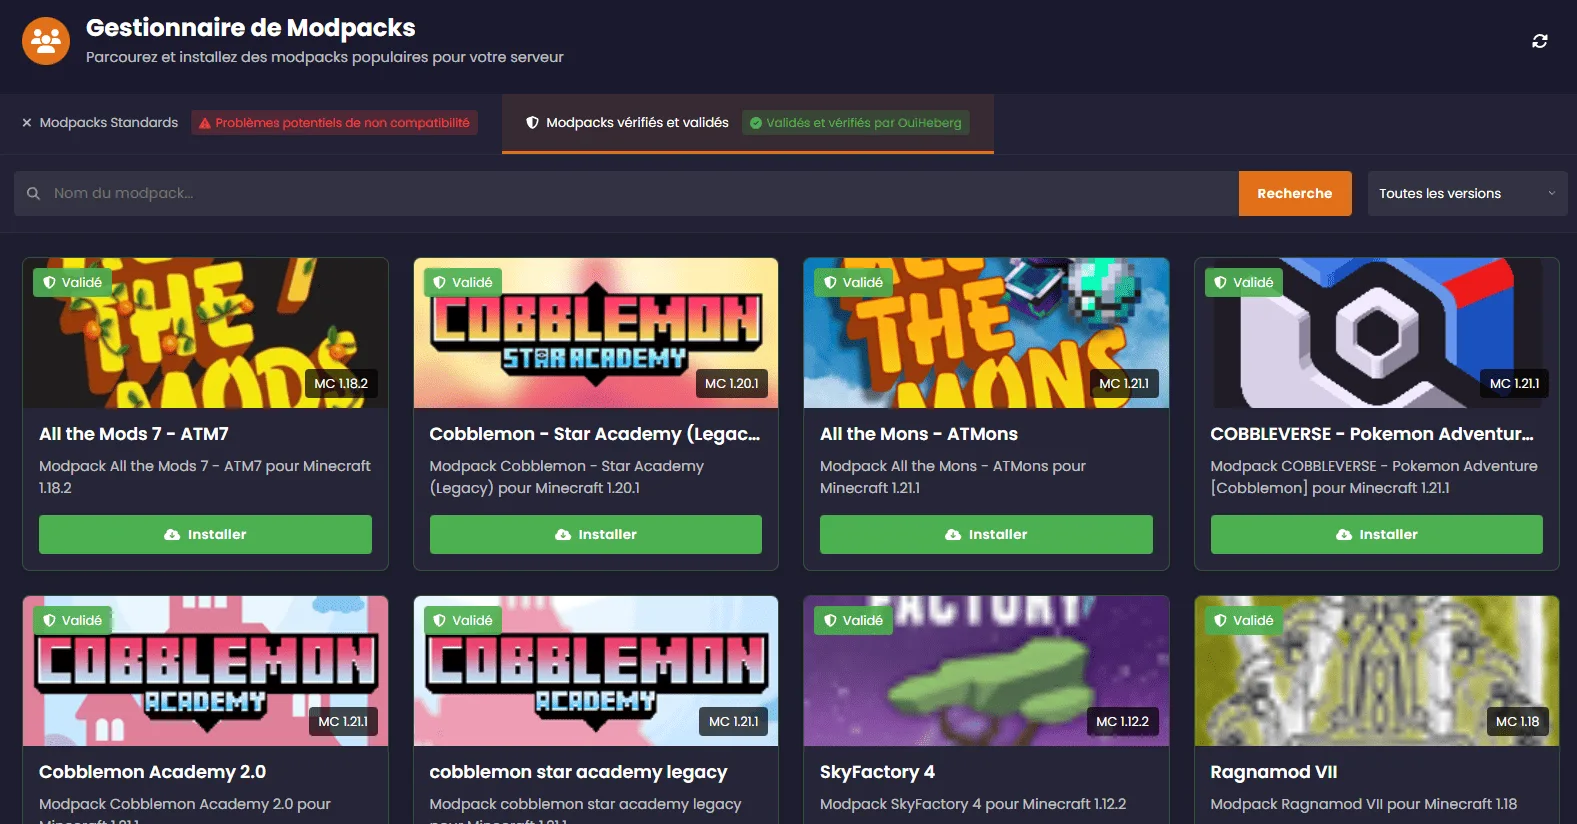
- Install a modpack — Via the Modpack Manager, search and install any CurseForge modpack with one click (Cobblemon, RLCraft, All The Mods…).
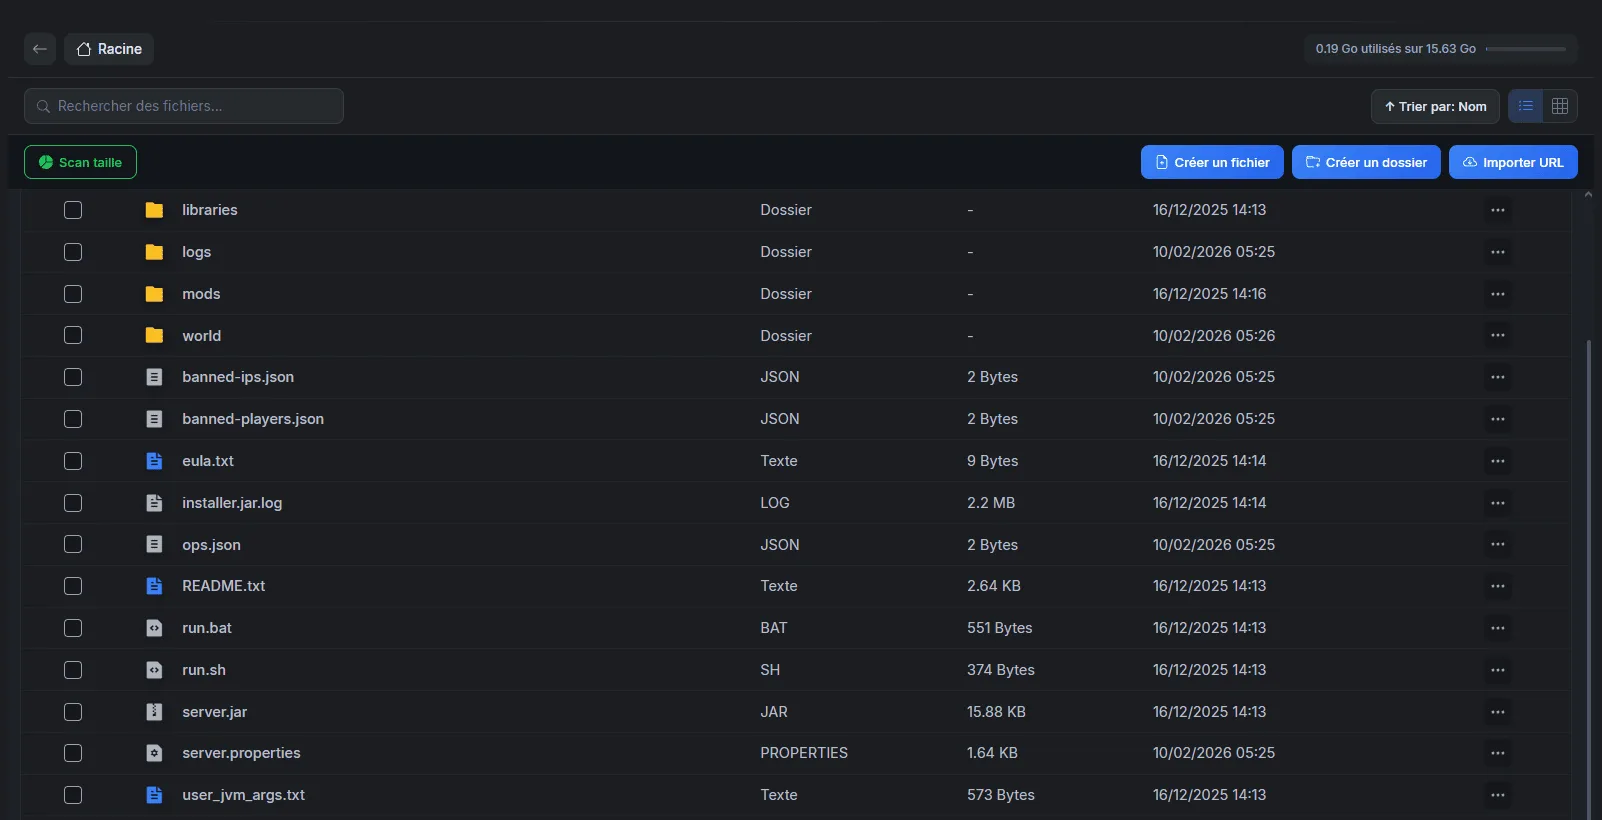
- Edit configuration files — The integrated file editor allows you to modify
server.properties,spigot.yml,paper-global.ymldirectly in the browser. - Monitor the console — See logs in real-time, execute server commands, monitor RAM and CPU.
Step 3 — Launch the server and connect
- Click on Start in OuiPanel
- Wait for the console to display
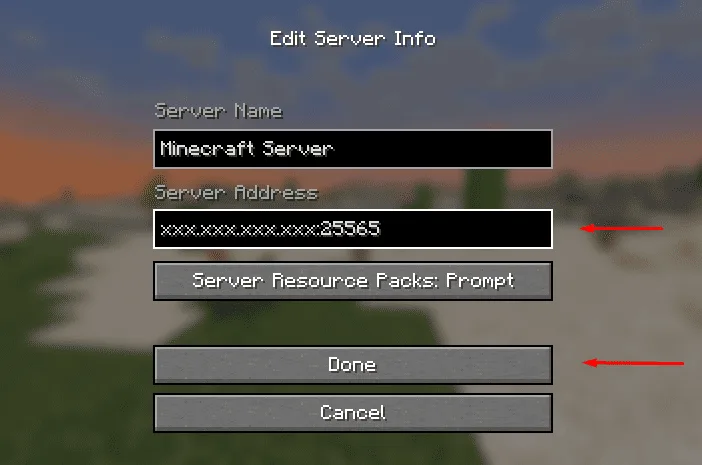
Done!(1-2 minutes for Paper, 5-10 minutes for a modpack) - Copy the IP address displayed in OuiPanel (format:
xxx.xxx.xxx.xxx:25565) - In Minecraft, go to Multiplayer → Add Server → paste the address → Join
That's it. Your Minecraft server is online.
💡 At OuiHeberg, DDoS protection, automatic backups, and technical support are included in all offers. The server remains accessible 24/7 without your PC being on.
Method 2: Create a server by self-hosting
Self-hosting means running the server on your own machine (your gaming PC, an old PC, or a Raspberry Pi). It's free but requires more work.
Hardware and software prerequisites
Before starting, make sure your machine can handle the load:
- 1-2 players, Vanilla/Paper → 2 GB of RAM dedicated to the server, dual-core processor, 10 GB of disk
- 3-5 players, Paper with plugins → 3-4 GB of RAM, quad-core processor (Ryzen 5 / i5 minimum), 20 GB of disk
- 6-10 players or modpack → 6-8 GB of RAM, high-performance processor (Ryzen 7 / i7), 50 GB of SSD disk
- 10+ players or large modpack → 8-12 GB of RAM, SSD mandatory, fiber connection recommended
Your PC will need to stay on as long as you want the server to be accessible. And your internet connection will be shared between your game and your players.
Install Java + download server.jar
1. Install Java
The required version of Java depends on your version of Minecraft:
- Minecraft 1.16.5 and earlier → Java 8
- Minecraft 1.17.x → Java 17
- Minecraft 1.18 to 1.20.4 → Java 17
- Minecraft 1.20.5 to 1.21+ → Java 21
Download Java from Adoptium (free, open-source). After installation, verify:
java -version
2. Download the server
Create a dedicated folder (e.g., minecraft-server on your desktop), then download the server file:
- Paper (recommended): papermc.io/downloads
- Forge: files.minecraftforge.net → Installer → "Install Server"
- Fabric: fabricmc.net/use/installer → "Server" tab
- Bedrock (BDS): minecraft.net/download/server/bedrock
3. First launch
Create a startup file in the server folder.
On Windows, create start.bat:
java -Xms2G -Xmx4G -jar server.jar nogui
pause
On Linux / macOS, create start.sh:
#!/bin/bash
java -Xms2G -Xmx4G -jar server.jar nogui
Run the script. The server will start, generate some files, then stop with a message about the EULA. This is normal.
4. Accept the EULA
Open the eula.txt file that was just created and change eula=false to eula=true. Save, then rerun the script. The server will now start completely and generate the world.
For Bedrock, there is no EULA to accept: directly run bedrock_server.exe (Windows) or bedrock_server (Linux).
Open ports and configure the firewall
For your friends to connect from the internet, you need to open the correct port on your router and firewall:
- Minecraft Java → port 25565 TCP
- Minecraft Bedrock → port 19132 UDP
On your internet router:
- Access your router's interface (usually
192.168.1.1or192.168.0.1) - Look for the "NAT", "Port Forwarding" or "Port Redirection" section
- Create a rule: external port 25565 (or 19132) → local IP of your PC → same internal port
- Save
On your PC (firewall):
On Linux with ufw:
sudo ufw allow 25565/tcp    # Java
sudo ufw allow 19132/udp    # Bedrock
sudo ufw enable
On Windows, create an inbound rule in Windows Firewall for the concerned port.
⚠️ Security: self-hosting exposes your public IP to your players and makes you vulnerable to DDoS attacks. If security is a concern, a professional host with integrated DDoS protection is a better option.
Configure server.properties
The server.properties file is the heart of your Minecraft server configuration. It is automatically generated on the first launch. Open it with a text editor (or via the integrated editor of OuiPanel if you are hosted).
Here are the most important settings to adjust:
Gameplay settings:
- gamemode=survival — Default game mode for new players. Possible values: survival, creative, adventure, spectator.
- difficulty=normal — World difficulty. Values: peaceful, easy, normal, hard.
- pvp=true — Enables player versus player combat. Set to
falseif you want a cooperative-only server. - spawn-protection=16 — Radius in blocks around the spawn where only operators can build/destroy. Set to
0to disable. - allow-nether=true — Enables access to the Nether. Disabling can improve performance on a small server.
- max-players=20 — Maximum number of simultaneous players. Adjust according to your available RAM.
Performance settings:
- view-distance=8 — Render distance in chunks. Reducing to 6-8 significantly improves performance. Increasing to 12-16 offers better visuals but consumes more RAM and CPU.
- simulation-distance=6 — Distance at which entities (mobs, redstone, crops) are simulated. Keep at 4-6 for good performance.
Network settings:
- server-port=25565 — Server port. Only modify if you are hosting multiple servers on the same machine.
- online-mode=true — Verifies Mojang/Microsoft accounts. Always keep on true for security. Setting to false allows cracked accounts but opens the door to identity theft.
- motd=My Minecraft server — Message displayed in the server list. You can use Minecraft color codes.
Bedrock specific settings (in server.properties of BDS):
- server-port=19132 — Default UDP port for Bedrock
- server-portv6=19133 — IPv6 port
- level-name=Bedrock level — World name
After each modification, save the file and restart the server to apply the changes.
Install your first plugins and mods
A raw Minecraft server is functional, but it's with plugins and mods that the experience becomes truly interesting.
Plugins (Paper / Spigot)
Plugins are server-side extensions. Players don't need to install anything on their side. Drop the .jar files into the plugins/ folder and restart.
Essential plugins to start:
- EssentialsX — Basic commands every server should have: /home, /tpa, /spawn, /warp, /msg. Indispensable.
- LuckPerms — Permissions and ranks management. Allows defining what each group of players can or cannot do.
- WorldGuard + WorldEdit — Zone protection (prevents destruction in certain regions) and terrain editing tools.
- CoreProtect — Logs every action of every player. If someone destroys a construction, a simple
/co rollback u:player t:1hrestores everything. - Vault — Economy and permissions API used by hundreds of other plugins. Install it even if you don't use it directly.
Download your plugins only from reliable sources: SpigotMC.org, Modrinth, or Hangar.
For a detailed guide, check out our article on how to install plugins on your Minecraft server.
Mods (Forge / Fabric)
Mods deeply modify the game: new blocks, new dimensions, new mechanics. Unlike plugins, mods must be installed on both the client AND server sides (except for exceptions).
Drop the .jar files into the mods/ folder of the server. Ensure all your players have exactly the same mods installed.
For modpacks (Cobblemon Academy, RLCraft, All The Mods…), use CurseForge or Modrinth on the client side. On the server side at OuiHeberg, the Modpack Manager installs the complete pack with one click.
Invite your friends to join
Your server is running, it's configured, the plugins are installed. All that's left is to bring your friends in.
LAN connection (same Wi-Fi network)
If your friends are at your place or on the same local network:
- Find the local IP address of the server machine (e.g.,
192.168.1.42)
- Windows: type
ipconfigin the command prompt - Linux/macOS: type
ip aorifconfigin the terminal
- In Minecraft → Multiplayer → Add Server → enter
192.168.1.42(without port if it's the default port) - Join
Internet connection (public IP)
If your friends are at their homes, they need your public IP address:
- Find your public IP on monip.org or a similar site
- Ensure port-forwarding is configured on your router (see self-hosting section)
- Communicate the address to your friends:
your.public.ip:25565
If you are with a host, it's simpler: the IP address is displayed directly in the panel. No port-forwarding to configure, no public IP to share.
Cross-play Java/Bedrock with GeyserMC
You play on Java, but a friend is on Switch or mobile? GeyserMC solves this problem. It's a plugin/mod that translates the Bedrock protocol to Java, allowing Bedrock players to join a Java server.
To install it:
- Download GeyserMC (plugin version for Paper, or mod for Fabric/Forge)
- Place it in the
plugins/ormods/folder - Restart the server
- GeyserMC automatically opens a UDP port (19132 by default) for Bedrock players
- Bedrock players connect with the server IP + port 19132
For a complete guide, check out our tutorial on how to configure GeyserMC for cross-play.
FAQ — Create a Minecraft server
How much RAM for 10, 20, or 50 players?
The necessary RAM depends on the type of server and the number of players:
- 5-10 players, Paper vanilla → 3-4 GB
- 10-20 players, Paper with plugins → 4-8 GB
- 20-50 players, Paper with plugins → 8-12 GB
- 50+ players → 12-16 GB+
- Modpack (regardless of the number of players) → add 2-4 GB more compared to the above values
These values are indicative. A server with many automatic farms, redstone, or loaded chunks will consume more. Use the Spark plugin (/spark healthreport) to monitor actual usage.
Free Minecraft server, is it possible?
Yes. OuiHeberg offers a free Minecraft server with enough resources to play with friends. It's the best option to test without commitment.
Self-hosting on your PC is also "free" in terms of monthly cost, but you have to consider the cost of electricity, hardware wear, and the time spent configuring and maintaining the server.
How to secure your server?
The basics of security for a Minecraft server:
- Keep
online-mode=truein server.properties. It's the most basic protection: it verifies that each player has a legitimate Minecraft account. - Install LuckPerms to manage permissions. Only give operator rights (
/op) to trusted people. Use permission groups (visitor, player, moderator, admin) with graduated rights. - Install WorldGuard to protect the spawn and important areas from destruction.
- Install CoreProtect to rollback any malicious action.
- Only open necessary ports on your firewall (25565 TCP for Java, 19132 UDP for Bedrock).
- Make regular backups. With a host like OuiHeberg, automatic backups are included. In self-hosting, set up a daily backup script for the
world/folder. - DDoS protection: if you self-host, you have no protection against DDoS attacks (which can take your server — and your internet connection — offline). Professional hosts include DDoS protection.
Should you choose Paper or Vanilla?
Paper, always. Paper is 100% compatible with Vanilla gameplay (your players won't see any difference) but offers better performance, Mojang bug fixes, and plugin support. There is no downside to using Paper instead of Vanilla.
My server lags, what to do?
Four actions in order of priority:
- Install Spark (
/spark profiler start) to identify the exact source of the lag - Pregenerate the world with the Chunky plugin (
/chunky radius 5000then/chunky start) — generating new chunks is the primary cause of lag - Reduce the view-distance to 6-8 in server.properties
- Check your plugins/mods — a single poorly coded plugin can bring a server to its knees
Create your Minecraft server in 2 minutes on OuiHeberg
You have read the guide, you know what you need. The fastest way to take action: choose an offer, install your server version with one click from OuiPanel, and connect.
DDoS protection, automatic backups, technical support, and an intuitive management panel included in all offers.