
What to do in the first 30 minutes
Retrieve the IP address, username, and password from the OuiHeberg client area
Connect via RDP from Windows (
mstsc), macOS, or LinuxChange the Administrator password immediately
Launch Windows Update and restart if necessary
Check the Windows firewall and only open the necessary ports
Set the time zone to Europe/Paris and enable backups
🎯 What you will do in this guide
This guide covers everything that happens after receiving your delivery email: from the first RDP connection to a secure, configured, and ready-to-use Windows VPS.
We are not talking about Linux here. Only Windows Server, only concrete steps.
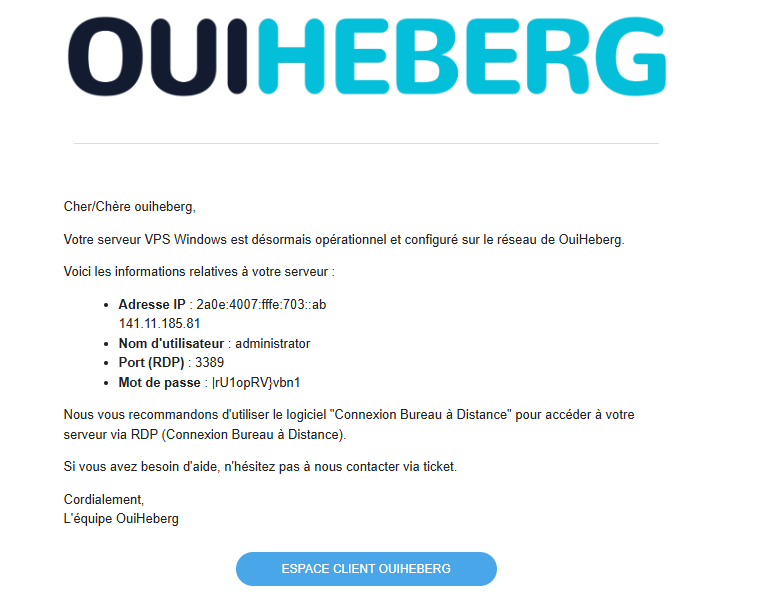
🔑 Step 1: Retrieve your login credentials
Upon receiving the OuiHeberg delivery email, log in to your client area.
You will find:
Information | Example |
|---|---|
IPv4 Address |
|
Username |
|
Initial Password |
|
Windows Server Version | Windows Server 2025 |
⚠️ Note this information in a password manager (Bitwarden, 1Password…) before doing anything else. The initial password will only be displayed once in certain configurations.
🖥️ Step 2: Connect via RDP for the first time
RDP (Remote Desktop Protocol) is Microsoft's native protocol for remotely accessing a Windows desktop. It listens by default on TCP port 3389.
From Windows
Press
Win + R, typemstsc, and confirmIn the Computer field, enter the IPv4 of your VPS
Click on Connect
Enter
Administratoras the username and the initial password
Or directly from the command line:
mstsc /v:145.xxx.xxx.xxx
From macOS
Install Microsoft Remote Desktop (free on the Mac App Store).
Open the app → click + → Add PC
PC name: enter the IPv4 of your VPS
User account:
Administrator+ initial passwordDouble-click the connection to connect
From Linux
Use Remmina (pre-installed on Ubuntu/Debian):
sudo apt install remmina remmina-plugin-rdp  # if not already installed
remmina
Create a new RDP connection, enter the IP, login, and password.
⚠️ The certificate warning: this is normal
On the first connection, you will see a message like:
"The certificate of this remote computer cannot be verified."
This is expected and normal. The VPS uses a self-signed certificate generated at installation. Click Yes (or Continue) to accept and proceed.
This is not a sign of compromise: it simply means that the certificate is not issued by a known public authority.
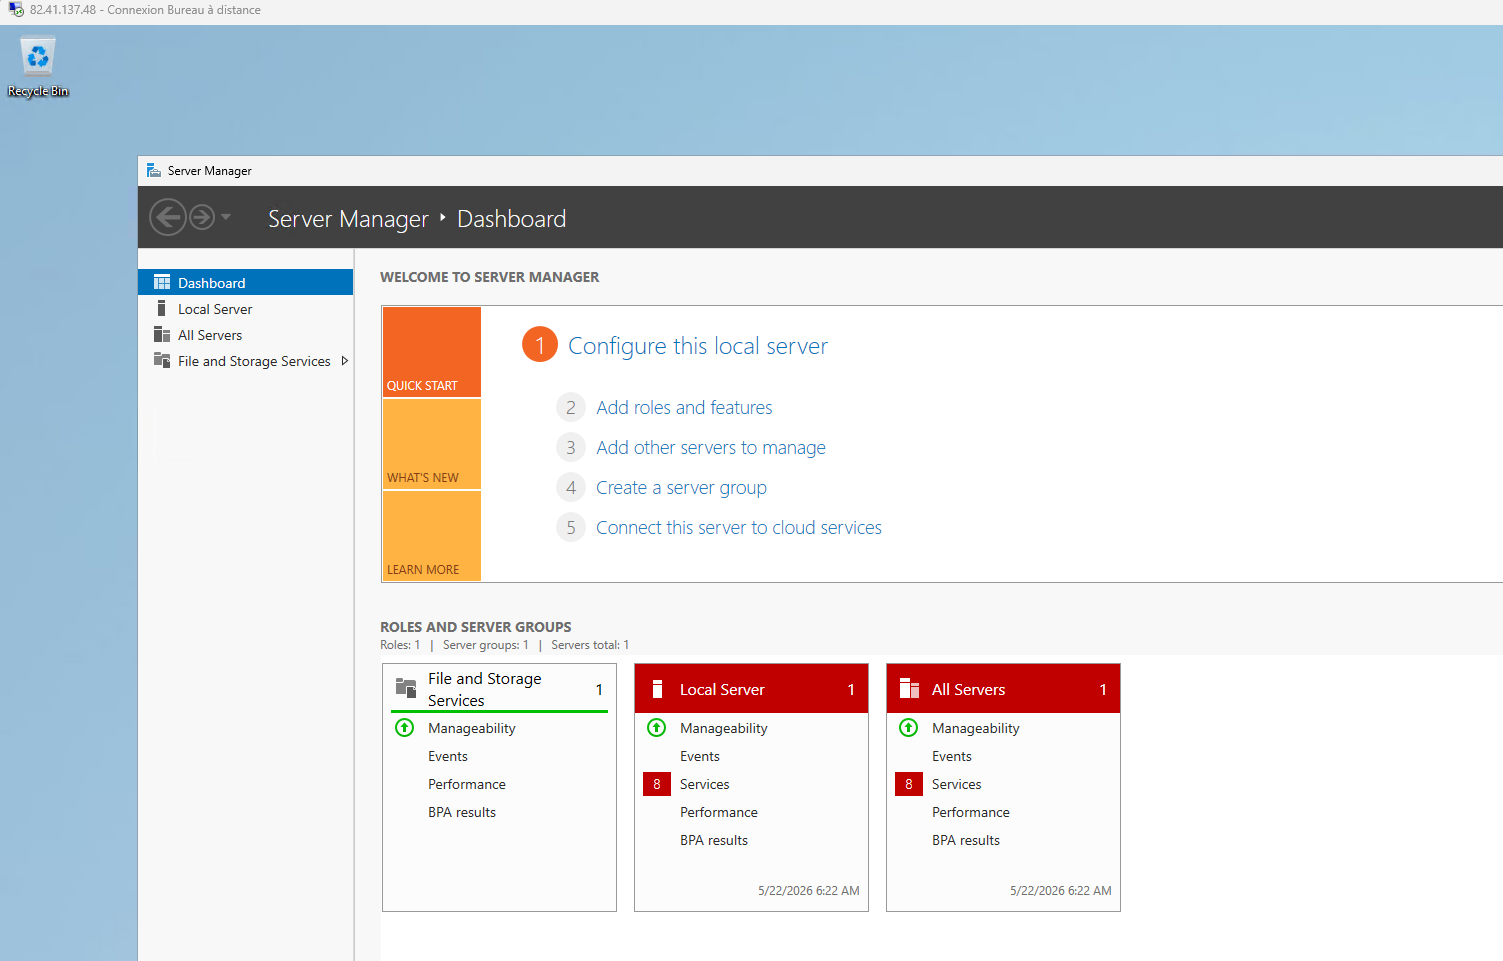
First screen after connection
You arrive at the Windows Server desktop. Server Manager opens automatically on startup: you can close it for now.
👉 For complete documentation on RDP connection (troubleshooting, advanced options, multi-monitors): [See our complete guide on RDP connection →]
 🔐 Step 3: Change the Administrator password
This is the first thing to do. The initial password was sent by email: it must be replaced immediately.
GUI Method (recommended for beginners)
In the RDP session:
Press
Ctrl + Alt + End(equivalent toCtrl + Alt + Deletein RDP)Click on Change a password
Enter the old password, then the new one twice
Confirm
💡 On some RDP clients,
Ctrl + Alt + Enddoes not work. Use the RDP toolbar → Ctrl+Alt+Delete.
PowerShell Method (faster)
Open PowerShell as an administrator and run:
net user Administrator "YourNewPassword123!"
Or with the native cmdlet:
$Password = ConvertTo-SecureString "YourNewPassword123!" -AsPlainText -Force
Set-LocalUser -Name "Administrator" -Password $Password
Windows Server password requirements
Windows Server enforces a complexity policy by default. Your password must:
Be at least 8 characters (12+ recommended)
Contain at least 3 of the 4 types below:
Uppercase letters (A–Z)
Lowercase letters (a–z)
Numbers (0–9)
Special characters (
!,@,#,$…)
Not contain the username
Valid example: OuiHeberg#2024!: 14 characters, uppercase, lowercase, number, special character.
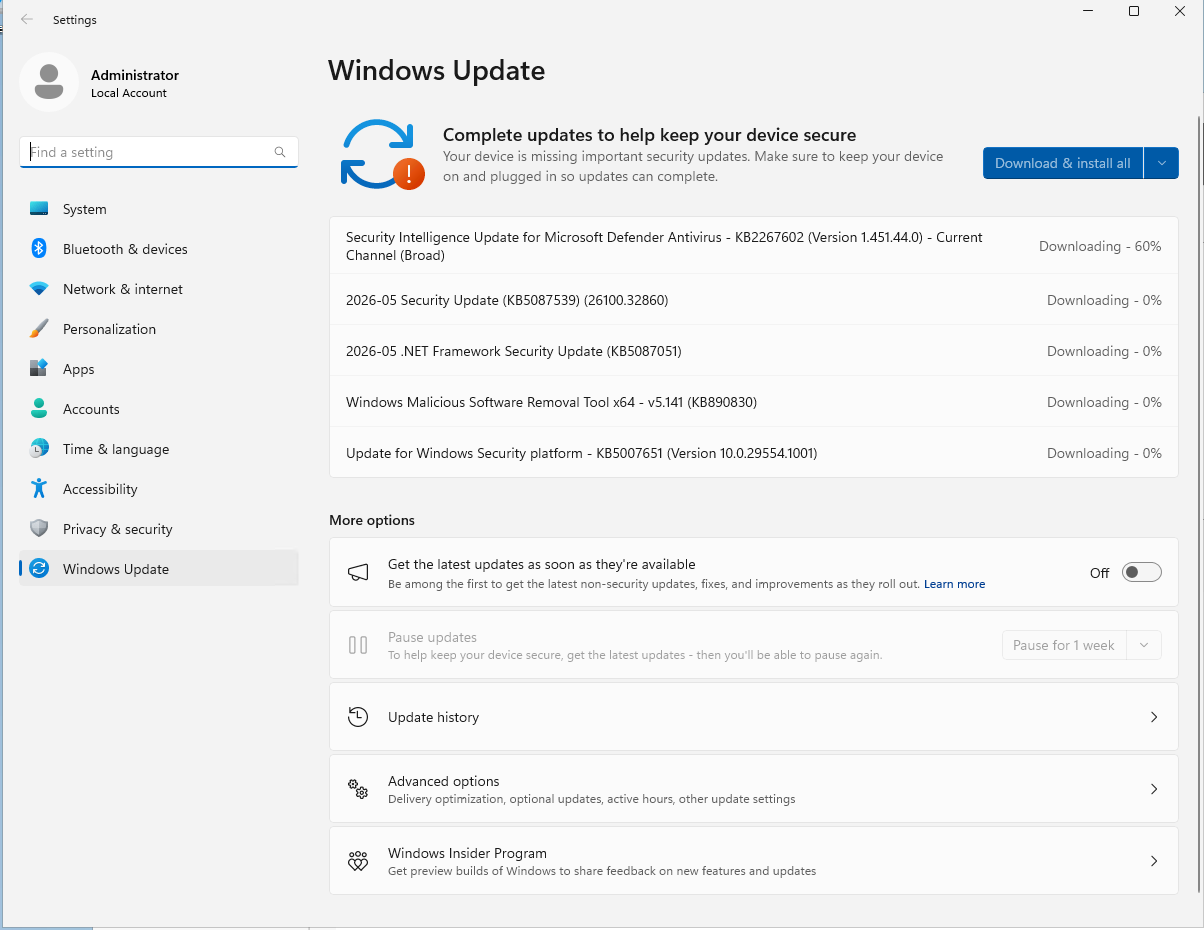
🔄 Step 4: Update Windows Server
A delivered VPS is not necessarily up to date. Updates fix critical security vulnerabilities: do not ignore them.
GUI Method
Open Settings (
Win + I)Go to Windows Update
Click on Check for updates
Install everything that is available
Restart if prompted, then reconnect via RDP
PowerShell Method
The PSWindowsUpdate module greatly simplifies updates from the command line:
# Install the module (once)
Install-Module PSWindowsUpdate -Force

# Check for available updates
Get-WindowsUpdate

# Install all updates and automatically restart if necessary
Install-WindowsUpdate -AcceptAll -AutoReboot
⚠️ If a restart is triggered, wait 2–3 minutes before reconnecting via RDP. The server needs to finish applying the updates.
 🛡️ Step 5: Configure the Windows firewall
The Windows firewall is enabled by default on Windows Server. This is a good thing: never disable it globally.
Check active rules
# List all enabled firewall rules
Get-NetFirewallRule | Where-Object {$_.Enabled -eq "True"} | Select DisplayName, Direction, Action | Format-Table -AutoSize
Essential rules to keep
Rule | Port | Protocol | Why |
|---|---|---|---|
Remote Desktop - User Mode (TCP-In) | 3389 | TCP | RDP access |
Remote Desktop - User Mode (UDP-In) | 3389 | UDP | Optimized RDP |
Windows Remote Management (HTTP-In) | 5985 | TCP | WinRM (optional) |
⛔ Never disable the RDP rule (port 3389) without first creating a rule for the new port. You would lose access to the VPS.
Open a custom port (example: port 80 for IIS)
# Open port 80 inbound (HTTP)
New-NetFirewallRule -DisplayName "HTTP" -Direction Inbound -Protocol TCP -LocalPort 80 -Action Allow

# Open port 443 inbound (HTTPS)
New-NetFirewallRule -DisplayName "HTTPS" -Direction Inbound -Protocol TCP -LocalPort 443 -Action Allow
Close an unnecessary port
# Disable an existing rule (example: WinRM if not used)
Disable-NetFirewallRule -DisplayName "Windows Remote Management (HTTP-In)" 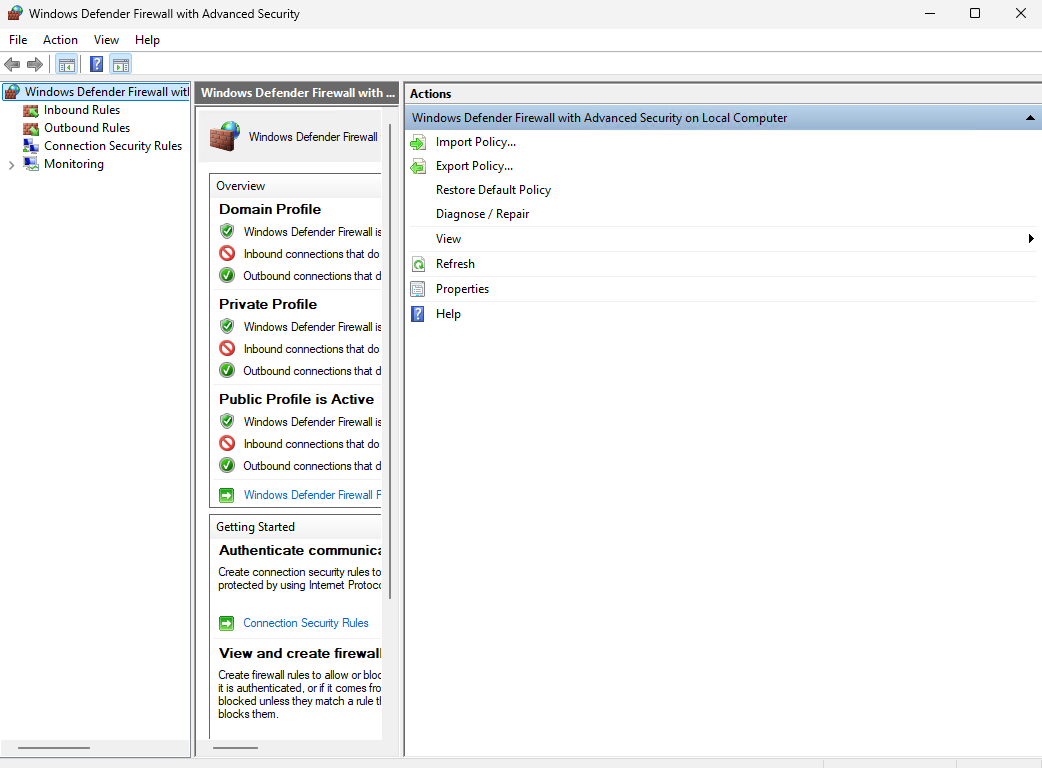 🔒 Step 6: Secure RDP access
Port 3389 is constantly scanned by bots on the Internet. Here are the measures to apply from day one.
6.1: Change the RDP port (3389 → custom port)
Choose a port between 1024 and 65535, not used by another service. Example: 33890.
# Set the new port
$newport = 33890

# Modify the registry
Set-ItemProperty -Path 'HKLM:\SYSTEM\CurrentControlSet\Control\Terminal Server\WinStations\RDP-Tcp' `
  -Name "PortNumber" -Value $newport

# Create the firewall rule for the new port
New-NetFirewallRule -DisplayName "RDP-$newport-TCP" -Direction Inbound -Protocol TCP -LocalPort $newport -Action Allow
New-NetFirewallRule -DisplayName "RDP-$newport-UDP" -Direction Inbound -Protocol UDP -LocalPort $newport -Action Allow

# Restart the RDP service
Restart-Service TermService -Force
⚠️ Before restarting the service, ensure that the firewall rule for the new port is created. Otherwise, you will lose access.
After this change, connect with: mstsc /v:185.xxx.xxx.xxx:33890
6.2: Enable NLA (Network Level Authentication)
NLA requires authentication before a full session is opened. This reduces the attack surface and protects against denial-of-service attacks.
# Enable NLA
Set-ItemProperty -Path 'HKLM:\System\CurrentControlSet\Control\Terminal Server\WinStations\RDP-Tcp' `
  -Name "UserAuthentication" -Value 1
Verification:
(Get-ItemProperty -Path 'HKLM:\System\CurrentControlSet\Control\Terminal Server\WinStations\RDP-Tcp').UserAuthentication
# Should return: 1
6.3: Create a dedicated user (do not use Administrator directly)
The Administrator account is the primary target for brute-force attacks. Create a dedicated account with a non-obvious name.
# Create a new local user
$Password = ConvertTo-SecureString "MyPassword#Strong!" -AsPlainText -Force
New-LocalUser -Name "myuser" -Password $Password -FullName "My User" -Description "Main admin account"

# Add to the Administrators group
Add-LocalGroupMember -Group "Administrators" -Member "myuser"

# Add to the Remote Desktop Users group
Add-LocalGroupMember -Group "Remote Desktop Users" -Member "myuser"
Then, disable the Administrator account once you have verified that the new account works:
Disable-LocalUser -Name "Administrator"
🕐 Step 7: Configure the time zone and language
An incorrect time zone skews your logs, scheduled tasks, and SSL certificates. Fix it immediately.
PowerShell Method (recommended)
# Set the time zone to Paris (UTC+1 / UTC+2 in summer)
Set-TimeZone -Id "Romance Standard Time"

# Check
Get-TimeZone
The expected result:
Id                         : Romance Standard Time
DisplayName                : (UTC+01:00) Brussels, Copenhagen, Madrid, Paris
GUI Method
Right-click on the clock in the taskbar → Adjust date/time
Disable Set time zone automatically
Select (UTC+01:00) Brussels, Copenhagen, Madrid, Paris
Interface language
If your VPS is delivered in English and you want the interface in French:
# Install the French language pack
Install-Language fr-FR

# Set as system language
Set-WinSystemLocale fr-FR
Set-WinUILanguageOverride -Language fr-FR
A restart is necessary to apply the change.
💾 Step 8: Enable automatic backups
A VPS without a backup is a lost VPS. A wrong manipulation, a failed update, ransomware: and everything disappears.
Option 1: OuiHeberg Backups (recommended)
OuiHeberg offers snapshots and automatic backups directly from the client area.
[📌 Placeholder: link to OuiHeberg backup offer]
Option 2: Windows Server Backup (native)
Install the Windows Server Backup feature:
# Install Windows Server Backup
Install-WindowsFeature -Name Windows-Server-Backup -IncludeManagementTools

# Check the installation
Get-WindowsFeature -Name Windows-Server-Backup
Create a basic backup policy:
# Create a new policy
$Policy = New-WBPolicy

# Add system state
Add-WBSystemState $Policy

# Add bare-metal recovery
Add-WBBareMetalRecovery $Policy

# Set the destination (replace E: with your backup drive)
$BackupLocation = New-WBBackupTarget -VolumePath "E:"
Add-WBBackupTarget -Policy $Policy -Target $BackupLocation

# Schedule: every day at 02:00
Set-WBSchedule -Policy $Policy -Schedule 02:00

# Apply the policy
Set-WBPolicy -Policy $Policy
💡 For off-site backup, prefer OuiHeberg snapshots or a solution like Veeam Agent for Windows (free for personal use).
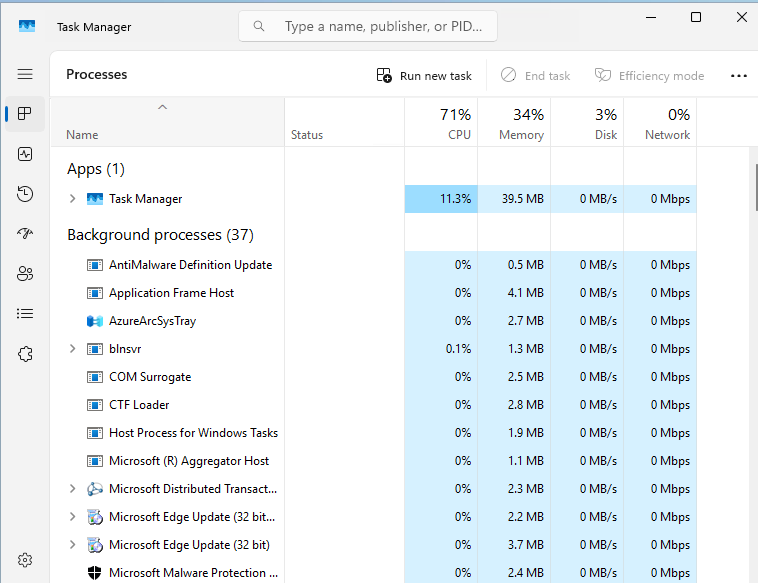
📊 Step 9: Check VPS performance
Before deploying anything, establish a baseline of available resources.
Task Manager
Open Task Manager (Ctrl + Shift + Esc) → Performance tab.
Upon delivery, you should see:
CPU: < 10% (Windows indexes in the background at startup: this is normal)
RAM: 30–50% used (basic Windows services)
Disk: high activity for 5–10 min after the first startup (indexing)
Confirm disk type (NVMe)
Get-PhysicalDisk | Select FriendlyName, MediaType, Size
On a OuiHeberg VPS, you should see MediaType: SSD or NVMe.
Check available disk space
Get-PSDrive C | Select Name, Used, Free
Typical result on a 50 GB VPS:
Name  Used(GB)  Free(GB)
----  --------  --------
C     18.4      31.6
Test network connectivity
# Test HTTP connectivity to Google
Test-NetConnection google.com -Port 80

# Test HTTPS connectivity
Test-NetConnection google.com -Port 443

# Test latency (ping)
Test-Connection google.com -Count 4
Check available RAM
Get-CimInstance Win32_OperatingSystem | Select TotalVisibleMemorySize, FreePhysicalMemory
The values are in KB: divide by 1024 to get MB.
🚀 Step 10: Next steps based on your usage
Your VPS is now secure and operational. The next steps depend on what you want to do with it.
🌐 Web hosting
Goal: host websites on Windows Server.
Install IIS (Internet Information Services):
Install-WindowsFeature -Name Web-Server -IncludeManagementTools
Install PHP (via Web Platform Installer or manually from php.net)
Install SQL Server Express (free) or MySQL/MariaDB
Configure virtual hosts in IIS Manager
[📌 Placeholder: link to our IIS guide on Windows Server]
🖥️ Remote Desktop / Remote Desktop Services (RDS)
Goal: allow multiple users to connect simultaneously.
⚠️ By default, Windows Server allows 2 simultaneous RDP connections (administrator sessions). Beyond that, an RDS CAL license is required.
Install the Remote Desktop Services role:
Install-WindowsFeature -Name RDS-RD-Server -IncludeManagementTools
Add users to the Remote Desktop Users group
Configure RemoteApp to publish specific applications
💻 Development / ASP.NET
Goal: deploy .NET applications on IIS.
Install IIS + ASP.NET:
Install-WindowsFeature -Name Web-Server, Web-Asp-Net45, Web-Net-Ext45 -IncludeManagementTools
Install the .NET Runtime (download from dotnet.microsoft.com)
Install Visual Studio Build Tools to compile from the command line
Deploy your app via Web Deploy or FTP
✅ Summary: 30-Minute Checklist
[ ] Credentials retrieved from the OuiHeberg client area
[ ] RDP connection established from your workstation
[ ] Certificate warning accepted
[ ] Administrator password changed
[ ] Windows Update launched and updates installed
[ ] Restart performed if requested
[ ] Firewall checked: RDP rule active
[ ] RDP port changed (3389 → custom port)
[ ] NLA enabled
[ ] Dedicated user created (non-Administrator)
[ ] Time zone set to Paris (Romance Standard Time)
[ ] Backups enabled (OuiHeberg or Windows Server Backup)
[ ] Performance checked (CPU, RAM, disk, network)
[ ] Usage defined (IIS, RDS, .NET…) and initial roles installed
🔧 Quick Troubleshooting
Problem | Probable Cause | Solution |
|---|---|---|
Unable to connect via RDP | Incorrect IP, firewall blocking, wrong port | Check the IP in the client area; test |
Blocking certificate warning | RDP client too strict | Click "Yes" / "Continue": this is normal on the first connection |
Password denied | Uppercase/lowercase, copy-paste with space | Type the password manually; check the keyboard layout |
Forgotten password / account locked | Too many failed attempts | Use the KVM console in the OuiHeberg client area to reset |
Windows Update stuck at 0% | BITS service or Windows Update stopped | Run |
RDP session disconnects immediately | Session timeout, NLA conflict | Check session settings in |
CPU at 100% on first boot | Windows Search indexing, initial Defender scan | Wait 10–15 min: this is normal after a first installation |
Slow RDP / choppy display | Insufficient bandwidth, too high colors | In mstsc → Options → Experience → reduce display quality |
❓ FAQ
What version of Windows Server is installed on my VPS?
Check in the OuiHeberg client area (VPS information section). You can also confirm it from PowerShell:
Get-ComputerInfo | Select WindowsProductName, WindowsVersion, OsHardwareAbstractionLayer
OuiHeberg offers Windows Server 2019 and Windows Server 2022.
How to reset the password if I am locked out?
If you can no longer connect via RDP (forgotten password or locked account), use the KVM console available in your OuiHeberg client area. It gives you direct access to the server screen, independent of RDP. From there, you can change the password via Ctrl + Alt + Del → Change a password.
Can I install any software on my Windows VPS?
Yes. You have full Administrator rights. You can install any software compatible with Windows Server (IIS, SQL Server, Node.js, Apache, etc.). The only limitation: software requiring a DirectX/GPU graphical interface (games, certain 3D tools) will not work properly without a dedicated GPU.
How many simultaneous RDP connections are possible?
By default, 2 simultaneous administrator sessions are allowed on Windows Server without additional licensing. For more simultaneous connections (non-administrator users), a Remote Desktop Services role and RDS CAL (Client Access License) must be purchased separately from Microsoft.
Is my Windows VPS automatically backed up?
Not by default. OuiHeberg offers optional automatic backup options (snapshots, remote backup) from the client area. We strongly recommend enabling them. You can also configure Windows Server Backup natively (see Step 8).
How to contact OuiHeberg support if I have a problem?
OuiHeberg support is available 24/7:
Support ticket: from the client area → Support → New ticket
Live chat: available on ouiheberg.com
Email: [email protected]
For critical issues (inaccessible VPS, data loss), open a ticket with Urgent priority.