
 Client area
Quick Summary : Activate Hyper-V in 3 commands
Open PowerShell as an administrator and run these 3 commands in order:
# 1. Install Hyper-V with management tools
Install-WindowsFeature -Name Hyper-V -IncludeManagementTools -Restart

# 2. Check the installation after reboot
Get-WindowsFeature -Name Hyper-V

# 3. Check that the service is active
Get-Service -Name vmms
Automatic reboot included. On a OuiHeberg VPS, nested virtualization is already enabled: no additional configuration needed on the host side.
No server yet? Our Windows Server VPS plans come with the license and administrator access over RDP.
Hyper-V on a VPS: what you need to know beforehand
Nested virtualization: what is it?
Your VPS is itself a virtual machine running on a physical hypervisor. To run Hyper-V inside this VPS, the host must expose virtualization extensions to the guest system. This is called nested virtualization.
Without it, Windows Server detects the Hyper-V role but refuses to start VMs: you get the error "The processor does not have the required virtualization capabilities."
The command to run on the physical host (not in your VPS) is:
Set-VMProcessor -VMName <YourVPSName> -ExposeVirtualizationExtensions $true
For most hosting providers, this step is manual and paid. At OuiHeberg, nested virtualization is enabled by default on all Windows VPS.
Discover our Windows VPS with Hyper-V enabled
Hardware and software prerequisites
Before installing Hyper-V, check these points:
RAM: 4 GB minimum (8 GB recommended for creating usable VMs)
CPU: 64-bit processor with SLAT (Second Level Address Translation): Intel EPT or AMD RVI
OS: Windows Server 2019, 2022, or 2026 (Standard, Datacenter, or Essentials)
Nested virtualization: enabled by the host provider on the physical node
Disk space: plan for at least 20 GB per guest VM
Comparison table: Hyper-V by Windows Server edition
Edition | Hyper-V available | Included Windows VMs | Recommended usage |
|---|---|---|---|
Standard | ✅ Yes | 2 Windows Server VMs | Light virtualization, 1-2 VMs |
Datacenter | ✅ Yes | Unlimited | Heavily virtualized environments |
Essentials | ✅ Yes | 0 (limited license) | Small structures, not for intensive virtualization |
⚠️ OuiHeberg Note: all our Windows VPS run on Windows Server Standard or Datacenter. Nested virtualization is enabled by default: you can start directly at the installation step below.
Method 1: PowerShell (recommended)
This is the fastest and most reliable method, especially on a VPS without a graphical interface.
Step 1: Open PowerShell as an administrator
Right-click on the Start menu → Windows PowerShell (Admin) or Terminal (Admin).
Step 2: Start the installation
Install-WindowsFeature -Name Hyper-V -IncludeManagementTools -Restart
The flag -IncludeManagementTools also installs the Hyper-V Manager and PowerShell cmdlets. The flag -Restart automatically reboots the server at the end.
Step 3: Check after reboot
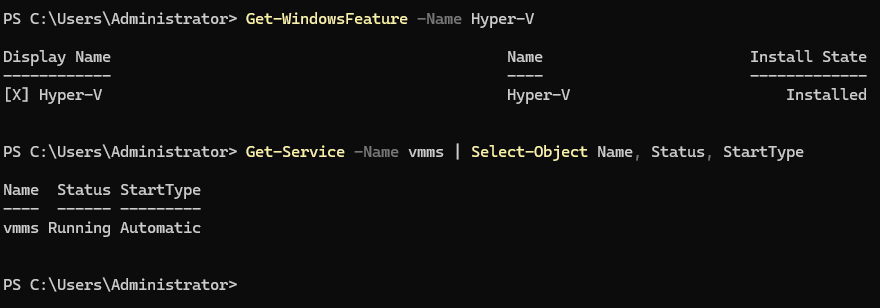
Get-WindowsFeature -Name Hyper-V
The Install State column should display Installed. If you see Available, the installation failed: rerun the command.
Step 4: Confirm that the management service is active
Get-Service -Name vmms | Select-Object Name, Status, StartType
Expected result: Status = Running, StartType = Automatic.
Method 2: Server Manager (GUI)
If you prefer the graphical interface, here are the 5 essential steps.
Step 1: Open the Server Manager (icon in the taskbar or servermanager.exe).
Step 2: Click on Manage → Add Roles and Features.
Step 3: Choose Role-based or feature-based installation, then select your local server.
Step 4: In the list of roles, check Hyper-V. A window will prompt you to add management tools: accept.
Step 5: Click on Install and wait for it to finish. Check Restart automatically if you want to avoid doing it manually.
💡 The GUI method is identical on Windows Server 2019, 2022, and 2026.
Method 3: DISM (command line)
DISM is useful in two cases: automated deployment scripts or environments where PowerShell is restricted.
DISM /Online /Enable-Feature /FeatureName:Microsoft-Hyper-V-All /All /NoRestart
Then reboot manually:
shutdown /r /t 0
DISM vs PowerShell: when to choose what?
Criterion | PowerShell | DISM |
|---|---|---|
Syntax | More readable | More verbose |
Auto restart | ✅ | ❌ Manual |
Script compatibility | Excellent | Good |
Post-install verification |
|
|
Recommended for VPS | ✅ Yes | Specific cases |
Configuring virtual switches
This is the step that most guides gloss over. Yet, a misconfigured switch = VMs without network.
The 3 types of switches: comparison table
Type | Physical network access | Host access | Access between VMs | Use case |
|---|---|---|---|---|
External | ✅ Yes | ✅ Yes | ✅ Yes | VM with public IP/LAN, internet access |
Internal | ❌ No | ✅ Yes | ✅ Yes | Host lab ↔ VMs, NAT from the host |
Private | ❌ No | ❌ No | ✅ Yes | Isolated sandbox, malware testing, VM-to-VM network |
Create an external switch (PowerShell)
# Identify the physical network adapter
Get-NetAdapter

# Create the external switch
New-VMSwitch -Name "External-Switch" -NetAdapterName "Ethernet" -AllowManagementOS $true
Replace "Ethernet" with the exact name of your network adapter (displayed by Get-NetAdapter).
Create an internal switch for isolated lab
New-VMSwitch -Name "Internal-Switch" -SwitchType Internal
Then assign an IP to the virtual interface created on the host:
# Get the index of the virtual interface
Get-NetAdapter | Where-Object {$_.Name -like "*Internal-Switch*"}

# Assign an IP
New-NetIPAddress -IPAddress 192.168.100.1 -PrefixLength 24 -InterfaceIndex <Index>
Create a switch via Hyper-V Manager (GUI)
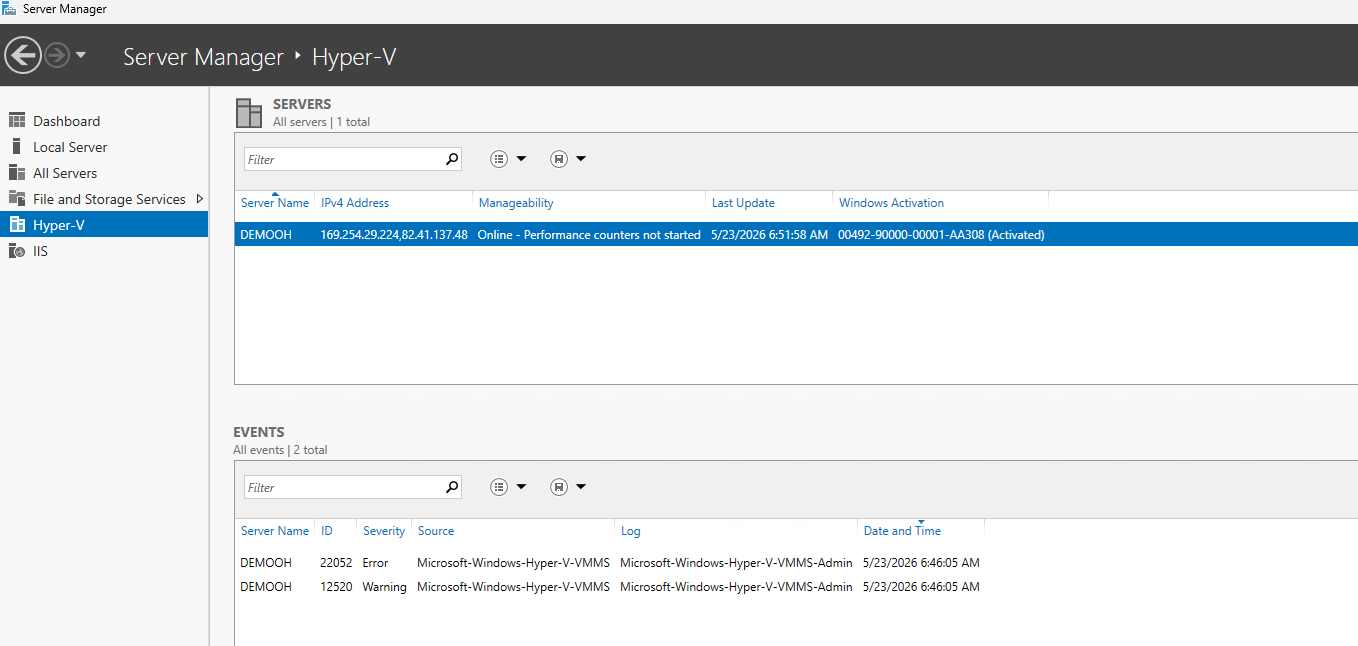
Open the Hyper-V Manager
Click on Virtual Switch Manager (right panel)
Choose the type (External / Internal / Private)
Give a descriptive name and click on Apply
 Create your first virtual machine
PowerShell: New-VM with full parameters
New-VM `
  -Name "VM-Test-01" `
  -MemoryStartupBytes 2GB `
  -Generation 2 `
  -NewVHDPath "C:\VMs\VM-Test-01.vhdx" `
  -NewVHDSizeBytes 40GB `
  -SwitchName "External-Switch"

# Allocate vCPUs
Set-VMProcessor -VMName "VM-Test-01" -Count 2

# Enable Dynamic Memory (optional)
Set-VMMemory -VMName "VM-Test-01" -DynamicMemoryEnabled $true -MinimumBytes 512MB -MaximumBytes 4GB

# Mount the installation ISO
Add-VMDvdDrive -VMName "VM-Test-01" -Path "C:\ISOs\windows-server-2022.iso"

# Start the VM
Start-VM -Name "VM-Test-01"
GUI: 6 summarized steps
Hyper-V Manager → New → Virtual Machine
Name the VM and choose the storage location
Select Generation 2 (recommended for all modern OS)
Set the startup RAM (2048 MB minimum)
Connect to the previously created virtual switch
Create a virtual disk (VHDX) and mount your ISO
Table: recommended RAM/CPU allocation based on usage
Usage | Dedicated RAM | vCPUs | Memory type |
|---|---|---|---|
Light dev/test | 1–2 GB | 1–2 | Dynamic |
Web/app server | 2–4 GB | 2 | Dynamic |
Database | 4–8 GB | 2–4 | Static |
Critical production | 8 GB+ | 4+ | Static |
💡 For database VMs (SQL Server, MySQL), always use static memory: dynamic memory can cause latency spikes during reallocations.
Checkpoints and backups
Standard vs Production checkpoint: the difference that matters
Criterion | Standard | Production |
|---|---|---|
Capture RAM | ✅ Yes | ❌ No |
Data consistency | ⚠️ Partial | ✅ VSS (application consistency) |
Restoration | Exact state at time T | Clean boot like after a shutdown |
Recommended for | Dev/test/debug | Production workloads |
In practice: use Production checkpoints for your production VMs (SQL Server, IIS, AD). Keep Standard checkpoints for your test labs where you need to revert to a precise memory state.
Create a checkpoint before each modification (PowerShell)
# Production checkpoint (recommended)
Checkpoint-VM -Name "VM-Test-01" -SnapshotName "Before-Update-$(Get-Date -Format 'yyyyMMdd')" -CheckpointType Production

# List existing checkpoints
Get-VMCheckpoint -VMName "VM-Test-01"

# Restore a checkpoint
Restore-VMCheckpoint -VMName "VM-Test-01" -Name "Before-Update-20260526"
Checkpoint ≠ backup
A checkpoint is not a backup. If the host disk fails, you lose the VM and all its checkpoints.
For a true backup strategy for your Windows VPS, check our dedicated guide
Performance and optimization
Dynamic Memory vs Static Memory: when to use what
Dynamic Memory allows Hyper-V to allocate and reclaim RAM as needed by the VM. Useful for consolidating multiple lightweight VMs on the same host.
Static Memory fixes an unmovable amount of RAM. No latency from reallocation, predictable behavior. Essential for databases and real-time workloads.
Simple rule: if your VM runs SQL Server, MySQL, or a game server → static memory. For everything else, Dynamic Memory works well.
Optimization table based on total VPS RAM
Total VPS RAM | Host RAM to reserve | VM recommendations |
|---|---|---|
4 GB | 1.5 GB | 1 VM max (2 GB): Dynamic Memory required |
8 GB | 2 GB | 2–3 lightweight VMs or 1 production VM (4–6 GB) |
16 GB | 2–3 GB | 3–5 VMs, mix Dynamic/Static based on usage |
32 GB | 3–4 GB | 6–10 VMs, static memory possible for all |
⚠️ Always reserve RAM for the host. An 8 GB VPS with 8 GB allocated to VMs will end up in swap: catastrophic performance.
NUMA and CPU: avoid over-provisioning
Do not exceed the number of physical vCPUs available on your VPS. If your VPS has 4 vCPUs, creating 3 VMs with 4 vCPUs each = 12 virtual vCPUs for 4 physical → guaranteed CPU contention.
Practical rule: total vCPUs of VMs ≤ 2× the vCPUs of the host VPS for acceptable performance.
Hyper-V Security
Six points to apply on any exposed Hyper-V environment.
1. Secure Boot enabled on all Generation 2 VMs
Enabled by default on Gen 2 VMs. Do not disable it unless absolutely necessary: it prevents the loading of unsigned bootloaders.
Set-VMFirmware -VMName "VM-Prod-01" -EnableSecureBoot On
2. vTPM for critical VMs
The virtual TPM allows enabling BitLocker in the guest VM and protecting secrets at the firmware level.
Enable-VMTPM -VMName "VM-Prod-01"
3. Network isolation by switches
Do not place your production VMs and your test VMs on the same virtual switch. Use a Private switch for labs and an External switch for production.
4. Encrypted backups
If you export VMs, encrypt the VHDX files with BitLocker or a third-party tool. An unencrypted export = full access to the VM's disk.
5. Restricted Hyper-V Manager access
Limit the Hyper-V Administrators group to only those accounts that need it. By default, any local administrator can manage Hyper-V.
# View group members
Get-LocalGroupMember -Group "Hyper-V Administrators"
6. Audit Hyper-V events
Enable auditing in Event Viewer → Microsoft-Windows-Hyper-V-VMMS. Event IDs 13002 (VM start) and 13003 (VM stop) are the most useful for detecting unauthorized actions.
Troubleshooting: 6 common errors
1. "The processor does not have the required virtualization capabilities"
Cause: nested virtualization is not enabled on the host node.
Solution: contact your host to run Set-VMProcessor -VMName <VPS> -ExposeVirtualizationExtensions $true. At OuiHeberg, it is enabled by default.
2. "An hypervisor is already running"
Cause : VirtualBox or VMware Workstation is installed and has taken control of the hypervisor.
Solution : uninstall VirtualBox/VMware, then check that Hyper-V is not conflicting with the boot configuration :
bcdedit /set hypervisorlaunchtype auto
Then restart.
3. The Hyper-V Manager does not open
Cause : the vmms (Virtual Machine Management Service) service is stopped.
Solution :
Start-Service -Name vmms
Set-Service -Name vmms -StartupType Automatic
4. Unable to create VMs
Cause : insufficient rights: your account is not in the Hyper-V Administrators or Administrators group.
Solution :
Add-LocalGroupMember -Group "Hyper-V Administrators" -Member "DOMAIN\MyAccount"
5. VM network without connectivity
Cause : incorrectly configured virtual switch or unassociated network adapter.
Solution : check that the External switch is properly linked to the active physical adapter (Get-NetAdapter). Also check that the VM is connected to the correct switch in its network settings.
# See the switch connected to a VM
Get-VMNetworkAdapter -VMName "VM-Test-01" | Select-Object SwitchName, IPAddresses
6. Degraded performance after activation
Cause : Dynamic Memory misconfigured: the minimum RAM is too low, the VM is constantly swapping.
Solution : increase the minimum RAM or switch to static memory for critical VMs :
Set-VMMemory -VMName "VM-Prod-01" -DynamicMemoryEnabled $false -StartupBytes 4GB
FAQ
Can Hyper-V be enabled on all Windows VPS?
No. The host provider must have enabled nested virtualization on the physical node. Without this step on the host side, Hyper-V installs but refuses to start VMs. At OuiHeberg, it is enabled by default on all Windows VPS.
What is the difference between Hyper-V and VMware?
Hyper-V is Microsoft's hypervisor, integrated into Windows Server: free with the OS license. VMware (vSphere/ESXi) is an independent bare-metal hypervisor, more commonly used in enterprise data centers. On a Windows VPS, Hyper-V is the only realistic choice via nested virtualization.
How many VMs can be created on an 8 GB RAM VPS?
In practice: 2 to 3 lightweight VMs (1–2 GB each) or 1 production VM (4–6 GB). Always keep 2 GB for the host system. Beyond that, performance degrades quickly.
Does Hyper-V slow down the host VPS?
The installation of the Hyper-V role has a negligible impact on the host (< 1% CPU at rest). Degradation comes from the VMs themselves if you over-provision RAM or vCPUs. Size correctly and the impact is minimal.
Can Hyper-V be used to host a game server?
Yes. Create a VM with static memory, allocate 2–4 vCPUs and 4–8 GB RAM depending on the game. Connect it to an External switch for network access. Performance is slightly lower than bare-metal (virtualization overhead ~3–5%), which is acceptable for most multiplayer games.
How to properly uninstall Hyper-V?
Remove-WindowsFeature -Name Hyper-V -IncludeManagementTools -Restart
Note: all created VMs remain on the disk (VHDX files) but will no longer be accessible via Hyper-V. Export or back up your VMs before uninstalling.