
 Client area
Install IIS on a Windows Server VPS: Complete Guide IIS (Internet Information Services) is Microsoft's native web server, integrated into all editions of Windows Server. Whether you want to host a showcase website, an ASP.NET application, or an internal web service, IIS is the go-to solution on a Windows VPS. In this complete guide, you will learn how to install IIS on your Windows Server VPS (2016, 2019, 2022, or 2025) using three methods: Server Manager (graphical interface), PowerShell, and DISM via command line.
💡 Prerequisites: You must be connected to your Windows VPS via RDP with an account that has Administrator rights. If you haven't done so yet, check our guide Connecting to a Windows VPS via RDP.
1. What is IIS and why use it?
Internet Information Services (IIS) is the web server developed by Microsoft, natively available on Windows Server. It allows you to:
🌐 Host static (HTML, CSS, JS) or dynamic (ASP.NET, PHP) websites
🔒 Manage SSL/TLS certificates to secure your HTTPS connections
⚙️ Configure application pools to isolate your web applications
📊 View access logs and monitor performance
🔄 Manage multiple sites on a single server via bindings
IIS is particularly suited for Microsoft environments: ASP.NET applications, .NET Core, REST APIs on Windows, or WordPress sites hosted on Windows with PHP.
2. IIS Versions by Windows Server
All modern versions of Windows Server come with IIS 10.0. Here is the compatibility table:
Windows Server | IIS Version | Extended Support |
|---|---|---|
Windows Server 2016 | IIS 10.0 (build 14393) | January 2027 |
Windows Server 2019 | IIS 10.0 (build 17763) | January 2029 |
Windows Server 2022 | IIS 10.0 (build 20348) | October 2031 |
Windows Server 2025 | IIS 10.0 (build 26100) | November 2034 |
✅ Good news: the installation commands are identical across all these versions. This guide is valid for Windows Server 2016, 2019, 2022, and 2025.
3. Method 1: Install IIS via Server Manager
This is the most visual method, ideal if you are new to Windows Server.
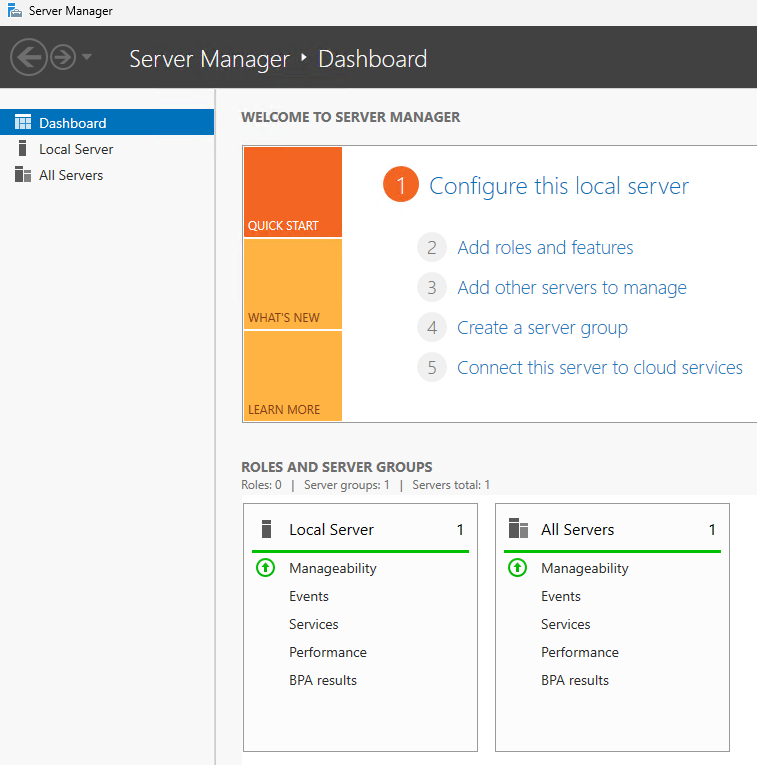
Step 1: Open Server Manager
Open the Start menu, search for Server Manager, and click on it. It opens automatically upon logging into Windows Server.
Step 2: Launch the Add Roles and Features Wizard
In Server Manager, click on Manage (at the top right), then select Add Roles and Features.
Step 3: Navigate through the wizard
The wizard opens. Follow these steps:
Before you begin: click Next.
Installation type: select Role-based or feature-based installation, then Next.
Server selection: choose your server from the server pool, then Next.
Step 4: Select the Web Server (IIS) role
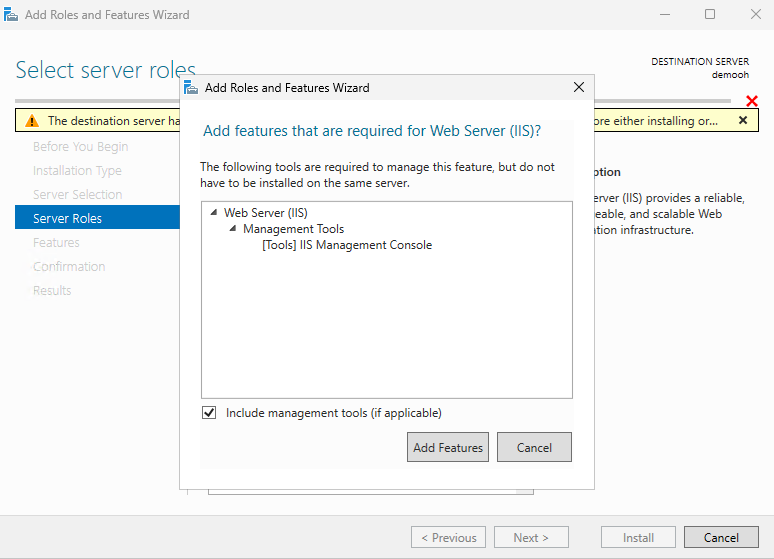
In the list of server roles, scroll down and check Web Server (IIS).
A pop-up window appears asking you to add required features. Click on Add Features, then Next.
Step 5: Select additional features
In the Features section, you can add optional components as needed:
.NET Framework 4.x: for ASP.NET applications
ASP.NET: for dynamic web development
WebSocket Protocol: for real-time applications
Click Next.
Step 6: Confirm and install
Review the summary of your selections, then click Install. The installation usually takes 1 to 3 minutes.
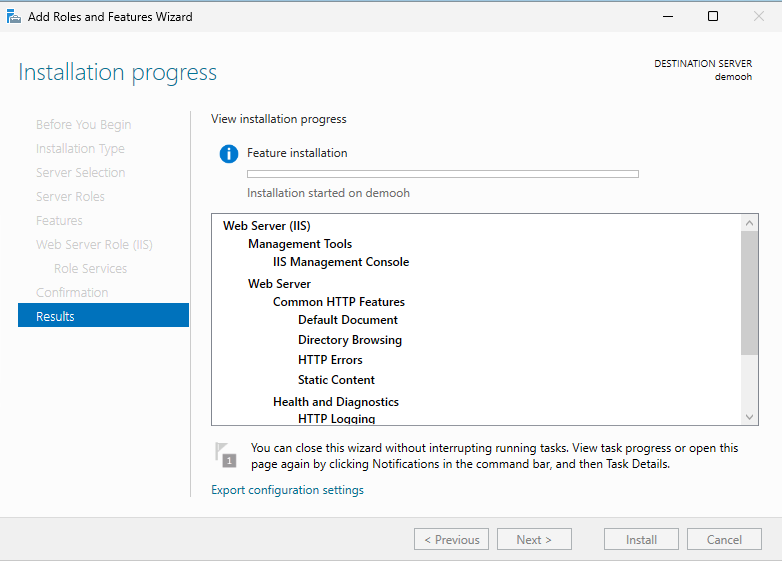
Once completed, click Close. IIS is now installed.
4. Method 2: Install IIS via PowerShell
PowerShell is the recommended method for system administrators: faster, scriptable, and reproducible.
Minimal installation (Web Server role + management tools)
Open PowerShell as Administrator (right-click on PowerShell > Run as administrator) and execute:
Install-WindowsFeature -name Web-Server -IncludeManagementTools
This command installs the IIS Web Server role along with the IIS management console (IIS Manager).
Installation with additional features
To install IIS with ASP.NET support, management tools, and WebSocket protocol:
Install-WindowsFeature -name Web-Server, Web-ASP, Web-Mgmt-Tools, Web-WebSockets
Parameter details:
Web-Server: installs the main web server roleWeb-ASP: adds ASP.NET supportWeb-Mgmt-Tools: installs IIS management toolsWeb-WebSockets: installs WebSocket protocol support
Check installed IIS features
After installation, list the active IIS features with:
Get-WindowsFeature -Name Web-* | Where-Object {$_.InstallState -eq "Installed"}
Expected result
Success Restart Needed Exit Code      Feature Result
------- -------------- ---------      --------------
True    No             Success        {Web Server (IIS), ...}
✅ If
Restart Neededshows No, your server does not need to restart. If Yes, schedule a restart.
5. Method 3: Install IIS via DISM (command line)
DISM (Deployment Image Servicing and Management) is the command-line tool for managing Windows features. It works on all editions of Windows Server 2012, 2016, 2019, 2022, and 2025.
Open Command Prompt as Administrator
Search for Command Prompt in the Start menu, right-click, and select Run as administrator.
Basic installation command
dism /online /enable-feature /featurename:IIS-WebServerRole /all /norestart
The /norestart flag prevents automatic restart. Remove it if you want to restart immediately after installation.
Install additional features
dism /online /enable-feature /featurename:IIS-ASPNET45 /all
dism /online /enable-feature /featurename:IIS-WebSockets /all
IIS-ASPNET45: installs ASP.NET 4.5 supportIIS-WebSockets: installs WebSocket protocol support
Complete installation with all common features
For a complete deployment including authentication, compression, logging, and ASP.NET support:
dism.exe /Enable-Feature /Online /All ^
/FeatureName:IIS-DefaultDocument ^
/FeatureName:IIS-DirectoryBrowsing ^
/FeatureName:IIS-HttpErrors ^
/FeatureName:IIS-StaticContent ^
/FeatureName:IIS-HttpLogging ^
/FeatureName:IIS-RequestMonitor ^
/FeatureName:IIS-HttpCompressionStatic ^
/FeatureName:IIS-HttpCompressionDynamic ^
/FeatureName:IIS-RequestFiltering ^
/FeatureName:IIS-BasicAuthentication ^
/FeatureName:IIS-WindowsAuthentication ^
/FeatureName:IIS-NetFxExtensibility45 ^
/FeatureName:IIS-ASPNET45 ^
/FeatureName:IIS-ISAPIExtensions ^
/FeatureName:IIS-ISAPIFilter ^
/FeatureName:IIS-ManagementConsole
💡 The character
^allows you to continue the command on the next line in the Windows command prompt.
Expected success message
Enabling feature(s)
[==========================100.0%==========================]
The operation completed successfully.
6. Verify that IIS is working correctly
Test from the server's browser
After installation, open a browser on your VPS and go to:
http://localhost
You should see the IIS welcome page (blue background with the IIS logo). This confirms that IIS is operational.
Test connectivity on port 80
From PowerShell, check that port 80 is listening:
Test-NetConnection -ComputerName localhost -Port 80
Expected result:
ComputerName     : localhost
RemoteAddress    : 127.0.0.1
RemotePort       : 80
TcpTestSucceeded : True
Open IIS Manager
Press Win + R, type inetmgr, and hit Enter to directly open the Internet Information Services (IIS Manager).
7. Configure your first website in IIS
Step 1: Create the site directory
Create a folder to host your site's files, for example:
C:\inetpub\mysite
Place a test index.html file there:
<!DOCTYPE html>
<html>
<head><title>My IIS Site</title></head>
<body>
  <h1>🎉 My site is running on IIS!</h1>
</body>
</html>
Step 2: Add a new site in IIS Manager
Open IIS Manager (
inetmgr)In the left panel, right-click on Sites > Add Website
Fill in the fields:
Site name:
mysitePhysical path:
C:\inetpub\mysiteBinding: Type
http, Port80, Host name (your domain or leave blank)
Click OK
Step 3: Configure the application pool
Each IIS site is associated with an application pool that isolates its process. By default, a pool is automatically created with the site's name.
To check or modify the pool:
Click on Application Pools in IIS Manager
Select your site's pool
Ensure that the .NET CLR version matches your application (v4.0 for ASP.NET, No Managed Code for ASP.NET Core)
Step 4: Test the site
Open a browser and go to http://localhost (or the public IP of your VPS). You should see your index.html page.
8. Additional modules and features
IIS is modular. Here are the most useful features and how to install them:
Common modules table
Feature | Usefulness | PowerShell Command |
|---|---|---|
Static Compression | Reduces the size of static files |
|
Dynamic Compression | Compresses dynamic responses |
|
Windows Authentication | SSO with Active Directory |
|
Basic Authentication | HTTP login/password |
|
HTTP Logging | Logs web requests |
|
Request Filtering | Security for incoming requests |
|
WebSockets | Real-time applications |
|
ASP.NET 4.x | .NET Framework applications |
|
FTP | Built-in FTP server |
|
Install dynamic compression (example)
Install-WindowsFeature Web-Dyn-Compression
Then check in IIS Manager > your site > Compression that dynamic compression is enabled.
9. Open port 80 in Windows Firewall
By default, Windows Firewall may block incoming connections on port 80. Here’s how to open this port.
Via PowerShell (recommended)
New-NetFirewallRule -DisplayName "IIS HTTP" -Direction Inbound -Protocol TCP -LocalPort 80 -Action Allow
For HTTPS (port 443):
New-NetFirewallRule -DisplayName "IIS HTTPS" -Direction Inbound -Protocol TCP -LocalPort 443 -Action Allow
Via the graphical interface
Open the Windows Defender Firewall with Advanced Security
Click on Inbound Rules > New Rule
Select Port > TCP > Specific port:
80Choose Allow the connection and name the rule
IIS HTTP
🔒 To learn more about configuring the Windows Server firewall, check our guide Configuring the Windows Server Firewall on a VPS.
10. Common errors and solutions
❌ Error 503: Service unavailable
Cause: The application pool associated with the site is stopped.
Solution:
Open IIS Manager
Click on Application Pools
Select the affected pool and click Start
Or via PowerShell:
Start-WebAppPool -Name "PoolName"
❌ Error 404: Page not found
Cause: The physical path of the site is incorrect, or the default document is not configured.
Solution:
Check the path in IIS Manager > your site > Basic Settings
Ensure that
index.htmlordefault.aspxis in the list of Default Documents
❌ The default IIS page displays instead of my site
Cause: The default site (Default Web Site) is conflicting with your site on port 80.
Solution:
In IIS Manager, stop the Default Web Site (right-click > Stop)
Or modify your site's binding to use a specific host name
❌ Unable to access the site from outside
Cause: Port 80 is blocked by Windows Firewall or by your VPS's network rules.
Solution:
Check the firewall rules (see section 9)
Ensure that your VPS provider does not have an additional network firewall to configure in your client area
❌ Error during installation: "The feature is not available"
Cause: The Windows source files are missing (common on VPS with a minimal image).
Solution: Specify the source path during installation:
Install-WindowsFeature -name Web-Server -IncludeManagementTools -Source "D:\sources\sxs"
(Replace D: with the letter of your Windows Server ISO drive)
11. FAQ
Is IIS free on Windows Server? Yes. IIS is included in all Windows Server licenses (Standard, Datacenter, Essentials). There is no additional cost to enable it.
What is the difference between IIS and Apache/Nginx? IIS is Microsoft's native web server, optimized for the Windows ecosystem and .NET applications. Apache and Nginx are cross-platform open-source web servers. On a Windows VPS, IIS is generally preferred for ASP.NET applications, while Apache or Nginx can be installed for PHP or other stacks.
Can PHP run on IIS? Yes. IIS supports PHP via the FastCGI module. You can install PHP manually or use Microsoft's Web Platform Installer to simplify the deployment of WordPress, Joomla, or other PHP CMS on IIS.
How many sites can be hosted on a single IIS? There is no theoretical limit. IIS can host hundreds of sites on a single server, each with its own domain name, port, or IP address. The practical limit depends on your VPS resources (RAM, CPU, bandwidth).
How to restart IIS without restarting the server? Use the following command in PowerShell or the command prompt:
iisreset
Or to restart only the W3SVC service:
Restart-Service W3SVC
How to uninstall IIS if I no longer need it?
Uninstall-WindowsFeature -Name Web-Server -IncludeManagementTools
Does IIS support HTTP/2 and HTTP/3? IIS 10.0 (Windows Server 2016 and later) natively supports HTTP/2 for HTTPS connections. HTTP/3 (QUIC) support is available experimentally on Windows Server 2022 and 2025.
Conclusion
You now know how to install IIS on your Windows Server VPS using the three available methods: Server Manager for a graphical approach, PowerShell for automation, and DISM for pure command line. IIS is now ready to host your websites and web applications.
Recommended next steps:
🔒 Configure an SSL/TLS certificate to enable HTTPS
⚙️ Optimize application pools for your needs
🛡️ Strengthen IIS security (disable version headers, configure request filtering)
📊 Enable logging and performance monitoring
💡 Need a high-performance Windows VPS to host IIS? Check out our Windows VPS offers at OuiHeberg, with Windows Server 2022 and 2025 available, deployment in under 2 minutes, and French-speaking support 7 days a week.