
 Client area
Quick Summary
Open regedit or PowerShell as an administrator.
Modify the PortNumber value in
HKLM:\SYSTEM\CurrentControlSet\Control\Terminal Server\WinStations\RDP-Tcp.Create an incoming firewall rule allowing the new TCP port.
Restart the RDP service:
Restart-Service -Name TermService -Force.Reconnect via mstsc using the syntax
IP:NewPort.
🎯 Why Change the Default RDP Port (3389)?
The port 3389 is the first port scanned by bots as soon as an IP address is exposed on the Internet. In 2024, Shodan reported over 4.4 million exposed RDP instances: all continuously targeted by automated attacks.
Specifically, on a freshly deployed VPS, the first brute force attempts arrive in less than 10 minutes. The Administrator account is tested first.
Changing the port alone is not enough to secure a VPS. This is security through obscurity: it reduces noise, not risk. Combine it with:
Network Level Authentication (NLA)
Strict firewall rules (IP restriction)
A dedicated account without administrative rights
A account lockout policy
This is the first step, not the only one.
⚠️ Before You Start: Prerequisites
Before touching anything, check these points:
Administrator access to the VPS (active RDP session or OuiHeberg console)
Do not disconnect your current RDP session: apply changes in the correct order (firewall first, then registry)
Choose a free port in the 49152–65535 range (dynamic ports, less targeted by scanners)
Have a backup access: KVM/IPMI console or the OuiHeberg emergency console: essential if you lock yourself out
⚠️ If you forget to open the new port in the firewall before restarting the RDP service, you will lose access. Keep the OuiHeberg console open in a tab.
🖥️ Method 1: Via the Registry Editor (GUI)
This is the classic method, suitable if you are not comfortable with PowerShell.
1. Open the Registry Editor
Press Win + R, type regedit, and hit Enter.
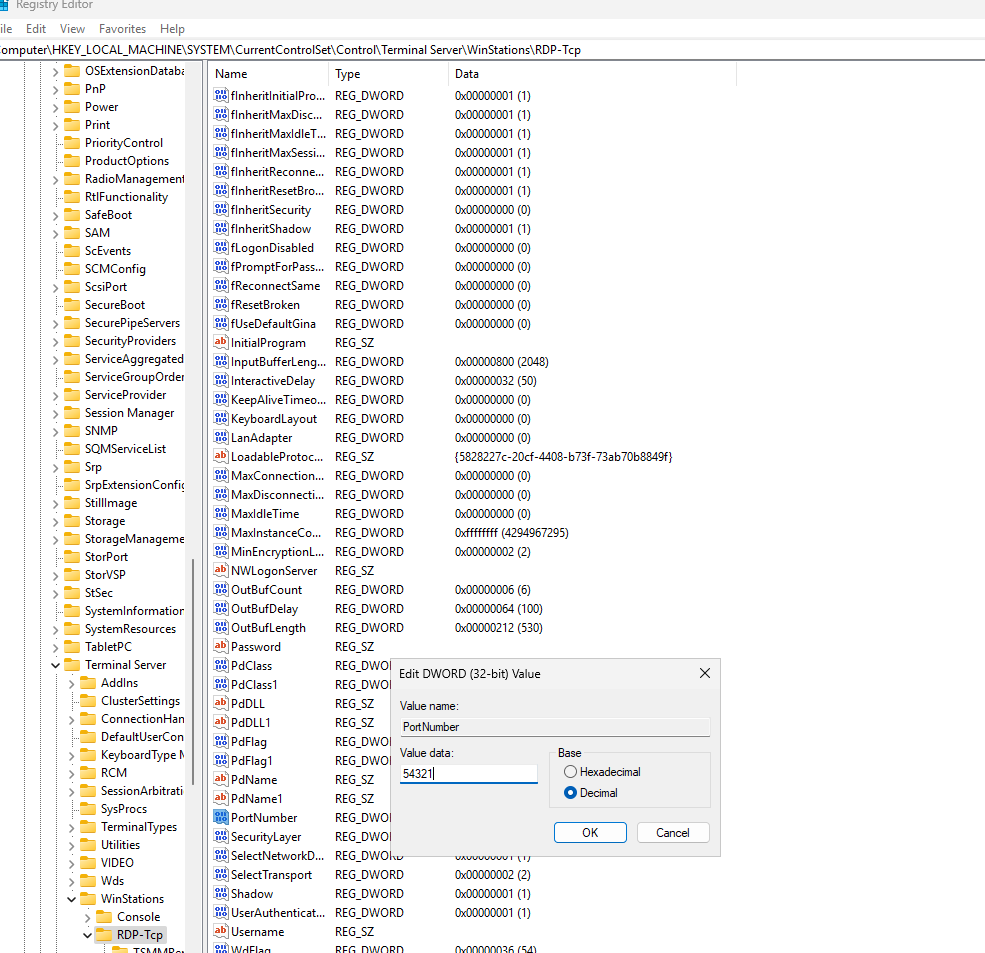
2. Navigate to the RDP key
In the address bar, paste this path:
HKEY_LOCAL_MACHINE\SYSTEM\CurrentControlSet\Control\Terminal Server\WinStations\RDP-Tcp
3. Modify the PortNumber value
Double-click on PortNumber
Select Decimal
Replace
3389with your new port (e.g.,54321)Click OK
4. Close regedit
The change is saved immediately. The RDP service must be restarted for it to take effect (see dedicated section).
 ⚡ Method 2: Via PowerShell (recommended)
Faster, reproducible, and scriptable. Open PowerShell as an administrator and execute the commands below.
Check the current RDP port:
Get-ItemProperty -Path 'HKLM:\SYSTEM\CurrentControlSet\Control\Terminal Server\WinStations\RDP-Tcp' -Name PortNumber
Change the RDP port (example: port 54321):
Set-ItemProperty -Path 'HKLM:\SYSTEM\CurrentControlSet\Control\Terminal Server\WinStations\RDP-Tcp' -Name PortNumber -Value 54321
Verify that the change is saved:
Get-ItemProperty -Path 'HKLM:\SYSTEM\CurrentControlSet\Control\Terminal Server\WinStations\RDP-Tcp' -Name PortNumber
Create the firewall rule in a single command:
New-NetFirewallRule -DisplayName "RDP Custom Port" -Direction Inbound -Protocol TCP -LocalPort 54321 -Action Allow
Remove the old RDP rule (optional but recommended):
Remove-NetFirewallRule -DisplayName "Remote Desktop - User Mode (TCP-In)"
Restart the RDP service without reboot:
Restart-Service -Name TermService -Force 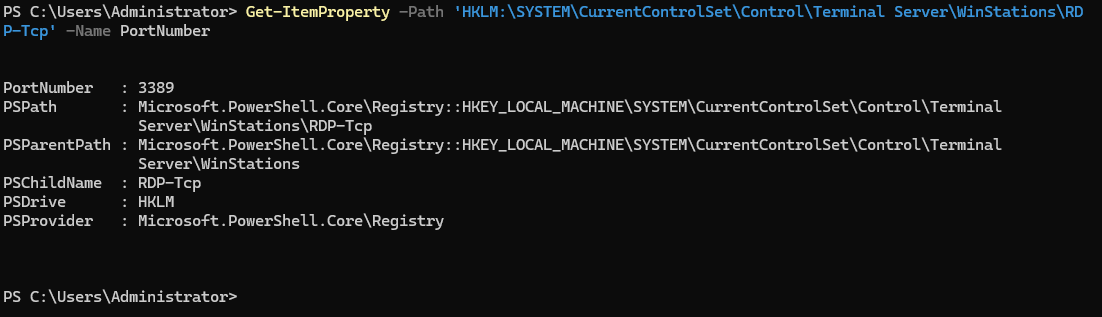 🔥 Update Windows Firewall Rules
This is the most critical step. If you restart the RDP service without having opened the new port in the firewall, you will lose access immediately.
Via the graphical interface (Windows Defender Firewall):
Open Windows Defender Firewall with Advanced Security (
wf.msc)Click on Inbound Rules → New Rule
Select Port → TCP → enter your new port (e.g.,
54321)Choose Allow the connection → apply to all profiles → name the rule
Click Finish
Via PowerShell (already included in Method 2):
New-NetFirewallRule -DisplayName "RDP Custom Port" -Direction Inbound -Protocol TCP -LocalPort 54321 -Action Allow
Block the old port 3389 (recommended):
New-NetFirewallRule -DisplayName "Block RDP Default Port" -Direction Inbound -Protocol TCP -LocalPort 3389 -Action Block
💡 Also remember to check the rules at your OuiHeberg infrastructure level. If an external firewall filters the ports, the new port must be opened there as well. Refer to our guide configure the Windows Server firewall for details.
🔄 Restart the RDP Service
Three options, from the fastest to the safest:
Option 1: PowerShell (no reboot, recommended):
Restart-Service -Name TermService -Force
Option 2: Services Manager:
Press
Win + R→ typeservices.mscFind Remote Desktop Services
Right-click → Restart
Option 3: Complete server restart:
The safest option if you want to ensure everything is clean. Use Restart-Computer or the Start menu.
✅ Verify that the change is active
Before logging out, confirm that the new port is indeed listening.
Method 1: netstat (CMD or PowerShell):
netstat -an | findstr :54321
You should see a line with 0.0.0.0:54321 in LISTENING state.
Method 2: Windows Settings:
Settings → System → Remote Desktop → Advanced settings → the displayed port should match the new one.
Method 3: Connection Test:
From another machine, open mstsc and connect using IP:54321. If the RDP connection window appears, you are good to go.
📸 [Placeholder screenshot: netstat -an result showing the new port in LISTENING state]
🔗 Connect with the New Port
The syntax changes slightly depending on the client used.
Windows: mstsc:
In the "Computer" field, enter: 203.0.113.10:54321
To save the connection as a .rdp file: Show Options → Save As.
macOS: Microsoft Remote Desktop:
Edit the connection → Port field → enter 54321.
Linux: Remmina:
In the connection settings, Port field → 54321.
Linux: rdesktop:
rdesktop -u Administrator -p 54321 203.0.113.10:54321
For more details on the initial connection, refer to our guide connecting to your Windows VPS via RDP.
🛡️ Going Further: Fully Securing RDP
Changing the port is a start. Here’s what really makes a difference.
Enable NLA (Network Level Authentication):
Set-ItemProperty -Path 'HKLM:\SYSTEM\CurrentControlSet\Control\Terminal Server' -Name UserAuthentication -Value 1
NLA requires authentication before establishing the RDP session: it blocks attacks that exploit the negotiation phase.
Create a dedicated RDP user:
Never expose the Administrator account over RDP. Create a dedicated account with limited rights, added to the "Remote Desktop Users" group.
Restrict RDP access by IP:
In the firewall rule, use the -RemoteAddress parameter to allow only your known IPs:
New-NetFirewallRule -DisplayName "RDP Custom Port IP Restricted" -Direction Inbound -Protocol TCP -LocalPort 54321 -RemoteAddress 203.0.113.5 -Action Allow
Enable account lockout policy:
Via secpol.msc → Account Policies → Account Lockout Policy → 5 max attempts.
VPN + RDP:
The most secure option: do not expose RDP on the Internet at all. Connect to the VPN first, then RDP to the private IP.
For further details on firewall configuration, refer to our comprehensive guide: configure the Windows Server firewall on a VPS.
🚨 Troubleshooting: Common Issues
1. Unable to connect after changing the port
Probable cause: the firewall rule was not created or is not active.
Check existing rules:
Get-NetFirewallRule | Where-Object { $_.DisplayName -like "*RDP*" }
Recreate the rule if necessary:
New-NetFirewallRule -DisplayName "RDP Custom Port" -Direction Inbound -Protocol TCP -LocalPort 54321 -Action Allow
2. Port already in use by another service
Check if the port is free before using it:
netstat -an | findstr :54321
If a line appears, choose another port in the 49152–65535 range.
3. The RDP service does not restart
Check the event logs to identify the error:
Get-EventLog -LogName System -Source "TermService" -Newest 10
Also check in the Event Viewer → Windows Logs → System → filter by source "TermService".
4. The external firewall blocks the new port
If you are using a OuiHeberg VPS, check that the port is open at the infrastructure level in your client area. The Windows firewall and the network firewall are two distinct layers.
5. You forgot the new RDP port
Retrieve it directly from the registry:
Get-ItemProperty -Path 'HKLM:\SYSTEM\CurrentControlSet\Control\Terminal Server\WinStations\RDP-Tcp' -Name PortNumber
❓ FAQ
Which port to choose to replace 3389?
Choose a port in the 49152–65535 range (IANA dynamic ports). These ports are rarely scanned by bots. Avoid well-known ports like 443, 8080, or 22. A port like 54321 or 59876 works perfectly.
Is changing the RDP port enough to secure my VPS?
No. It reduces the volume of automated attacks, but a targeted scanner will find the port in minutes. Combine this change with enabled NLA, a dedicated non-administrator account, IP access restriction, and an account lockout policy.
How do I connect via RDP with a custom port?
On Windows, use mstsc with the syntax IP:PORT in the "Computer" field (e.g., 203.0.113.10:54321). On macOS with Microsoft Remote Desktop, modify the Port field in the connection settings. On Linux, Remmina offers a dedicated Port field.
Do I need to restart the server after the change?
No, a complete restart is not necessary. Just restart the RDP service with Restart-Service -Name TermService -Force. The change is immediately active.
Can I change the RDP port without administrator access?
No. Modifying the registry and creating firewall rules require local administrator rights. Without these rights, the commands will fail with an access denied error.
How do I verify that the new RDP port is open?
Run netstat -an | findstr :54321 in CMD or PowerShell. If you see 0.0.0.0:54321 LISTENING, the service is indeed listening on that port. You can also test from an external machine with mstsc by entering IP:54321.
🔗 Useful Sources
Need a high-performance Windows VPS? Check out our Windows VPS offers.