Hosting a Discord Bot (Python) on OuiPanel
Estimated Time: 15 minutes
Difficulty: Intermediate ⭐⭐
Server Type: Python
📋 Introduction
This guide explains how to host a Discord bot developed with discord.py (Python) on OuiPanel. Your bot will be online 24/7.
What You Need
| Requirement | Description |
|---|---|
| 🤖 A Discord bot | Created on the Discord Developer Portal |
| 🔑 The bot's token | Secret key to connect your bot |
| 📁 The bot's files | Your source code (bot.py, requirements.txt, etc.) |
| 🐍 A Python server | Ordered on OuiHeberg |
🤖 Step 1: Create the Bot on Discord
If you already have your bot and its token, proceed to step 2
Create the Application
- Go to the Discord Developer Portal
- Log in with your Discord account
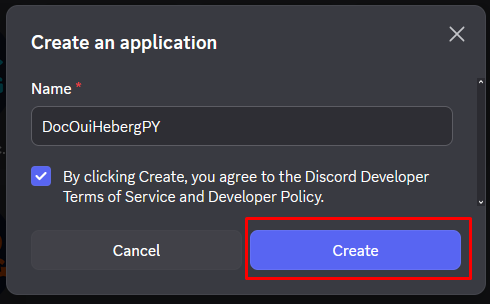
- Click on New Application

- Give a name to your application (e.g., "My Python Bot")
- Accept the terms of service
- Click on Create
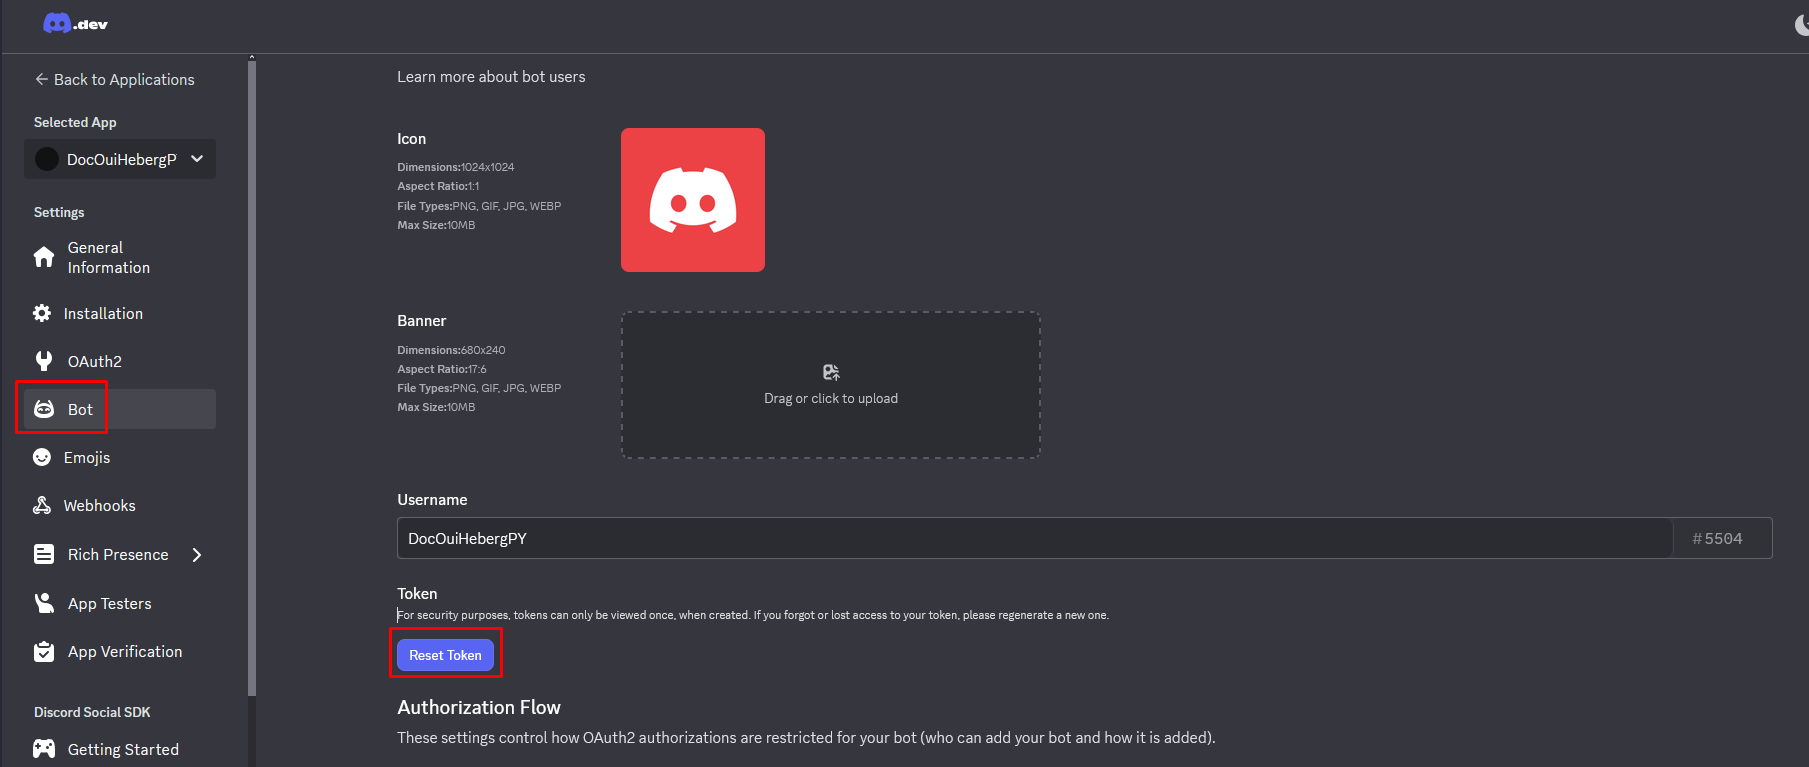
Get the Token
The token is the secret key that allows your code to connect to the bot.
- In the Bot section, find the TOKEN area
- Click on Reset Token
- Confirm by clicking on Yes, do it!
- Click on Copy to copy the token
⚠️ IMPORTANT - SECURITY :
- The token is like a password. NEVER share it!
- Never place it in public code (GitHub, GitLab, etc.)
- If your token is compromised, regenerate it immediately
- Keep it in a safe place for the next step
Enable Intents
Intents allow your bot to access certain information (messages, members, etc.).
- Still in the Bot section, scroll down to Privileged Gateway Intents
- Enable the necessary intents:
| Intent | Description | Recommendation |
|---|---|---|
PRESENCE INTENT | See members' status | Optional |
SERVER MEMBERS INTENT | Access the list of members | Optional |
MESSAGE CONTENT INTENT | Read message content | ✅ Required |
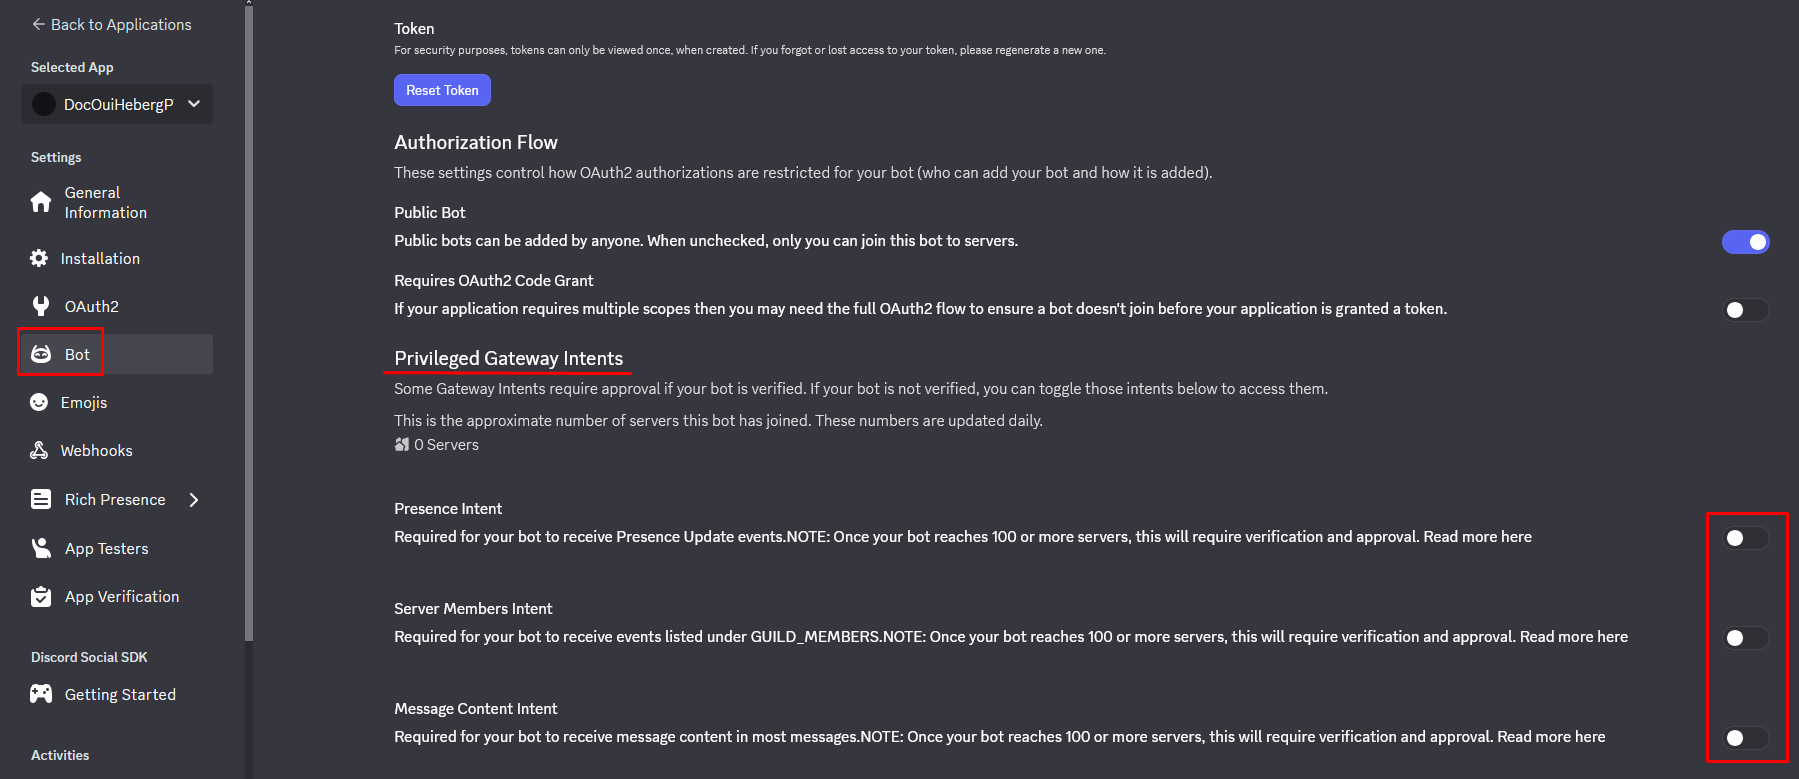
- Click on Save Changes
⚠️ Important: Without
MESSAGE CONTENT INTENT, your bot won't be able to read users' message content.
Invite the Bot to Your Discord Server
- In the left menu, click on OAuth2
- Click on URL Generator
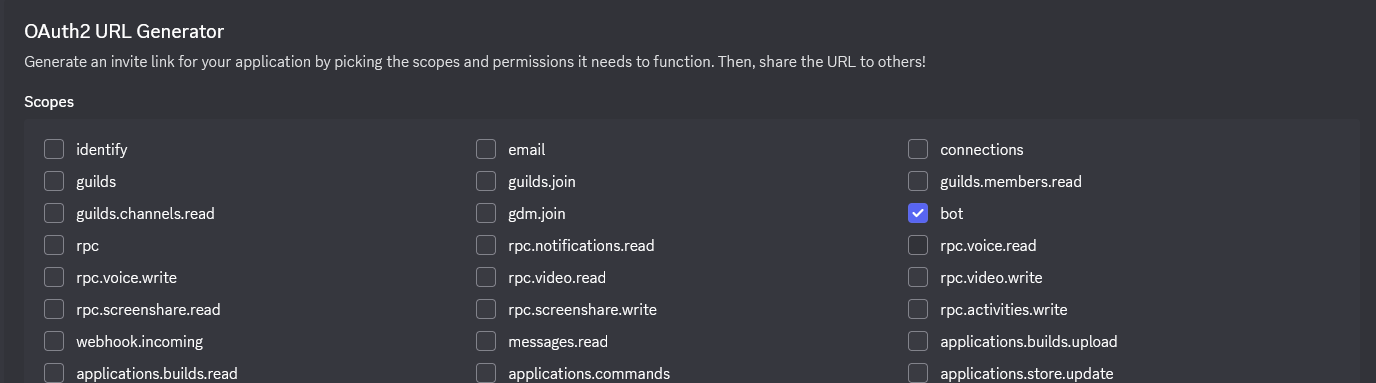
- In the SCOPES section, check :
- ✅
bot
- ✅
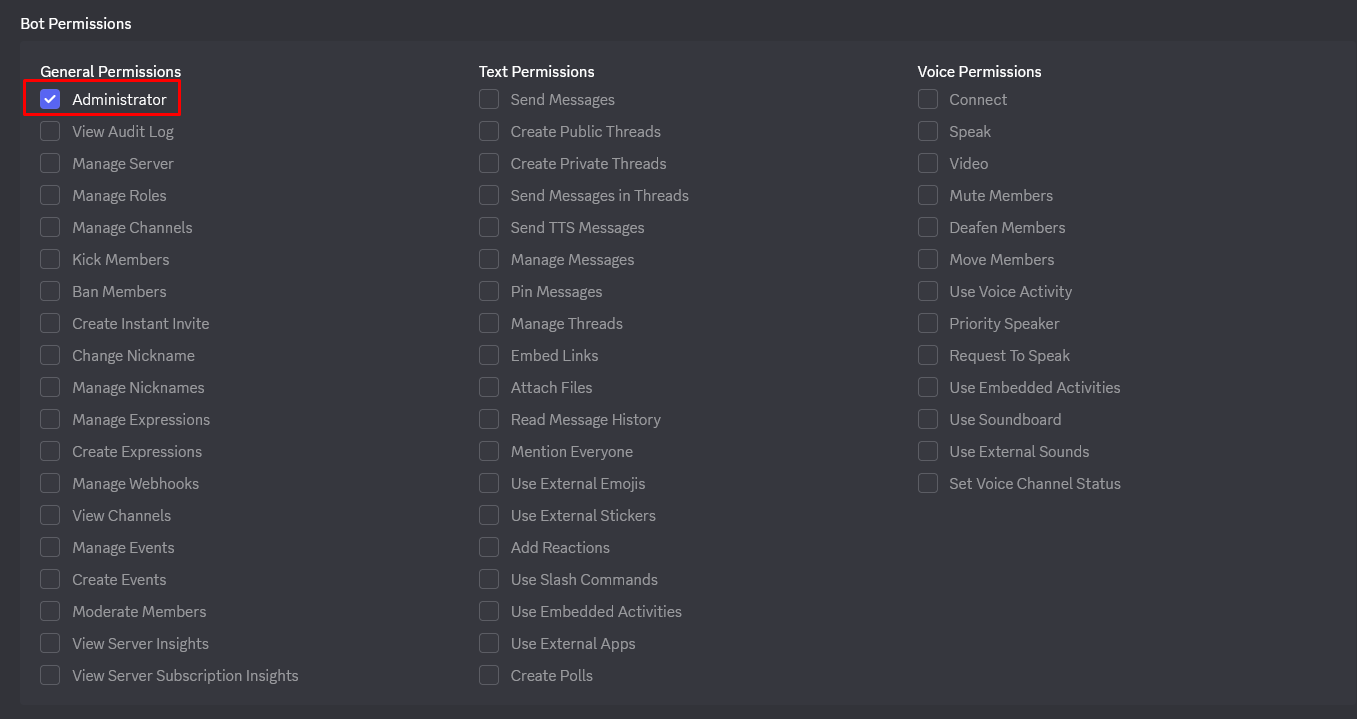
- In the BOT PERMISSIONS section, check the necessary permissions:
| Permission | Description |
|---|---|
Administrator | All permissions (simple but broad) |
| OR specific permissions: | |
Send Messages | Send messages |
Read Message History | Read history |
Embed Links | Send embeds |
Attach Files | Send files |
Use Slash Commands | Use slash commands |
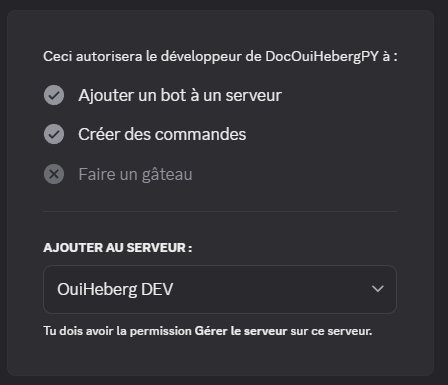
- At the bottom of the page, copy the generated URL

- Open this URL in your browser
- Select the server to invite the bot
- Click on Authorize
- Complete the captcha if prompted
✅ Your bot now appears in the member list of your server (currently offline).
📁 Step 2: Prepare the Bot's Files
File Structure
Your bot must have this structure:
📁 MyPythonBot/
├── 📄 bot.py             ← Main file (or main.py, index.py...)
├── 📄 requirements.txt   ← Python dependencies
├── 📄 .env               ← Bot's token (created on the server)
└── 📁 cogs/              ← (Optional) Modules folder
requirements.txt File
Create a requirements.txt file with the dependencies discord.py and python-dotenv:
audioop-lts==0.2.1
discord.py==2.3.2
python-dotenv==1.0.0
💡 These two packages are essential:
discord.py: The library for interacting with Discordpython-dotenv: To load the token from the.envfile
Main File (bot.py)
Create your main file with python-dotenv to load the token:
import os
import discord
from discord.ext import commands
from dotenv import load_dotenv

# Load environment variables from .env
load_dotenv()

# Intents configuration
intents = discord.Intents.default()
intents.message_content = True

# Bot creation with a prefix
bot = commands.Bot(command_prefix='!', intents=intents)

# Event: Bot ready
@bot.event
async def on_ready():
    print(f'✅ Bot connected as {bot.user.name}')
    print(f'📊 Connected to {len(bot.guilds)} server(s)')

# Command: !ping
@bot.command()
async def ping(ctx):
    """Responds Pong with latency"""
    latency = round(bot.latency * 1000)
    await ctx.send(f'🏓 Pong! Latency: {latency}ms')

# Command: !hello
@bot.command()
async def hello(ctx):
    """Says hello"""
    await ctx.send(f'👋 Hello {ctx.author.name}!')

# Error handling
@bot.event
async def on_command_error(ctx, error):
    if isinstance(error, commands.CommandNotFound):
        await ctx.send('❌ Unknown command.')
    else:
        print(f'Error: {error}')

# Connect with the token from .env
bot.run(os.getenv('DISCORD_TOKEN'))
⚠️ Important:
load_dotenv()must be called before usingos.getenv().
📤 Step 3: Upload Files to OuiPanel
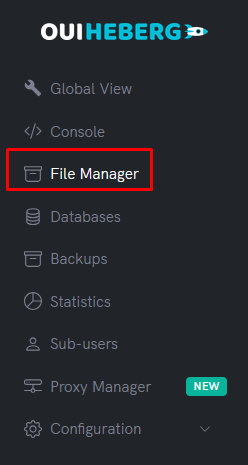
Using the File Manager
- Log in to OuiPanel
- Select your Python server
- In the side menu, click on File Manager
- Delete default files (if any)
- Click on Upload
- Upload your files:
bot.py(ormain.py,index.py...)requirements.txt- Your folders (
cogs/...) if needed

⚠️ Do not upload: The
.envfile will be created directly on the server in the next step (more secure).
Using SFTP (Recommended for multiple files)
- Connect via SFTP with FileZilla
- Drag and drop all the content from your bot folder
- Ensure all files are successfully uploaded
📖 Check the guide "SFTP Access with FileZilla" for detailed instructions.
🔑 Step 4: Create the .env File (Token)
Never put your token directly in the code! Create a .env file on the server.
Create the .env file
- In the File Manager, click on New file
- Name it
.env(with the dot in front) - Add the following content:
# Discord bot token
DISCORD_TOKEN=your_token_here

- Replace
your_token_herewith the token copied in Step 1 - Click on Create or Save
Example with a real token (format):
DISCORD_TOKEN=MTIzNDU2Nzg5MDEyMzQ1Njc4OQ.ABcdEF.abcdefghijklmnopqrstuvwxyz123456
Example with multiple variables:
# Discord bot token
DISCORD_TOKEN=MTIzNDU2Nzg5MDEyMzQ1Njc4OQ.ABcdEF.abcdefghijklmnopqrstuvwxyz123456

# Command prefix
PREFIX=!

# Owner ID (optional)
OWNER_ID=123456789012345678
⚠️ Important:
- No spaces around the
=- No quotes around the values
- Never share this file
Final Structure on the Server
📁 Root of the server/
├── 📄 .env               ← Contains DISCORD_TOKEN
├── 📄 bot.py             ← Your code
├── 📄 requirements.txt   ← Dependencies
└── ...
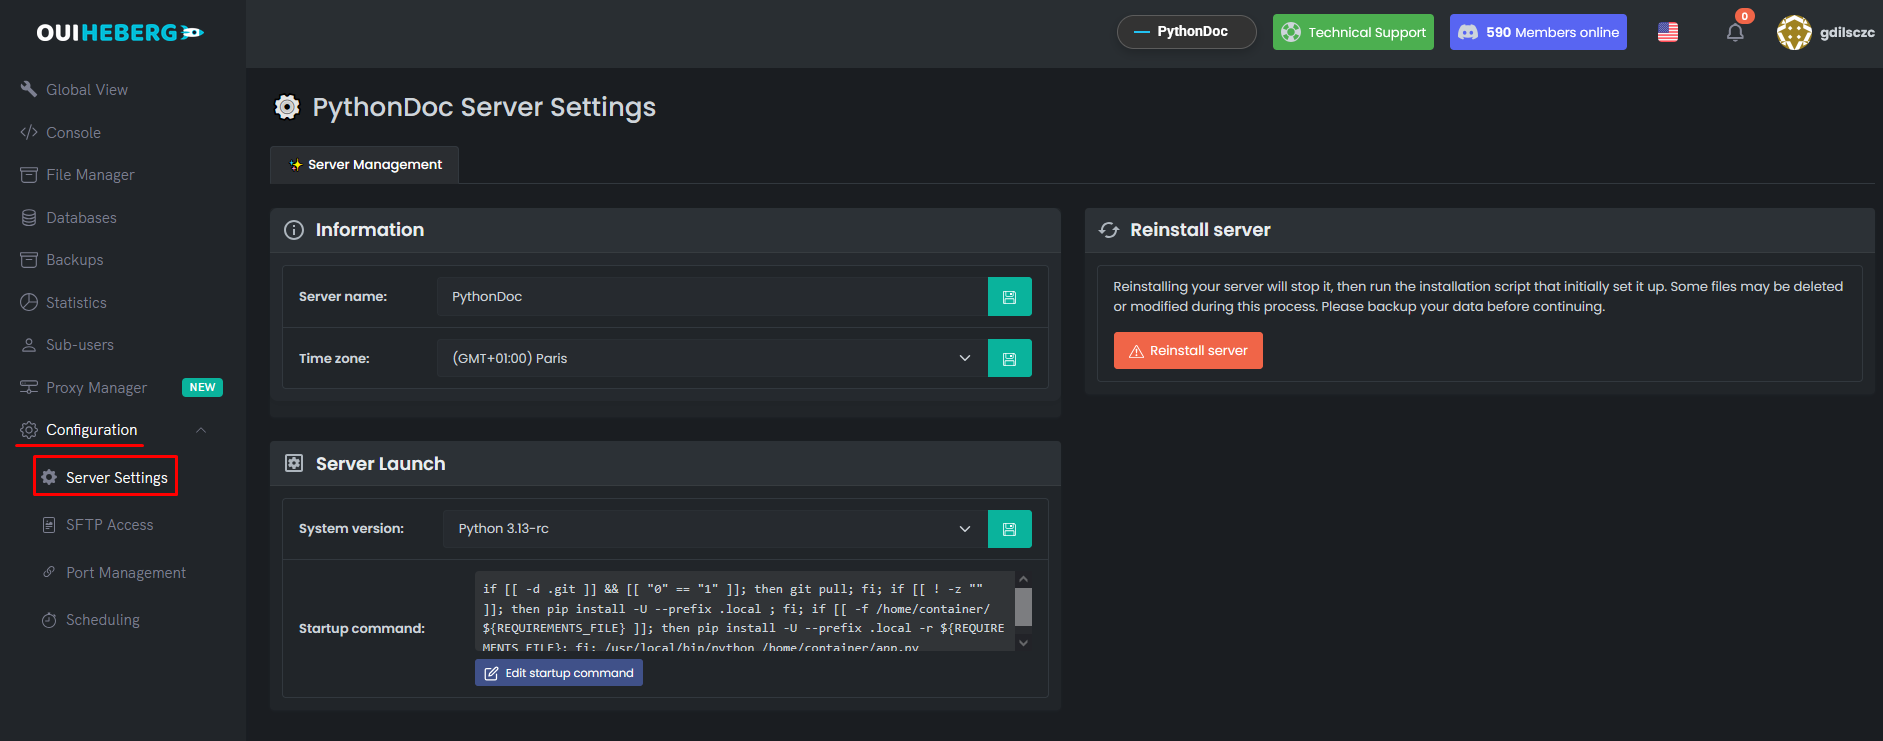
⚙️ Step 5: Configure the Startup File
OuiPanel needs to know which Python file to run at startup.
Accessing the settings
- In the side menu, click on Configuration
- Click on Server Settings
Configuring the file to execute
Locate the File to execute field:
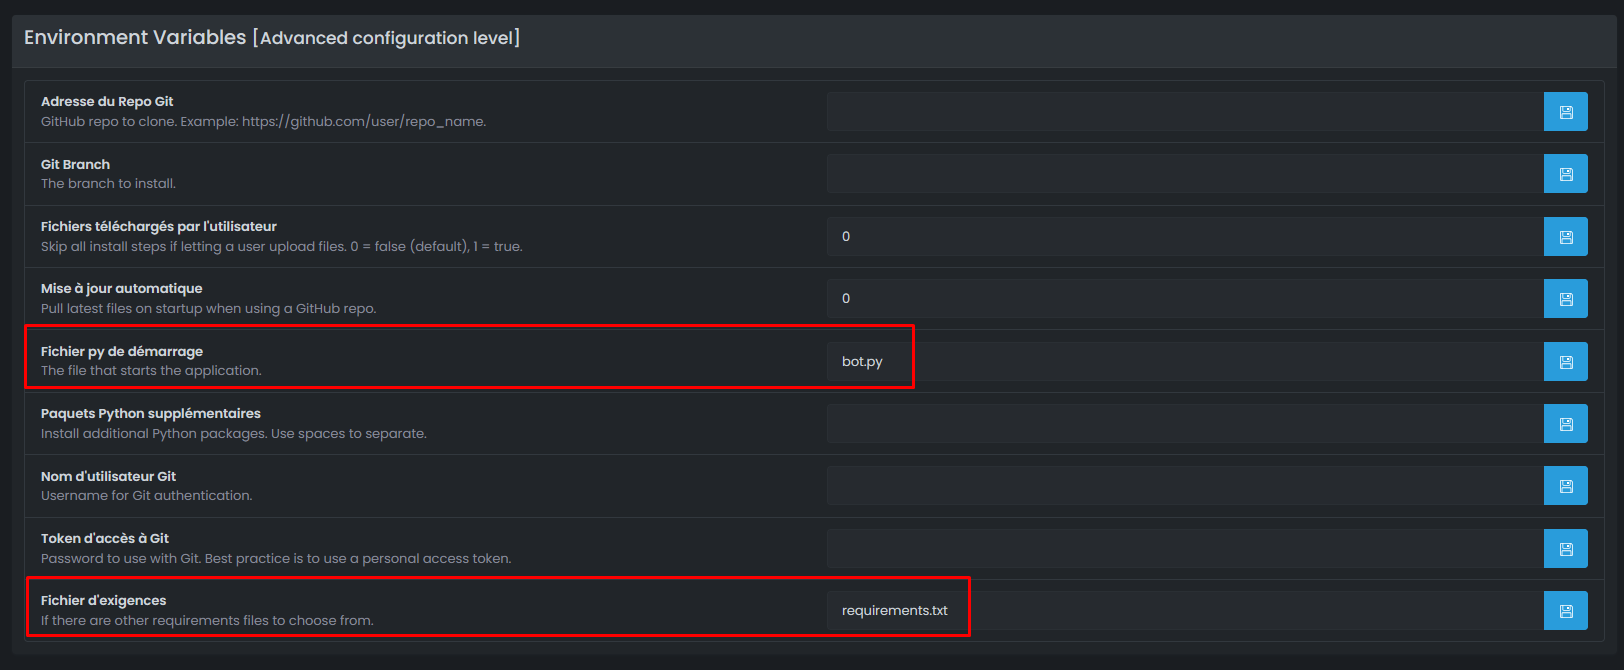
| Your main file | Value to set |
|---|---|
bot.py | bot.py |
main.py | main.py |
index.py | index.py |
app.py | app.py |
src/bot.py | src/bot.py |
⚠️ Important: The name must match exactly your file (case-sensitive).
🚀 Step 6: Start the Bot
Launching the server
- In the side menu, click on Console
- Click on Start
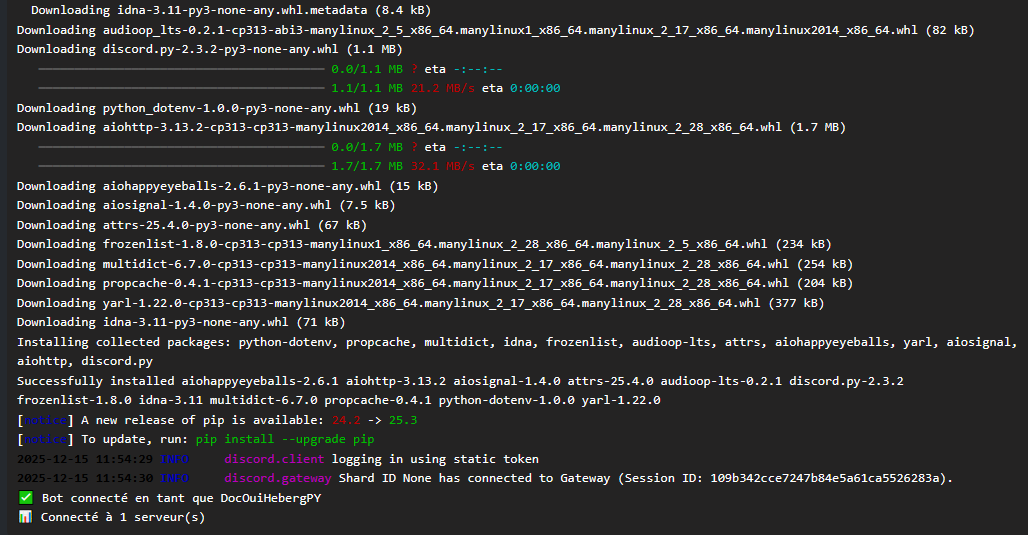
Automatic installation of dependencies
On the first start, the server automatically installs packages from requirements.txt:
Installing requirements from requirements.txt...
Collecting discord.py==2.3.2
Collecting python-dotenv==1.0.0
Successfully installed discord.py-2.3.2 python-dotenv-1.0.0

Running bot.py...
✅ Bot connected as MyBot
📊 Connected to 1 server(s)
✅ Step 7: Verify the Bot is Working
In the OuiPanel Console
You should see:
✅ Bot connected as MyBot
📊 Connected to 1 server(s)
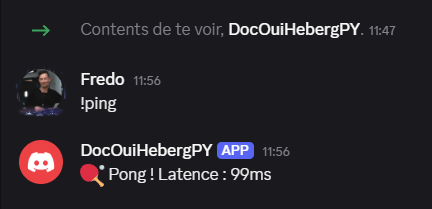
On Discord
- Open Discord
- Go to the server where you invited the bot
- Your bot should appear online (green dot)
- Test a command:
!ping - The bot responds: 🏓 Pong! Latency: XXms
🔧 Troubleshooting
The bot doesn't start
| ❌ Error | ✅ Solution |
|---|---|
ModuleNotFoundError: No module named 'discord' | Check requirements.txt and restart |
ModuleNotFoundError: No module named 'dotenv' | Add python-dotenv to requirements.txt |
FileNotFoundError: bot.py | Incorrect startup file configured |
SyntaxError | Error in your Python code |
Token Error
| ❌ Error | ✅ Solution |
|---|---|
LoginFailure: Improper token has been passed | Check the token in .env |
HTTPException: 401 Unauthorized | Invalid token, regenerate it |
PrivilegedIntentsRequired | Enable intents on the Discord portal |
Bot Not Reading Messages
| ❌ Cause | ✅ Solution |
|---|---|
| MESSAGE CONTENT INTENT disabled | Enable it on the Discord portal |
| Intents misconfigured in the code | Add intents.message_content = True |
Check your code:
intents = discord.Intents.default()
intents.message_content = True  # This line is mandatory!
.env File Not Being Read
| ❌ Cause | ✅ Solution |
|---|---|
| python-dotenv not installed | Check requirements.txt |
| load_dotenv() not called | Add load_dotenv() before os.getenv() |
| Incorrectly named file | The file must be named exactly .env |
| Incorrect format | No spaces around the = |
pip install Fails
| ❌ Error | ✅ Solution |
|---|---|
requirements.txt not found | Ensure the file is at the root |
Could not find a version | Check package names and versions |
🔒 Securing the .env File
| ✅ To Do | ❌ Not To Do |
|---|---|
Keep the .env file only on the server | Share the .env file |
Create the .env file directly on OuiPanel | Put the token in the code |
Add .env to .gitignore | Commit the .env to GitHub |
Recommended .gitignore file:
# Environment variables
.env
.env.local

# Python
__pycache__/
*.py[cod]
venv/
💡 Best Practices
Security
- ✅ Never share your token
- ✅ Create the
.envfile directly on the server - ✅ Regenerate the token if compromised
Performance
- ✅ Only enable the necessary intents
- ✅ Use
commands.Botinstead ofdiscord.Clientfor commands - ✅ Use Cogs to organize your code
Code
- ✅ Handle errors with try/except
- ✅ Add logs with
print()or theloggingmodule - ✅ Use Cogs for large bots
📂 Advanced Structure with Cogs (Recommended)
For a more organized bot:
📁 MyPythonBot/
├── 📄 bot.py               ← Entry point
├── 📄 requirements.txt
├── 📄 .env                 ← Created on the server
├── 📁 cogs/
│   ├── 📄 moderation.py    ← Moderation commands
│   ├── 📄 fun.py           ← Fun commands
│   └── 📄 utility.py       ← Utility commands
└── 📄 config.py            ← Non-sensitive configuration
Example of bot.py with Cogs:
import os
import discord
from discord.ext import commands
from dotenv import load_dotenv

load_dotenv()

intents = discord.Intents.default()
intents.message_content = True

bot = commands.Bot(command_prefix='!', intents=intents)

# Load cogs on startup
@bot.event
async def on_ready():
    print(f'✅ Bot connected as {bot.user.name}')

    # Load cogs
    for filename in os.listdir('./cogs'):
        if filename.endswith('.py'):
            await bot.load_extension(f'cogs.{filename[:-3]}')
            print(f'📦 Cog loaded: {filename}')

bot.run(os.getenv('DISCORD_TOKEN'))
Example of a cog (cogs/fun.py):
import discord
from discord.ext import commands

class Fun(commands.Cog):
    def __init__(self, bot):
        self.bot = bot

    @commands.command()
    async def ping(self, ctx):
        """Responds Pong!"""
        latency = round(self.bot.latency * 1000)
        await ctx.send(f'🏓 Pong! Latency: {latency}ms')

    @commands.command()
    async def hello(self, ctx):
        """Says hello"""
        await ctx.send(f'👋 Hello {ctx.author.name}!')

async def setup(bot):
    await bot.add_cog(Fun(bot))
📝 Summary
1. Create the bot on Discord Developer Portal
2. Get the Token (Reset Token → Copy)
3. Enable MESSAGE CONTENT INTENT
4. Invite the bot (OAuth2 → URL Generator → bot + applications.commands)
5. Prepare files (bot.py + requirements.txt with python-dotenv)
6. Upload files to OuiPanel (without the .env)
7. Create the .env file on the server with the token
8. Configure the startup file (bot.py, main.py...)
9. Start the server
10. Check that the bot is online on Discord → !pingNeed Python hosting?
Deploy your Python applications with our optimized hosting and dedicated support.