
Estimated Time: 15-20 minutes
Difficulty: Intermediate ⭐⭐
Prerequisites: Java Minecraft Server (Paper/Spigot), available additional port
📋 Introduction
Dynmap and BlueMap are plugins that generate an interactive web map of your Minecraft world, accessible from any browser. Players can explore the map, see real-time positions, and discover constructions.
Dynmap vs BlueMap Comparison
| Criterion | Dynmap | BlueMap |
|---|---|---|
| Rendering | 2D (satellite view) | 3D (isometric) |
| Disk Space | ⭐⭐ Moderate | ⭐⭐⭐ Higher |
| Performance | ⭐⭐⭐ Good | ⭐⭐ Moderate |
| Visual Quality | ⭐⭐⭐ Good | ⭐⭐⭐⭐⭐ Excellent |
| Configuration | ⭐⭐⭐ Simple | ⭐⭐⭐⭐ Very simple |
| Extensions | ⭐⭐⭐⭐⭐ Numerous | ⭐⭐⭐ Some |
| Resources | Light | More demanding |
Map Examples
Dynmap: 2D satellite view with zoom
┌──────────────────────────────┐
│  🗺️ 2D Google Maps Type Map   │
│  - Top-down view             │
│  - Multi-level zoom           │
│  - Markers and zones          │
└──────────────────────────────┘
BlueMap: Immersive isometric 3D view
┌──────────────────────────────┐
│  🏔️ 3D Isometric Map         │
│  - Free rotation              │
│  - 3D building view           │
│  - Highly detailed            │
└──────────────────────────────┘
🔧 Prerequisites
Compatible Server Type
| Type | Dynmap | BlueMap |
|---|---|---|
| Paper | ✅ | ✅ |
| Spigot | ✅ | ✅ |
| Purpur | ✅ | ✅ |
| Fabric | ✅ (mod) | ✅ (mod) |
| Forge | ✅ (mod) | ✅ (mod) |
| Vanilla | ❌ | ❌ |
Additional Required Port
Web maps require an additional HTTP port:
| Service | Default Port |
|---|---|
| Minecraft | 25565 |
| Dynmap | 8123 |
| BlueMap | 8100 |
💡 On OuiPanel, you will need to create an additional port allocation.
🗺️ Option A: Install Dynmap
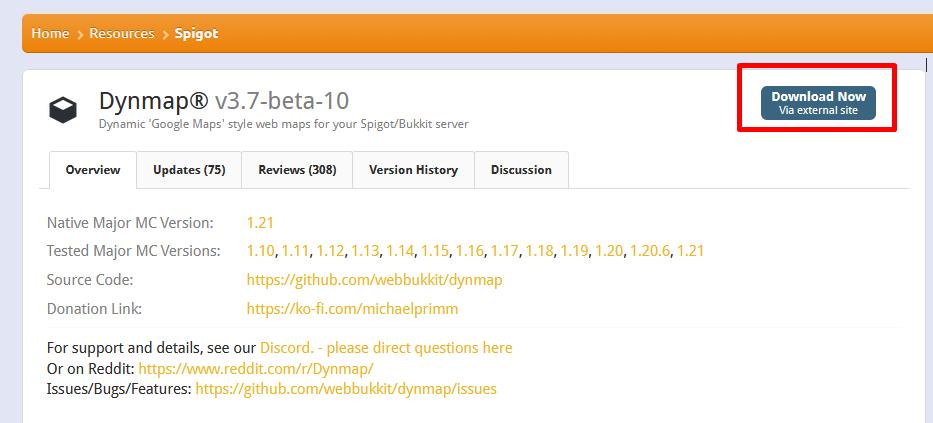
Step 1: Download Dynmap
- Go to spigotmc.org/resources/dynmap.274
- Click on Download
- Download the version corresponding to your Minecraft version
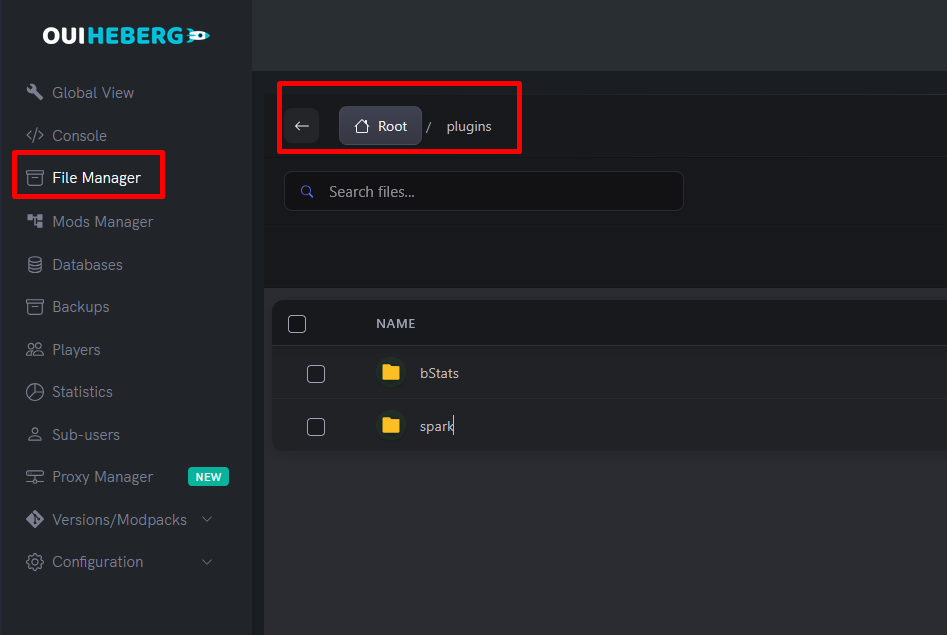
Step 2: Upload the Plugin
- Log in to OuiPanel
- Select your Minecraft server
- Go to the File Manager
- Navigate to the
pluginsfolder - Click on Upload and upload
Dynmap-*.jar
Step 3: First Startup
- Go to the Console
- Start the server
- Wait for Dynmap to generate its configuration files:
[INFO]: [dynmap] Loaded 3 maps of world 'world'
[INFO]: [dynmap] Enabled
[INFO]: [dynmap] Web server started on address 0.0.0.0:8123
- Stop the server to configure
Step 4: Create a Dedicated Port
- In OuiPanel, go to Configuration → Port Management
- Click on Add a Port
- Note the assigned port (e.g.,
8123or other) - Add a note: "Dynmap Port"

Step 5: Configure Dynmap
- In the File Manager, navigate to:
/plugins/dynmap/configuration.txt - Click to edit the file
Web Port Configuration
Find and modify these lines (around line 315):
# Web server bind address
webserver-bindaddress: 0.0.0.0

# Web server port (replace with your assigned port)
webserver-port: 8123
⚠️ Important: Replace
8123with the port you obtained in step 4!
Quality Configuration (Recommended)
To avoid server overload, change the rendering quality (line 16):
# Rendering quality (vlowres, lowres, hires)
deftemplatesuffix: lowres
| Quality | Details | Disk Space | Performance |
|---|---|---|---|
vlowres | Very low | ⭐ Minimal | ⭐⭐⭐⭐⭐ Excellent |
lowres | Low | ⭐⭐ Low | ⭐⭐⭐⭐ Very good |
hires | High | ⭐⭐⭐⭐⭐ High | ⭐⭐ Demanding |
💡 Tip: Start with
lowresand switch tohiresonly if your server has enough resources.
Recommended Full Configuration
# Rendering quality
deftemplatesuffix: lowres

# Rendering messages in chat
renderacceleratethreshold: 60
updaterate: 2000

# Integrated web server
webserver-bindaddress: 0.0.0.0
webserver-port: 8123

# Max number of tiles in queue
parallelrendercnt: 4
tileupdatedelay: 30

# Web chat
allowwebchat: true
webchat-interval: 5

# Player visibility
player-info-protected: false
showplayerfacesinmenu: true
Step 6: Restart and Access the Map
- Start the server
- Wait for the message:
[INFO]: [dynmap] Web server started on address 0.0.0.0:8123 - Open your browser and access:
Example:http://YOUR_IP:YOUR_PORThttp://123.456.789.0:8123
Step 7: Generate the Map
The map generates automatically as players explore. To generate manually:
/dynmap fullrender world
⚠️ Warning: Fullrender can take time and consume resources. Use a world border (
/worldborder) to limit the area.
Dynmap Commands
| Command | Description |
|---|---|
/dynmap fullrender [world] | Renders the entire world |
/dynmap cancelrender [world] | Cancels the ongoing render |
/dynmap pause all | Pauses all renders |
/dynmap pause none | Resumes renders |
/dynmap stats | Displays statistics |
/dynmap hide | Hides your position on the map |
/dynmap show | Shows your position |
/dmarker add <name> | Adds a marker |
🏔️ Option B: Install BlueMap
Step 1: Download BlueMap
- Go to bluemap.bluecolored.de or modrinth.com/plugin/bluemap
- Download the version corresponding to your server:
| Server | File |
|---|---|
| Paper / Spigot | BlueMap-*-spigot.jar |
| Fabric | BlueMap-*-fabric.jar |
| Forge | BlueMap-*-forge.jar |
Step 2: Upload the plugin
- In the File Manager, navigate to
plugins - Upload the file
BlueMap-*.jar
Step 3: First startup and acceptance
- Start the server
- BlueMap will create its files and display:
[BlueMap] BlueMap needs to download some resources from Mojang.[BlueMap] Please accept the Minecraft EULA and change 'accept-download' to 'true' in config. - Stop the server
Step 4: Accept the terms
- Navigate to
/plugins/BlueMap/(or/config/bluemap/for Fabric) - Open the file
core.conf - Modify:
accept-download: true - Save
Step 5: Create a dedicated port
- In Configuration → Port Management
- Add a new port
- Note the assigned port (e.g.,
8100)
Step 6: Configure the web server
- Open the file
webserver.confin/plugins/BlueMap/ - Modify the configuration:
# Enable the integrated web server
enabled: true

# Listen address
ip: "0.0.0.0"

# Web server port (your assigned port)
port: 8100

# Maximum connections
max-connections: 100
Step 7: World configuration (optional)
Open maps/world.conf to customize:
# Name displayed on the map
name: "My World"

# Starting position
start-pos: {x: 0, z: 0}

# Map boundaries (optional)
min-x: -5000
max-x: 5000
min-z: -5000
max-z: 5000

# Cave rendering
render-caves: true

# Sky color
sky-color: "#7dabff"
Step 8: Restart and access
- Start the server
- Wait for the messages:
[BlueMap] WebServer started![BlueMap] Loaded 1 map(s) - Access the map:
http://YOUR_IP:YOUR_PORT
BlueMap Commands
| Command | Description |
|---|---|
/bluemap render [world] | Starts rendering a world |
/bluemap pause | Pauses rendering |
/bluemap resume | Resumes rendering |
/bluemap cancel | Cancels the ongoing render |
/bluemap reload | Reloads the configuration |
/bluemap maps | Lists the maps |
/bluemap version | BlueMap version |
🌐 Configuration with Proxy Manager (Subdomain)
OuiPanel offers a Proxy Manager that allows accessing your map via a subdomain instead of a port.
Advantages of Proxy Manager
| Without Proxy | With Proxy |
|---|---|
http://123.456.789.0:8123 | https://map.yourserver.com |
| Remembering a port | Simple URL |
| Non-secure HTTP | Secure HTTPS |
Configure the Proxy Manager
- In OuiPanel, go to Proxy Manager
- Click on Add Rule
- Fill in the fields:
| Field | Value |
|---|---|
| Subdomain | map (or carte, dynmap, etc.) |
| Domain | Your domain (e.g., yourserver.ouiheberg.fr) |
| Target Port | Your map's port (e.g., 8123) |
| HTTPS | Enabled (recommended) |
- Click on Create
Result
Your map will be accessible via:
https://map.yourserver.ouiheberg.fr
Instead of:
http://123.456.789.0:8123
🎨 Customization
Dynmap: Adding Markers
Through in-game commands
/dmarker add "Main Spawn" icon:tower
/dmarker add "Shop" icon:chest
/dmarker add "PvP Arena" icon:skull
Available Icons
| Icon | Name |
|---|---|
| 🏠 | house |
| 📦 | chest |
| ⚔️ | skull |
| 🏰 | tower |
| ⛏️ | minecart |
| 🌟 | star |
| 🚩 | redflag |
BlueMap: Adding Markers
Create a file in /plugins/BlueMap/markers/markers.json:
{
  "markers": [
    {
      "id": "spawn",
      "type": "poi",
      "label": "Spawn",
      "position": {"x": 0, "y": 64, "z": 0},
      "icon": "assets/poi.svg"
    },
    {
      "id": "shop",
      "type": "poi",
      "label": "Shop",
      "position": {"x": 100, "y": 64, "z": -50}
    }
  ]
}
Dynmap: Integration with Plugins
Dynmap can display areas from popular plugins:
| Plugin | Dynmap Add-on |
|---|---|
| WorldGuard | Dynmap-WorldGuard |
| Towny | Dynmap-Towny |
| Factions | Dynmap-Factions |
| GriefPrevention | Dynmap-GriefPrevention |
| Residence | Dynmap-Residence |
Installation: Download the add-on and place it in /plugins/.
⚡ Performance Optimization
Limiting the Rendering Area
Before launching a full render, set a world border:
/worldborder set 10000
This limits the render to 10,000 blocks around the spawn.
Optimized Dynmap Configuration
# Reduce update frequency
updaterate: 3000
tileupdatedelay: 60

# Limit parallel renders
parallelrendercnt: 2

# Disable heavy features
smooth-lighting: false
better-grass: false
Optimized BlueMap Configuration
In core.conf:
# Render threads (adjust according to RAM)
render-threads: 2

# Update interval (in seconds)
update-interval: 300
🔧 Troubleshooting
Map is not accessible
| Cause | Solution |
|---|---|
| Wrong port | Check the port in the config and OuiPanel |
| Port not created | Create an allocation in Port Management |
| Firewall | Ensure the port is open |
| Web server not started | Check startup logs |
Error "Port already in use"
The port is already in use. Solutions:
- Change the port in the configuration
- Use another available port on OuiPanel
Black / Empty Map
The map has not been generated yet. Solutions:
- Explore the world in-game (automatic generation)
- Initiate a manual render:
/dynmap fullrender worldor/bluemap render world
Server lags during rendering
Solutions:
- Switch to
lowresorvlowresquality - Reduce
parallelrendercntto 1-2 - Increase
tileupdatedelay - Schedule renders during off-peak hours
Insufficient Disk Space
HD maps can take up a lot of space:
- Use
lowresinstead ofhires - Limit the area with a world border
- Delete old renders in
/plugins/dynmap/web/tiles/
📊 Final Comparison
| Feature | Dynmap | BlueMap |
|---|---|---|
| View | 2D satellite | 3D isometric |
| Default Port | 8123 | 8100 |
| Config File | configuration.txt | core.conf, webserver.conf |
| Plugin Integrations | ⭐⭐⭐⭐⭐ Many | ⭐⭐⭐ Some |
| RAM Consumption | Moderate | High |
| Initial Render | Fast | Slower |
| Visual Quality | Good | Excellent |
| Setup Ease | Simple | Very simple |
📝 Summary
INSTALLING A WEB MAP:

DYNMAP:
1. Download from spigotmc.org/resources/dynmap.274
2. Upload to /plugins/
3. Start → generate configs → stop
4. Create a port (Port Management)
5. Edit /plugins/dynmap/configuration.txt:
   - webserver-bindaddress: 0.0.0.0
   - webserver-port: YOUR_PORT
   - deftemplatesuffix: lowres
6. Restart
7. Access: http://IP:PORT

BLUEMAP:
1. Download from bluemap.bluecolored.de
2. Upload to /plugins/
3. Start → accept EULA → stop
4. Edit /plugins/BlueMap/core.conf:
   - accept-download: true
5. Create a port (Port Management)
6. Edit /plugins/BlueMap/webserver.conf:
   - ip: "0.0.0.0"
   - port: YOUR_PORT
7. Restart
8. Access: http://IP:PORT

PROXY MANAGER (optional):
- Allows access via https://map.domain.com
- Configuration in OuiPanel's Proxy Manager

COMMANDS:
├── Dynmap: /dynmap fullrender world
└── BlueMap: /bluemap render world

OPTIMIZATION:
├── Use lowres quality
├── Set a world border
├── Limit parallel renders
└── Schedule renders during off-peak hours
📚 Resources
| Resource | URL |
|---|---|
| Dynmap Wiki | github.com/webbukkit/dynmap/wiki |
| BlueMap Wiki | bluemap.bluecolored.de/wiki |
| Dynmap Discord | discord.gg/dynmap |
| BlueMap Discord | discord.gg/bluemap |
Need a Minecraft server?
Discover our Minecraft hosting plans starting from $9.98/month with automatic mod installation.