How to add a domain on cPanel
Estimated Time: 10 minutes
Difficulty: Beginner ⭐
📋 Introduction
You want to host multiple websites on your cPanel hosting? With addon domains, you can manage multiple independent sites from a single account.
This guide explains how to:
- ✅ Understand the different types of domains
- ✅ Prepare your domain (nameservers)
- ✅ Add an addon domain (new site)
- ✅ Create a domain alias (same site)
- ✅ Add a subdomain
- ✅ Manage and delete your domains
🎯 The 3 Types of Domains in cPanel
Before you start, understand the difference between the types of domains:
| Type | Description | Example | Use Case |
|---|---|---|---|
| 🌐 Main Domain | The base domain of your account | monsite.com | Your main site |
| ➕ Addon Domain | A new domain with its own site | autresite.fr | Host a 2nd site |
| 🔗 Alias (Parked Domain) | A domain that displays the same site | monsite.fr | Protect your brand |
| 📂 Subdomain | A section of your domain | blog.monsite.com | Specific section |
Summary Diagram
📁 Your cPanel hosting
│
├── 🌐 monsite.com (main domain)
│   └── /public_html/
│
├── ➕ autresite.fr (addon domain)
│   └── /public_html/autresite.fr/  ← Independent site
│
├── 🔗 monsite.fr (alias)
│   └── → Redirects to monsite.com  ← Same content
│
└── 📂 blog.monsite.com (subdomain)
    └── /public_html/blog/  ← Site section
🔧 Prerequisites: Point Your Domain
Before adding a domain in cPanel, you must point its DNS to your OuiHeberg hosting.
Step 1: Get OuiHeberg Nameservers
Your nameservers are indicated in:
- Your hosting welcome email
- Your OuiHeberg Client Area
Example of OuiHeberg nameservers:
ns1.ouiheberg.com
ns2.ouiheberg.com
ns3.ouiheberg.com
ns4.ouiheberg.com
💡 Nameservers vary depending on your server. Always check in your client area.
Step 2: Change Nameservers at Your Registrar
Log in to the registrar where you purchased your domain (OVH, Gandi, Namecheap, etc.) and change the nameservers.
At OVH:
- Log in to the OVH client area
- Go to Domains → Select your domain
- Click on DNS Servers
- Click on Modify DNS servers
- Enter the OuiHeberg nameservers
- Validate
At Gandi:
- Log in to your Gandi account
- Go to Domain Names
- Select your domain → Name Servers
- Choose External name servers
- Enter the OuiHeberg nameservers
- Save
Step 3: Wait for DNS Propagation
After changing nameservers, you need to wait for DNS propagation:
| Timeframe | Description |
|---|---|
| ⚡ 15 min - 2h | Rapid propagation (common case) |
| ⏳ 2h - 24h | Normal propagation |
| 🐢 24h - 48h | Global complete propagation |
Check propagation:
- 🔗 whatsmydns.net - Checks global propagation
- 🔗 dnschecker.org - DNS verification tool
⚠️ Important: Do not add the domain in cPanel before propagation is complete, or you may encounter errors.
➕ Add an Addon Domain (New Site)
An addon domain allows you to host a completely independent website.
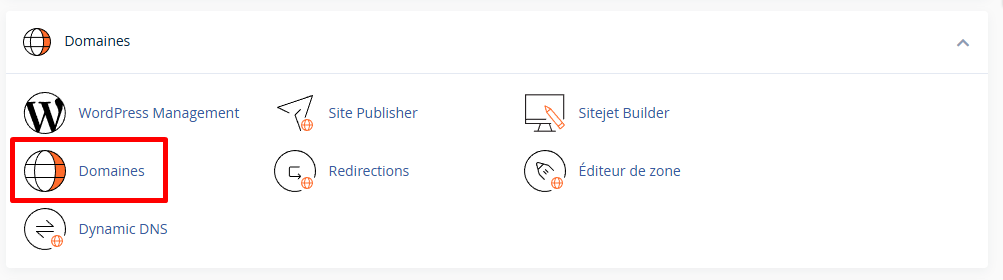
Step 1: Access the Domains Section
- Log in to cPanel
- In the Domains section, click on Domains
Step 2: Create a New Domain
- Click on the Create a New Domain button (or "Create A New Domain")

Step 3: Configure the Addon Domain
Fill in the following fields:
| Field | Description | Example |
|---|---|---|
| Domain | The domain name to add | autresite.fr |
| Share document root | ❌ Uncheck this box | Not checked |
| Document Root | The folder where the files will be | public_html/autresite.fr |
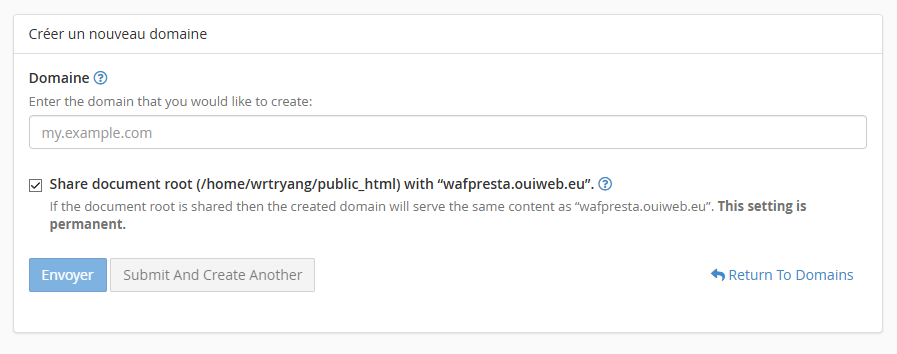
⚠️ Important: Uncheck "Share document root" to create an addon domain. Otherwise, you will create an alias.
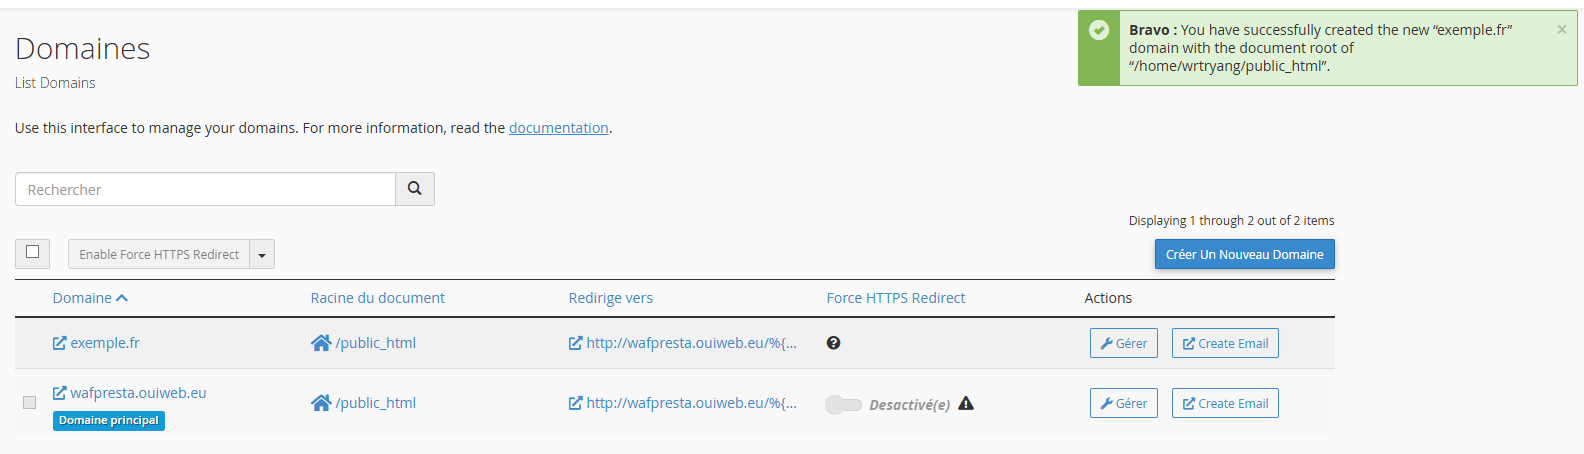
Step 4: Validate the Creation
- Review the information
- Click on Submit
- A confirmation message will appear
Step 5: Upload Your Site
Your addon domain is now configured! Upload your files to the created folder:
📁 /home/user/public_html/autresite.fr/
├── index.html (or index.php)
├── style.css
├── images/
└── ...
Upload methods:
- 📁 File Manager in cPanel
- 🔌 FTP Client (FileZilla)
- ⚙️ Softaculous to install WordPress
🔗 Create a Domain Alias (Same Site)
An alias (formerly "parked domain") displays the same content as your main domain.
Alias Use Cases
- 🛡️ Protect your brand (monsite.com + monsite.fr)
- 🔄 Redirect old URLs
- 🌍 International extensions (.com, .fr, .eu)
Step 1: Access the Domains Section
- Log in to cPanel
- Click on Domains
Step 2: Create a New Domain (Alias)
- Click on Create a New Domain
- Enter the domain name
- ✅ Leave checked the "Share document root" option
- Click on Submit
| Field | Configuration for an alias |
|---|---|
| Domain | monsite.fr |
| Share document root | ✅ Checked |
Step 3: Configure a redirection (recommended)
To avoid duplicate content (bad for SEO), configure a redirection:
- Go back to Domains
- Find your alias in the list
- Click on Manage Redirection
- Enter the destination URL:
https://monsite.com - Click on Save
💡 SEO Tip: Always redirect your aliases to the main domain with a 301 to avoid duplicate content.
📂 Create a Subdomain
A subdomain creates a separate section of your main site.
Examples of subdomains
| Subdomain | Usage |
|---|---|
blog.monsite.com | Blog section |
boutique.monsite.com | E-commerce |
support.monsite.com | Help center |
dev.monsite.com | Development site |
en.monsite.com | English version |
Step 1: Create the subdomain
- In cPanel, click on Domains
- Click on Create a new domain
- In the Domain field, enter the full subdomain:
blog.monsite.com - ❌ Uncheck "Share document root" if you want a separate folder
- Set the Document Root:
public_html/blog - Click on Submit
💡 cPanel automatically recognizes it as a subdomain if the parent domain exists.
Step 2: Upload the content
Upload your files into the subdomain folder:
📁 /home/user/public_html/blog/
├── index.html
└── ...
📋 Manage Your Domains
View all your domains
In cPanel → Domains, you see the complete list:
| Column | Description |
|---|---|
| Domain | Domain name |
| Document Root | Files directory |
| Status | Active / Redirected |
| Actions | Manage, Delete |
Modify a domain
- Click on Manage next to the domain
- You can modify:
- The Document Root (files directory)
- The redirection
- The SSL certificate options
Delete a domain
- In Domains, find the domain to delete
- Click on Manage
- Click on Remove Domain
- Confirm the deletion
⚠️ Attention: Deleting a domain does NOT remove the files from the directory. You will need to delete them manually if needed.
🔒 SSL Certificate for Your Domains
After adding a domain, install a free SSL certificate:
With AutoSSL (automatic)
cPanel automatically generates an SSL certificate via AutoSSL. Wait a few minutes after adding the domain.
Check in cPanel → SSL/TLS Status:
- 🟢 Green: Active SSL
- 🟡 Yellow: Pending
- 🔴 Red: Error (check DNS propagation)
Force renewal
If SSL is not generated automatically:
- Go to SSL/TLS Status
- Check the relevant domain
- Click on Run AutoSSL
⚠️ Troubleshooting
Error: "Domain already exists"
| ❌ Issue | ✅ Solution |
|---|---|
| The domain is already added | Check in the list of domains |
| The subdomain already exists | Delete it before recreating |
Error: "Could not determine nameserver IP"
| ❌ Issue | ✅ Solution |
|---|---|
| DNS not propagated yet | Wait 24-48h and try again |
| Incorrect nameservers | Check nameservers with your registrar |
| Expired domain | Renew your domain |
Check propagation:
https://www.whatsmydns.net/
Site displays a 404 error or white page
| ❌ Issue | ✅ Solution |
|---|---|
| No files | Upload index.html or index.php |
| Incorrect directory | Check the Document Root |
| Incorrect file name | The file must be index.html or index.php |
Site displays "Not Secure"
| ❌ Issue | ✅ Solution |
|---|---|
| SSL not installed | Wait for AutoSSL or run it manually |
| Incomplete DNS propagation | Wait for DNS propagation |
| Mixed content | Ensure all resources are in HTTPS |
Addon domain not accessible
Verification checklist:
□ Nameservers point to OuiHeberg
□ DNS propagation is complete (whatsmydns.net)
□ Domain is added in cPanel
□ Document Root folder exists
□ An index.html or index.php file exists in the folder
□ SSL certificate is active
📝 Summary of Commands
Add an addon domain (new site)
1. cPanel → Domains → Create a new domain
2. Enter the domain: othersite.fr
3. ❌ Uncheck "Share document root"
4. Document Root: public_html/othersite.fr
5. Submit
Add an alias (same site)
1. cPanel → Domains → Create a new domain
2. Enter the domain: monsite.fr
3. ✅ Leave checked "Share document root"
4. Submit
5. Configure a 301 redirection (recommended)
Add a subdomain
1. cPanel → Domains → Create a new domain
2. Enter: blog.monsite.com
3. ❌ Uncheck "Share document root"
4. Document Root: public_html/blog
5. Submit
📚 Related Articles
- 🌐 Configure DNS on cPanel (Zone Editor)
- 🔒 Install a Let's Encrypt SSL certificate
- 📧 Create emails on an addon domain
- 🔄 Configure redirects on cPanel
- ⚙️ Install WordPress with Softaculous