
 Client area
Are you looking for how to install Fail2ban to protect SSH on a Linux VPS? Fail2ban monitors server logs, detects repeated connection failures, and asks the firewall to temporarily block the responsible IP address.
This tutorial explains step by step how to install and configure Fail2ban on Debian 12, Debian 13, and Ubuntu 24.04. You will also learn how to check its operation, view banned IPs, unban an address, create a whitelist, and protect Nginx.
To quickly install Fail2ban on Debian or Ubuntu:
sudo apt update
sudo apt install -y fail2ban
sudo systemctl enable --now fail2ban
sudo fail2ban-client status
The complete configuration then consists of:
- creating
/etc/fail2ban/jail.local; - enabling the
sshdjail; - defining
maxretry,findtime, andbantime; - testing the configuration with
fail2ban-client -t; - checking the bans with
fail2ban-client status sshd.
The following sections detail each step and the specifics of systemd on recent versions of Debian.
Before you begin: avoid locking yourself out
A misconfiguration of Fail2ban can cut off your own SSH access. Before making any changes:
- open the web console or noVNC of your VPS;
- keep your current SSH session open;
- note your public IP address if it is static;
- check the port actually used by SSH;
- do not test the ban from your only means of accessing the server.
To find out the configured SSH port:
sudo sshd -T | grep '^port '
If the command returns, for example, port 2222, you will need to specify port = 2222 in the SSH jail instead of port = ssh.
How does Fail2ban work?
Fail2ban relies on three elements:
- a filter recognizes authentication failures in the logs using regular expressions;
- a jail counts the failures coming from each IP address;
- a action applies the ban with the available firewall, such as nftables or iptables.
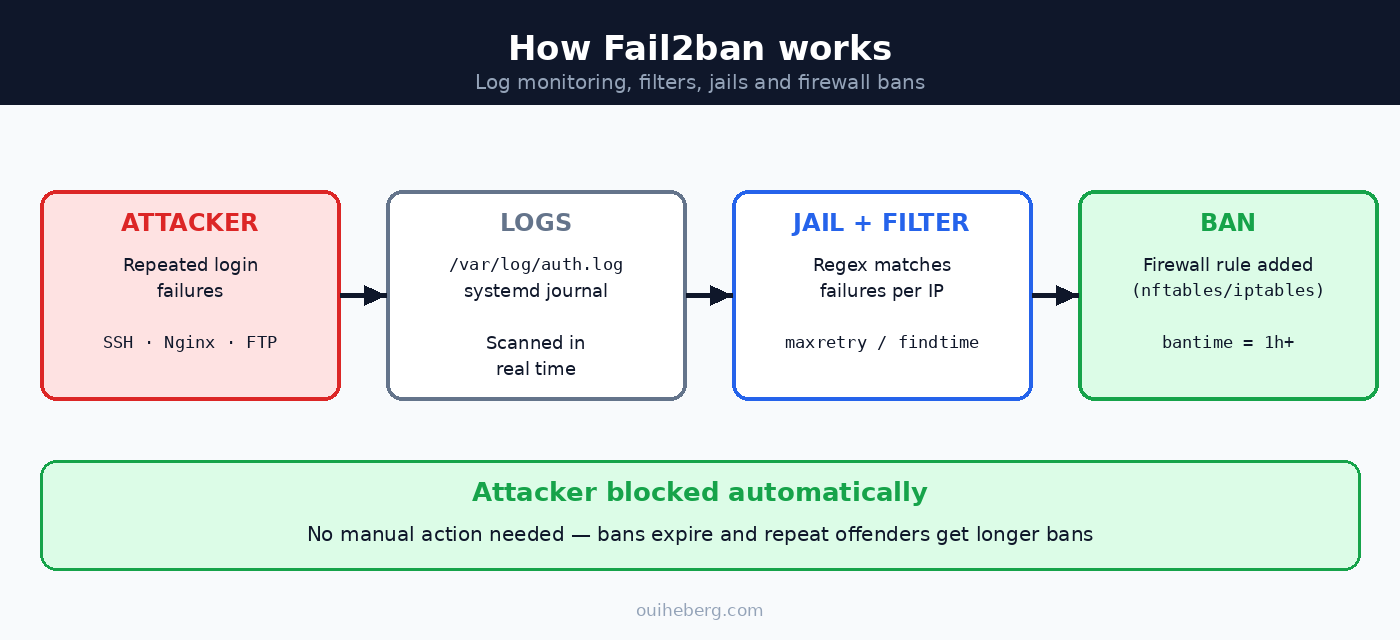
Three parameters primarily control the triggering of a ban:
maxretry: number of allowed failures before banning;findtime: period during which these failures are counted;bantime: initial duration of the ban.
With the configuration maxretry = 5, findtime = 10m, and bantime = 1h, an address producing five failures in ten minutes is blocked for one hour.
 Fail2ban does not replace SSH key authentication, a properly configured firewall, or security updates. It serves as an additional layer intended to reduce repeated attempts.
How to install Fail2ban on Debian 12/13 or Ubuntu 24.04?
Install the package provided by your distribution:
sudo apt update
sudo apt install -y fail2ban
sudo systemctl enable --now fail2ban
Then display the installed version and check that the service is responding:
fail2ban-client --version
sudo fail2ban-client ping
sudo fail2ban-client status
A functional installation should return Server replied: pong.
On Debian and Ubuntu, the package generally activates the sshd jail. However, do not assume that SSH is already protected: explicitly check its status.
sudo fail2ban-client status sshd
If the jail does not exist, if the service refuses to start, or if no log is found, proceed with the configuration below.
Specific case of Debian 12 and Debian 13
On a fresh installation of Debian 12 or 13, /var/log/auth.log may be absent, as rsyslog is no longer installed by default. SSH events are then kept in the systemd journal. On an upgraded server or one where rsyslog has been installed, the file may still exist.
Check the available source:
test -f /var/log/auth.log && echo "auth.log present" || echo "systemd logs probably used"
sudo journalctl -u ssh --since "10 minutes ago" --no-pager
If Fail2ban displays the error Have not found any log file for sshd jail, use the systemd backend presented in the next section.
How to configure Fail2ban to protect SSH?
Do not modify /etc/fail2ban/jail.conf directly. This file belongs to the package and may change during an update. Place only your customizations in /etc/fail2ban/jail.local or in a .local file under /etc/fail2ban/jail.d/.
The main loading order is as follows:
jail.conf;jail.d/*.conf;jail.local;jail.d/*.local.
Parameters read last replace previous values.
Create the local file:
sudo nano /etc/fail2ban/jail.local
Here is a base suitable for a classic Linux VPS using the systemd journal:
[DEFAULT]
# Initial duration of the ban
bantime = 1h

# Count failures over a period of 10 minutes
findtime = 10m
maxretry = 5

# Extend the duration when the same IP reoffends
bantime.increment = true
bantime.factor = 1
bantime.maxtime = 1w

# Addresses that should never be banned
ignoreip = 127.0.0.1/8 ::1

[sshd]
enabled = true
backend = systemd
port = ssh
If SSH listens on a custom port, replace port = ssh:
[sshd]
enabled = true
backend = systemd
port = 2222
Important: with
backend = systemd, do not add alogpathparameter in the jail. Fail2ban queries the systemd journal directly.
Why use progressive bans?
With bantime.increment = true, Fail2ban keeps a history of bans in its local database and gradually increases their duration. With the above values, reoffenders can face bans of one hour, then two hours, four hours, etc., without exceeding one week.
This mechanism reduces the incentive for repeated attempts while avoiding a permanent ban caused by a simple human error. Its effectiveness, however, depends on the behavior of attackers: a botnet using many different addresses will not be stopped by extending the ban of a single IP.
How to check that Fail2ban is working?
Always test the loading of the configuration before applying it:
sudo fail2ban-client -t
If no errors are returned, reload Fail2ban and check the SSH jail:
sudo fail2ban-client reload
sudo fail2ban-client status sshd
sudo journalctl -u fail2ban -n 50 --no-pager
The test fail2ban-client -t checks the configuration but does not prove by itself that the filter recognizes your logs or that the firewall is actually blocking the IPs. To test the SSH filter with systemd:
sudo fail2ban-regex --print-all-matched systemd-journal sshd
If your server uses /var/log/auth.log:
sudo fail2ban-regex --print-all-matched /var/log/auth.log sshd
Perform a functional test without losing access
Use a second internet connection, such as a phone's hotspot, and deliberately cause several SSH failures. Keep your administration session and the web console open.
Then check the result:
sudo fail2ban-client status sshd
sudo fail2ban-client banned
Also check that the firewall contains a Fail2ban rule. Depending on your system:
sudo nft list ruleset | grep -iE 'f2b|fail2ban'
sudo iptables -S | grep -i f2b
One of these commands may return nothing if the server uses only the other firewall system.
How to see the IPs banned by Fail2ban?
See active jails
sudo fail2ban-client status
See the IPs banned by the SSH jail
sudo fail2ban-client status sshd
See all banned IPs
sudo fail2ban-client banned 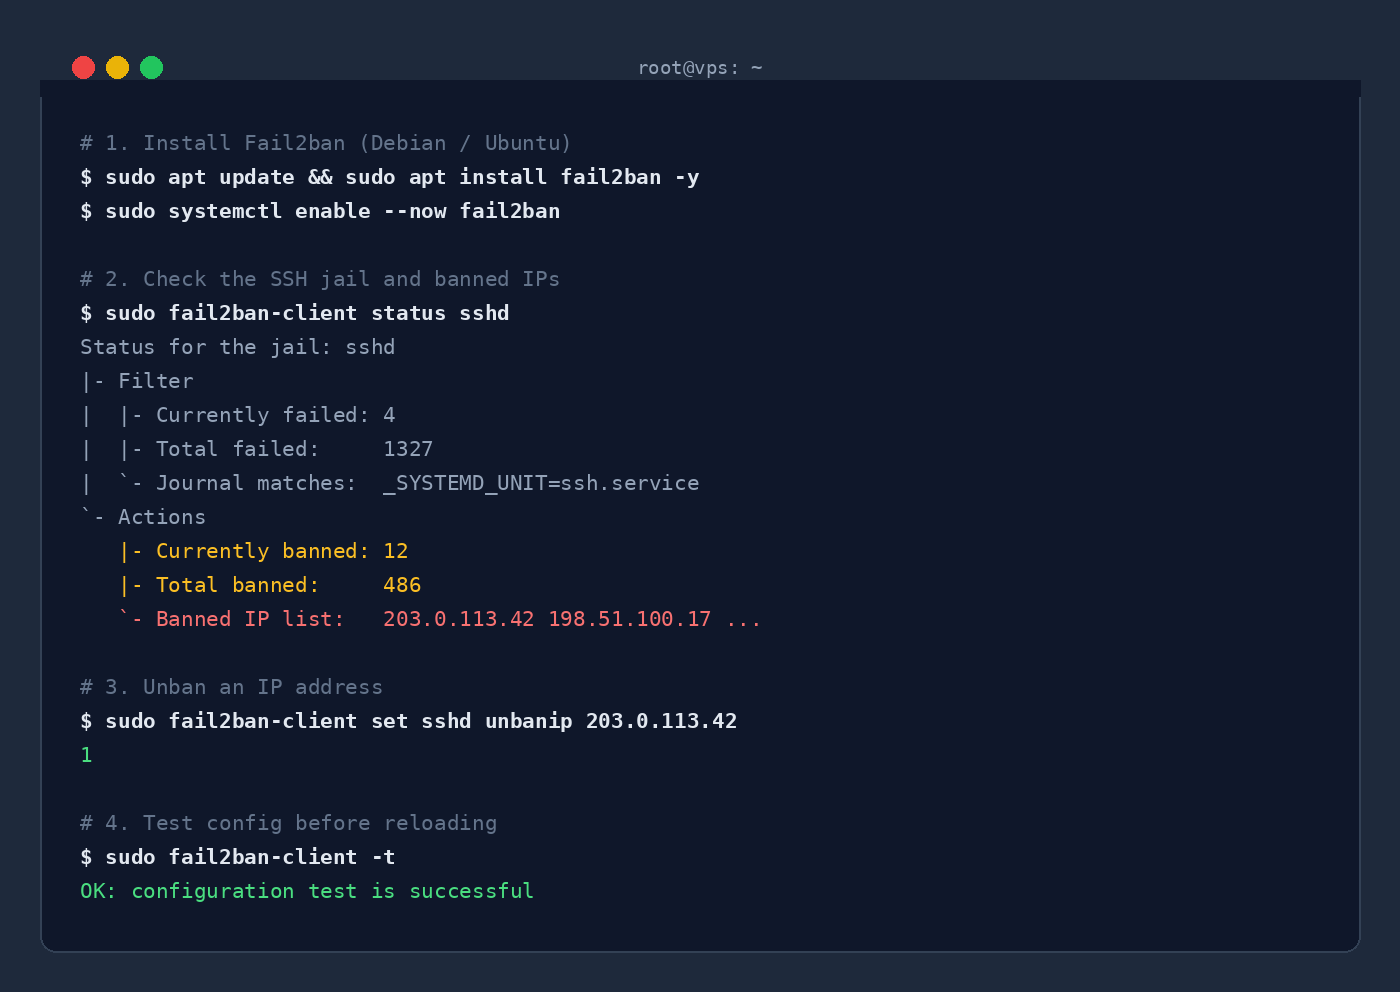 How to unban an IP with Fail2ban?
If your address has been blocked after several password errors, use the web console of the VPS or another authorized connection to run the following commands.
Unban an IP from a specific jail
sudo fail2ban-client set sshd unbanip 203.0.113.42
Unban an IP from all jails
sudo fail2ban-client unban 203.0.113.42
Unban all IPs
This command clears the bans from all jails. Use it only if absolutely necessary:
sudo fail2ban-client unban --all
Manually ban an IP
sudo fail2ban-client set sshd banip 198.51.100.17
How to add an IP to the Fail2ban whitelist?
The ignoreip parameter contains the addresses that Fail2ban should never ban. It accepts IPv4 addresses, IPv6 addresses, CIDR ranges, and DNS names.
[DEFAULT]
ignoreip = 127.0.0.1/8 ::1 203.0.113.42 192.0.2.0/24
Then reload the configuration:
sudo fail2ban-client -t
sudo fail2ban-client reload
Only add your personal address if it is static and truly controlled. Avoid whitelisting a range that is too broad belonging to an operator or a public VPN: an attacker using the same range could no longer be banned.
To temporarily ignore an IP in the SSH jail:
sudo fail2ban-client set sshd addignoreip 203.0.113.42
This change is applied in memory and is not a persistent configuration. To keep it after a restart or reload, add the address in a .local file.
How to protect Nginx with Fail2ban?
Fail2ban provides several Nginx filters. Two jails are particularly useful:
nginx-http-auth, for repeated HTTP Basic authentication failures;nginx-limit-req, for requests rejected by Nginx's rate limiting.
Add the necessary jails in /etc/fail2ban/jail.local:
[nginx-http-auth]
enabled = true
port = http,https

[nginx-limit-req]
enabled = true
port = http,https
maxretry = 10
The nginx-limit-req jail does not create the rate limiting for you. Nginx must already use the limit_req_zone and limit_req directives, and the rejections must appear in its error log.
Check the Nginx configuration and test the filter before enabling the jail:
sudo nginx -T | grep -E 'limit_req(_zone)?'
sudo fail2ban-regex /var/log/nginx/error.log nginx-limit-req
sudo nginx -t
Then reload both services:
sudo systemctl reload nginx
sudo fail2ban-client -t
sudo fail2ban-client reload
sudo fail2ban-client status nginx-limit-req
If Nginx is behind Cloudflare, a reverse proxy, or a load balancer, first configure the restoration of the real IP address of the visitor. Otherwise, the logs may contain the address of the proxy, and Fail2ban may block it instead of the responsible client.
If your web server is not yet installed, check our guide on installing Nginx and PHP-FPM on a VPS.
For Windows, the equivalent principle is presented in our guide dedicated to RDP brute-force attacks on a Windows VPS.
Why is Fail2ban not working or not banning any IP?
1. Check that the service is running
sudo systemctl --no-pager --full status fail2ban
sudo fail2ban-client ping
sudo journalctl -u fail2ban -n 100 --no-pager
2. Check that the jail is active
sudo fail2ban-client status
sudo fail2ban-client status sshd
3. Check the source of the logs
sudo journalctl -u ssh -n 50 --no-pager
sudo tail -n 50 /var/log/auth.log
The second command will normally fail if /var/log/auth.log does not exist. In this case, use the systemd backend.
4. Test the filter
sudo fail2ban-regex systemd-journal sshd
If the counters remain at zero despite real connection failures, check the logged service, the selected filter, the backend, and the SSH port.
5. Check the firewall action
sudo fail2ban-client get sshd actions
sudo nft list ruleset | grep -iE 'f2b|fail2ban'
sudo iptables -S | grep -i f2b
Fail2ban can use nftables or iptables depending on the distribution, package version, and your configuration. Do not force a different action without identifying the currently used firewall.
The most common errors
Self-banning
Five incorrect passwords can block your IP for the entire duration set by bantime. Keep a web console available and place only your trusted fixed IPs in ignoreip.
Directly modifying jail.conf
The .conf files are distributed with the package. Use a .local file to maintain a readable configuration and facilitate updates.
Forgetting the custom SSH port
Fail2ban may detect failures without blocking the correct port if the jail and the service are not consistent. Compare the output of sshd -T with the port parameter.
Assuming that syntax testing is enough
fail2ban-client -t does not replace testing the filter and checking the firewall rules. Check all three levels: configuration, detection, and banning.
Banning the address of a reverse proxy
Without correct configuration of the real IPs, Fail2ban may only see the address of Cloudflare or the proxy. First, fix the Nginx logs before enabling the HTTP jails.
Believing that Fail2ban blocks DDoS attacks
Fail2ban acts after connections arrive at the server. It can reduce application brute force, but cannot prevent a volumetric attack from saturating the upstream network link.
Truly strengthening the security of the VPS
For consistent defense, combine Fail2ban with several measures:
- use SSH keys and disable password authentication whenever possible — check our guide to configure an SSH key on a Linux VPS;
- deny direct SSH connection from
root; - expose only necessary ports with a firewall;
- regularly install security updates;
- monitor server logs and alerts;
- maintain a backup access to the console;
- enable HTTPS for web services.
Our guide Certbot: install a Let's Encrypt SSL certificate complements this configuration. You can also find our other tutorials in the Linux documentation.
Fail2ban and anti-DDoS protection address two different risks. Fail2ban blocks behaviors identified in the server logs, while anti-DDoS filters volumetric traffic upstream. The OuiHeberg Linux VPS include anti-DDoS protection and root access to apply the settings in this guide.
FAQ about Fail2ban
Does Fail2ban work with UFW, nftables, or iptables?
Yes, but the action used depends on the package and server configuration. Check it with sudo fail2ban-client get sshd actions, then check the rules with nft list ruleset or iptables -S. Avoid claiming that a system is used by default without verifying it on the concerned machine.
Does Fail2ban protect against DDoS attacks?
No. It mainly deals with repetitive behaviors visible in the logs, such as SSH or HTTP failures. A volumetric attack must be filtered by the host's network infrastructure.
Should I change the SSH port?
Changing the SSH port generally reduces the noise from automated scans, but does not provide strong protection: a complete scan can find the new port. SSH keys, disabling passwords, and network filtering remain priorities.
Why does Fail2ban not ban any IP?
The most common causes are an inactive jail, a wrong backend, an absent log, a filter that does not match the logs, or an incorrect firewall action. Check status, fail2ban-regex, the service logs, and the firewall rules in succession.
Sources and verification method
This guide has been verified from the following official resources:
- official Fail2ban configuration and jail parameters;
- manual
jail.confof Fail2ban 1.1.0 under Debian 13; - manual
fail2ban-clientof Fail2ban 1.1.0; - manual for testing filters with
fail2ban-regex; - Debian 12 notes on the switch from rsyslog to systemd-journald by default;
- Fail2ban package 1.0.2 provided with Ubuntu 24.04 LTS.
Commands must always be checked on the target server, as a custom SSH port, a replaced firewall, or modified logging can change the outcome.
Conclusion
A reliable Fail2ban configuration is not limited to installing the package. It is necessary to verify that the jail is active, that the filter actually recognizes failures, and that the firewall applies the banning.
For a classic Debian or Ubuntu VPS, an SSH jail with five attempts over ten minutes, an initial ban of one hour, and progressive durations constitutes a reasonable base. However, adapt these values to your users, maintain a backup access, and combine Fail2ban with SSH keys, a strict firewall, and regular updates.
Fail2ban is free software and works with all compatible hosts. If you are looking for a Linux environment with root access and DDoS protection, discover the OuiHeberg NVMe Linux VPS.
Fail2ban is one link in the VPS security checklist: updates, hardened SSH, UFW and backups complete the protection.