
 Client area
Difficulty: Beginner ⭐
Compatible servers: BeamMP on OuiPanel
📋 Introduction
This guide explains how to set up your BeamMP server in OuiPanel. You will see how to create your AuthKey and paste it into OuiPanel, join the server, set the players and the map, add mods and update BeamMP-Server.
Your server installs itself. To authenticate with BeamMP, it needs your AuthKey, which is free and in your name.
⚠️ On delivery, the Authentication Key variable contains
changemoi. Without your key, the server cannot authenticate with BeamMP: start with the sections "Create your AuthKey" and "Paste the key into OuiPanel".
🧰 Before you start
You need four things.
- BeamNG.drive for every player, yourself included. Each one must own the game, on PC.
- The BeamMP Launcher, free, from beammp.com. Every player installs it on their PC.
- A Discord account, to sign in to the BeamMP Keymaster and create your key.
- Your BeamMP server, which you open in OuiPanel at dash.ouipanel.com or with the Panel button in your client area. If you are still looking for BeamMP server hosting, our four plans range from 2 to 8 GB of RAM.
🔑 Create your AuthKey
The AuthKey authenticates your server with BeamMP. You create it on the Keymaster, BeamMP's key website.
- Open keymaster.beammp.com and sign in with your Discord account.
- In the left menu, open Keys.
- Click the green + button.
- Give the key a name. It is only a label, such as the name of your server.
- Click Create.
- Copy the key.
💡 Keep this key to yourself. The number of keys per account is limited.
🔐 Paste the key into OuiPanel
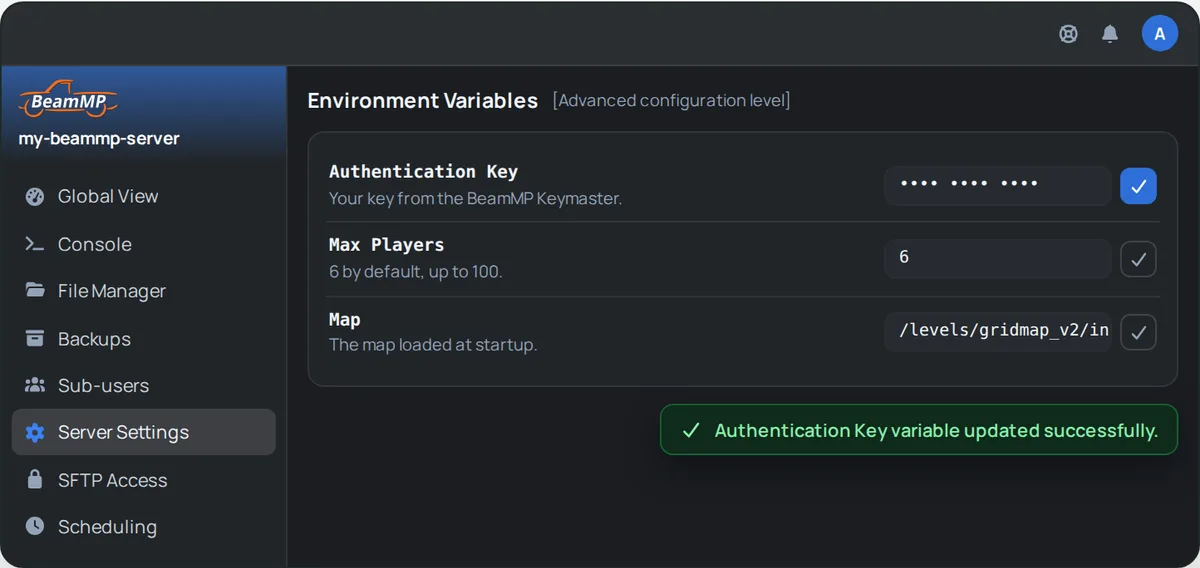
- In OuiPanel, go to Configuration › Server Settings.
- In the Environment Variables section, find Authentication Key. Replace
changemoiwith your key. - Click the checkmark to the right of the field to save it.
- Restart the server from the Console.
OuiPanel then writes your key into the ServerConfig.toml file at every startup. You have nothing else to do.
⚠️ A key works for only one server at a time. For a second BeamMP server, create another key on the Keymaster.
🎮 Join the server
- Launch BeamNG.drive with the BeamMP Launcher.
- Open the Direct Connect tab.
- Enter the address and port of your server, as shown in OuiPanel, then connect.
Each server has its own port, assigned by OuiPanel. It is the same over TCP and UDP, and it is already open. OuiPanel writes it into ServerConfig.toml automatically, so you have nothing to set.
Your friends join the server the same way, with the same address and port.
🌍 Public list or private server
Your server can appear in the public BeamMP server list, or stay private.
- Public server: you need a free, valid AuthKey created on the Keymaster (see above). Without a valid key, the BeamMP backend refuses it and the server does not appear in the list.
- Private server: set the Private variable to
truein Configuration › Server Settings, Environment Variables section, then restart. The server starts and does not appear in the list. According to the BeamMP documentation, you join it with Direct Connect, using the address and port.
⚠️ A private server has no password. Anyone who knows the address and port can join. Only share them with the players you choose.
👥 Set the players and cars
Your server accepts 6 players by default, with one car each.
| Variable | Purpose | Default | Maximum |
|---|---|---|---|
| Max Players | The number of players | 6 | 100 |
| Max Cars | Cars per player | 1 | 10 |
- In OuiPanel, go to Configuration › Server Settings.
- In the Environment Variables section, change Max Players or Max Cars, then click the checkmark to the right of the field.
- Restart the server from the Console.
On BeamMP, the size of your mods matters more than the number of players when picking a plan.
🗺️ Change the map
The Map variable sets the map loaded at startup. By default, it is /levels/gridmap_v2/info.json.
- In Configuration › Server Settings, Environment Variables section, replace the value of Map with the path of the map you want. For example
/levels/west_coast_usa/info.jsonor/levels/italy/info.json. - Click the checkmark to the right of the field.
- Restart the server from the Console.
For a map from a mod, the path uses the name of its folder.
- Upload its
.zipfile toResources/Client, like any other mod (next section). - Open the
.zipon your PC and note the name of the folder it contains underlevels. - Use this name in the Map path. For a
levels/my_mapfolder, the path is/levels/my_map/info.json. - Save with the checkmark, then restart the server.
🧩 Add vehicles and maps as mods
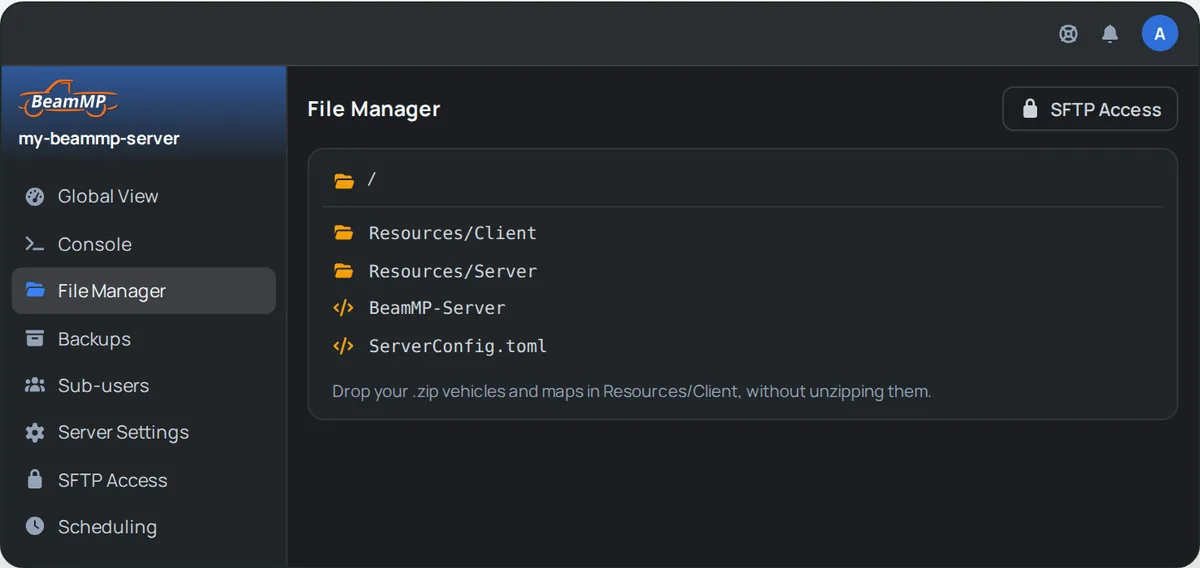
BeamNG.drive vehicles and maps are added as mods, in .zip files. They go in the Resources/Client folder of your server.
You have two ways to open the server files.
- The OuiPanel File Manager. Open your server, then click File Manager in the menu.
- SFTP, with software such as FileZilla. Our guide How to connect via SFTP with FileZilla explains the connection.
- Stop the server from the Console.
- Upload the
.zipfiles, without extracting them, to theResources/Clientfolder. - Start the server.
Your players download these mods when they join the server. The heavier your mods, the longer this download takes.
Benchmarks measured on our servers: with 13 mods, or 2.7 GB of files, the server uses 0.7 GB of RAM on average. With 156 mods, or 47 GB, it uses 1.5 GB.
⚠️ Mods remain unsupported by us. Make a backup before adding any.
To pick up mods you added or removed without restarting, type reloadmods in the OuiPanel Console.
🧪 Add Lua plugins
Lua plugins add server-side features, such as commands or game rules. Lua is built into BeamMP-Server, so there is nothing to install.
- Create one folder per plugin under
Resources/Server. For exampleResources/Server/MyPlugin/main.lua. - Put the plugin files in it.
Plugins are loaded when the server starts, then reloaded as soon as you change their files.
⚠️ Like mods, plugins come without support from us.
⌨️ Use the console
The OuiPanel Console accepts BeamMP-Server commands.
| Command | What it does |
|---|---|
say + message | Sends a message to all players |
list | Lists the connected players |
kick + name | Kicks a player |
status | Shows the server status |
version | Shows the BeamMP-Server version |
reloadmods | Reloads mods without restarting |
There is no command to ban or mute a player. You need a Lua plugin for that.
⚙️ Edit the ServerConfig.toml file
The ServerConfig.toml file, at the root of the server, holds the BeamMP settings. Some of them come from the OuiPanel variables.
| Settings | Where to change them |
|---|---|
Name, Port, AuthKey, Private, MaxPlayers, Description, MaxCars, Map, LogChat | In the OuiPanel variables. These 9 settings are rewritten at every startup. |
Tags, AllowGuests and the others | By hand, in the file. They stay in place until a reinstall. |
- Stop the server from the Console.
- Open
ServerConfig.tomlin the File Manager, change the value you want, then save. - Start the server.
💡 Changing one of the 9 settings in the file has no effect: OuiPanel rewrites it at the next startup. Use the variables.
🔄 Update BeamMP-Server
On delivery, the server installs the latest stable version of BeamMP-Server. It never updates itself.
- Update: when a new version is released, reinstall the server from OuiPanel. It downloads the latest stable version.
- Choose a specific version: in the variables, enter its exact tag, with the "v", in BeamMP Server Version, for example
v3.9.2. Save with the checkmark, then reinstall.
Reinstalling keeps your mods and plugins, in the Resources folder. It does rewrite ServerConfig.toml, though. Settings made by hand, such as Tags, go back to their default value.
💡 Make a backup before reinstalling, and write down the settings you made by hand.
💾 Back up your server
In OuiPanel, the Backups page creates a backup on demand, and the Scheduling page schedules them, for example every night. The number of backups depends on the plan: 2 for Start, 3 for Plus, 5 for Pro and 10 for Ultra.
A backup includes the whole server, mods included. A large mod pack therefore makes a large backup.