
 Client area
Claude, ChatGPT and other AI assistants can plug into outside services through the MCP protocol (Model Context Protocol). The OuiHeberg client area has its own MCP server. Once connected, your assistant can answer questions about your services, invoices, domains or tickets. By default, it can only read. It acts on your behalf only if you tick the allowed actions yourself.
Before you start
Only the account holder can connect an AI assistant. Sub-users cannot.
You need an assistant that supports custom MCP connectors. The client area mentions Claude and ChatGPT.
Copy the MCP server address
Log in to dash.ouiheberg.com.
At the top right, click your name, then My profile.
In the menu of the Account Settings page, choose AI assistants, the last section.
In the MCP server address box, click Copy. The address is
https://dash.ouiheberg.com/mcp.
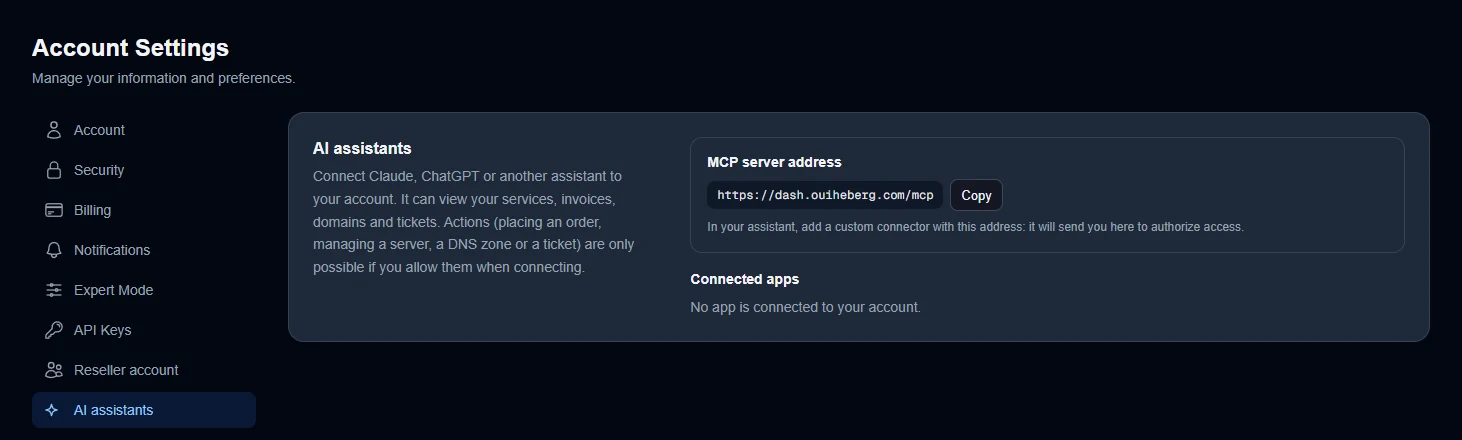
The text of this section describes the access as read-only. That is indeed the default. The actions described below are only added if you tick them when you authorize the assistant.
Add the connector in your assistant
In your assistant, add a custom connector and paste the copied address. This setting is usually found under connectors. Its exact location depends on the assistant.
The assistant then sends you to a client area page to authorize access. Log in if asked.
Authorize access
The authorization page asks whether the app may access your account. It shows the account you are logged in with and the site that will receive the access.
Check the app name and the site shown. If the page warns that this domain does not belong to a known assistant, only authorize if you started this connection yourself.
Tick what the app will be able to view. The tools are grouped by family.
Under Actions on your behalf, everything is unticked. Tick only the actions you want to allow. If you tick none, the assistant stays read-only.
Click Authorize, or Deny to cancel. You are then taken back to your assistant.
If you reconnect an assistant you already authorized, your previous choices are pre-filled. Nothing changes until you click Authorize.
What the assistant can do
View
Depending on what you ticked, the assistant can read your services and their status, your invoices and due dates, your domain names and their DNS zones, your tickets, and the platform status. You can ask it which invoices are still unpaid, when a domain expires or where a ticket stands.
Act, only if you ticked it
Order a plan. The order is paid from your balance if you ask for it. Otherwise, an invoice is issued and you pay it yourself.
Start, stop or restart a VPS.
Manage the auto-renewal of a domain.
Change the DNS zone of a domain.
Open, reply to or close a ticket on your behalf. Support sees the label “AI assistant”.
Actions on your account always happen in two steps. The assistant first shows you a preview, then waits for your confirmation. Every action is recorded in your account's activity log, and an e-mail notifies you unless you have turned it off.
What it can never do
Even with every action ticked, an assistant cannot pay by card or direct debit, see your payment methods, or reinstall or delete a server. Nor can it see your passwords, transfer codes or access keys.
Monitor or remove an assistant
Each authorized assistant appears under Connected apps, in the AI assistants section, with its connection date and last use.
The Permissions button lets you review what the assistant can view. A tool you untick is withdrawn from its next request, with no need to reconnect. To add an action you did not accept at first, reconnect the assistant and tick it on the authorization page.
The Disconnect button cuts its access immediately. You can reconnect it later from your assistant.
The e-mails sent after each action are managed in Account Settings › Notifications, on the Assistant action e-mails (MCP) line. Turning them off deletes nothing from the activity log.
💡 Start with read-only access. You will quickly see what the assistant brings you, and you can reconnect it with actions the day you need them.
Need help?
Open a ticket from Tickets › Open a Ticket (dash.ouiheberg.com/tickets/new).
You can also write to us on our Discord.