
 Client area

A domain's DNS zone tells the internet where its website, email and other services live. This guide shows how to add, edit and delete DNS records from the OuiHeberg client area at dash.ouiheberg.com.
Where your domain's DNS is managed
You can manage the zone in the client area only if the domain uses the OuiHeberg nameservers, ns1.ouiheberg.com to ns4.ouiheberg.com. If the domain points to another provider, such as Cloudflare, its records are managed with that provider.
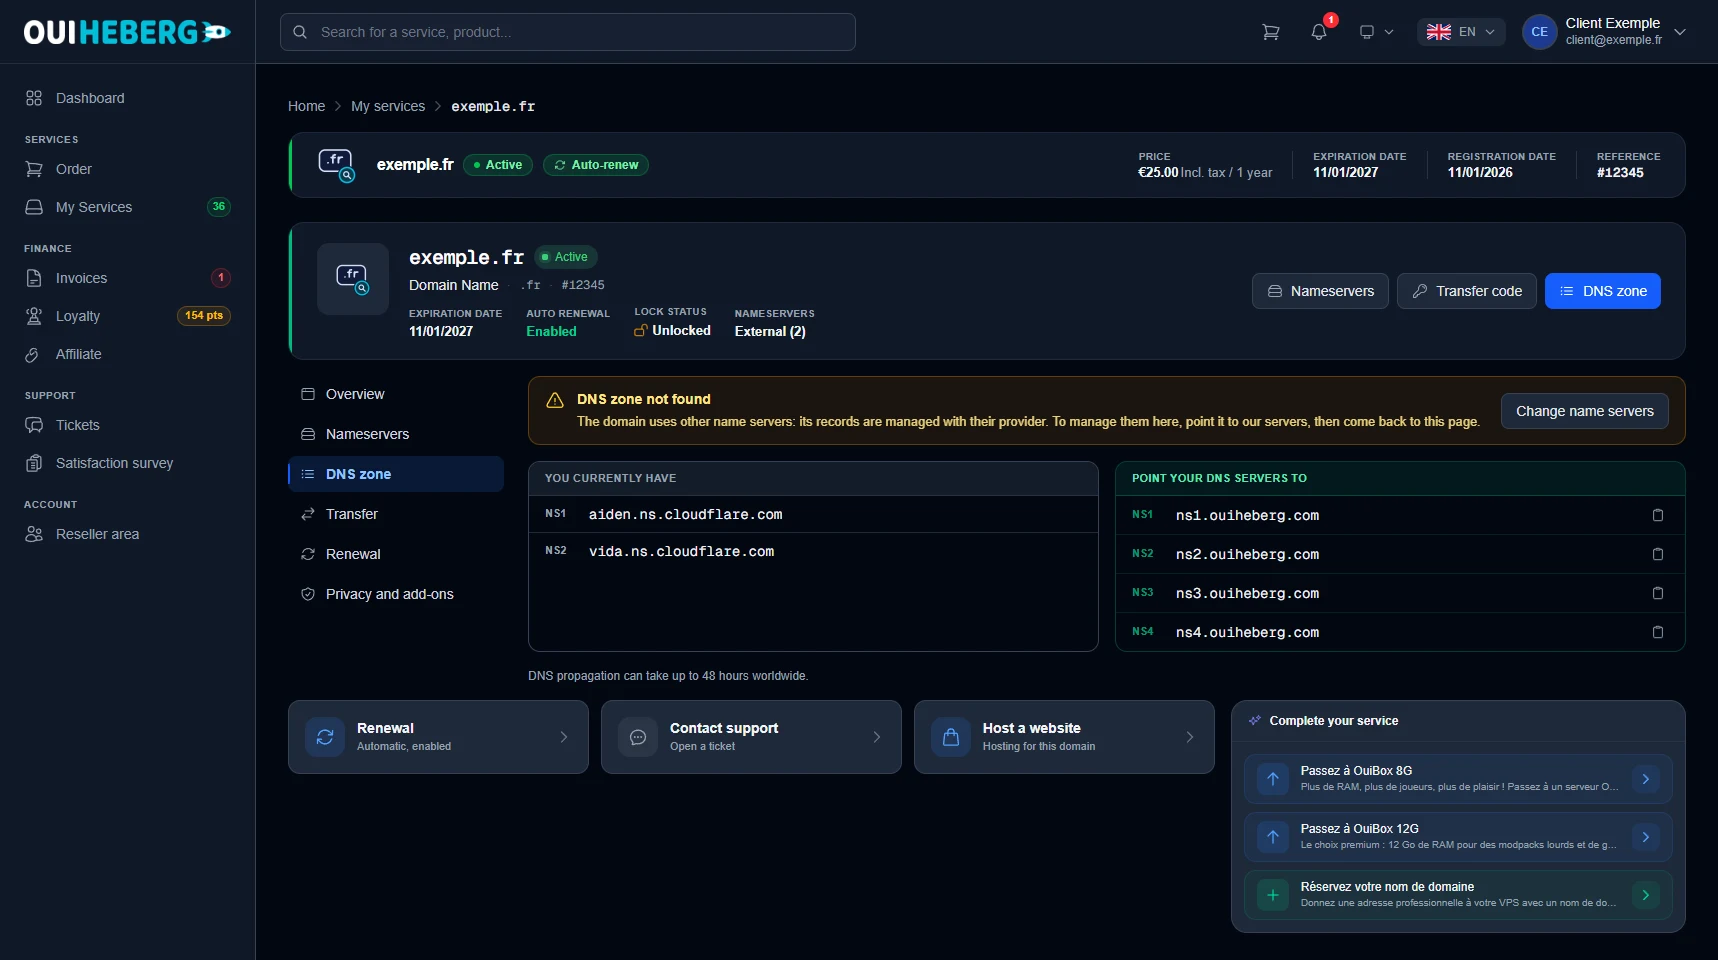
The easiest way to check is to open the DNS zone tab of the domain page. If the list of records appears, the zone is managed here. If the tab shows DNS zone not found, it is managed with the other provider.
💡 Are you a collaborator on the account? A domain's DNS zone is managed from the account holder's account. Depending on your permissions, you may be able to view it but not change it.
Open the domain's DNS zone
Log in to dash.ouiheberg.com and open My Services.
Select the Domains filter, then click your domain.
Click the DNS zone button at the top right of the page. The DNS zone tab in the left-hand menu leads to the same place.
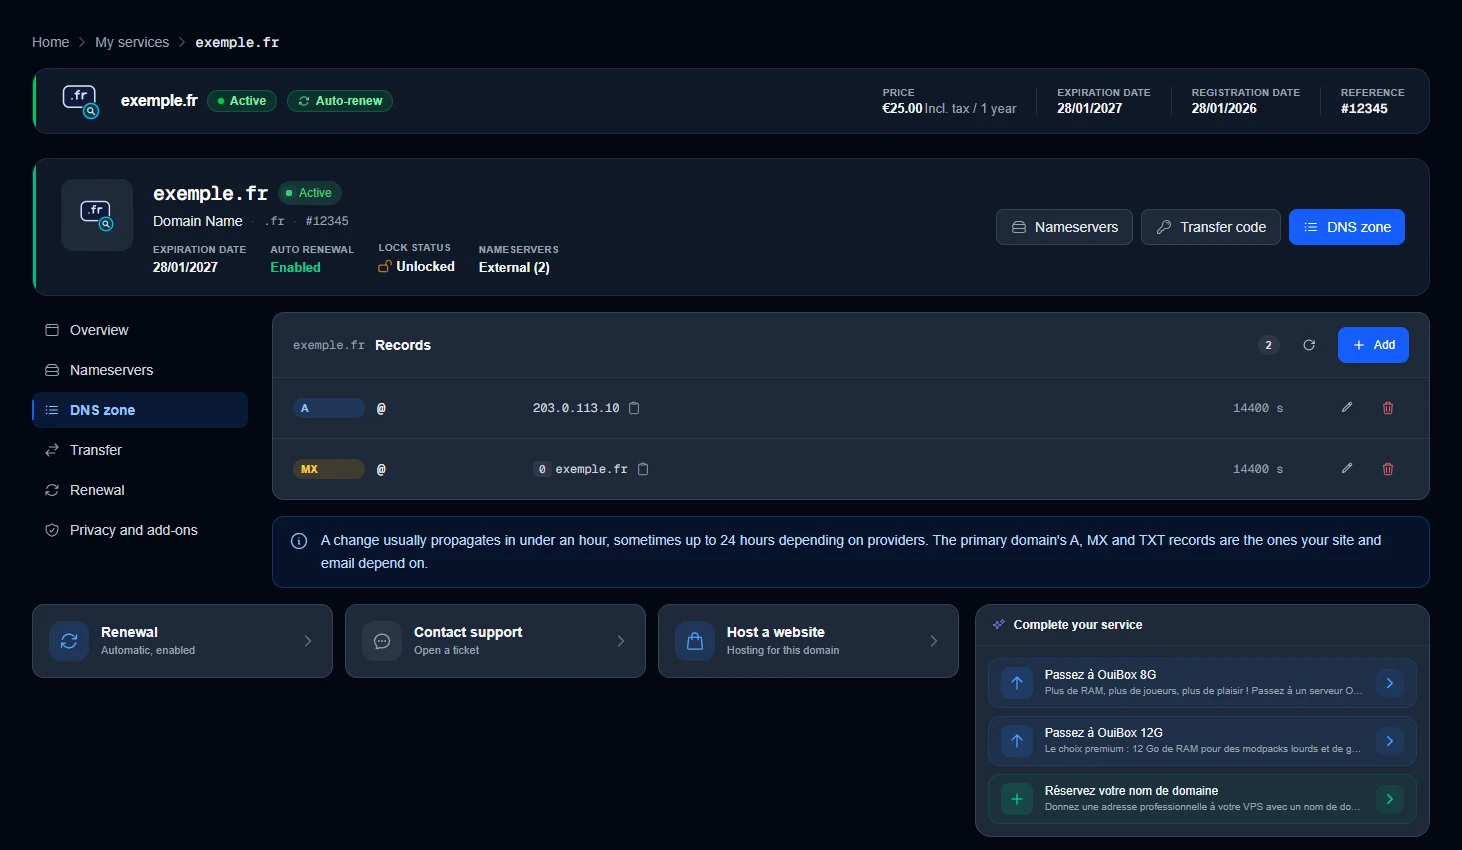
The Records card lists the zone. At the top of the card, a counter gives the number of records, next to an icon that refreshes the list. Each line shows the record's type, name, value and TTL. For an MX record, the priority appears before the value. The icon to the right of the value copies it. The pencil icon edits a record and the bin icon deletes it.
Add a DNS record
Click Add at the top right of the Records card.
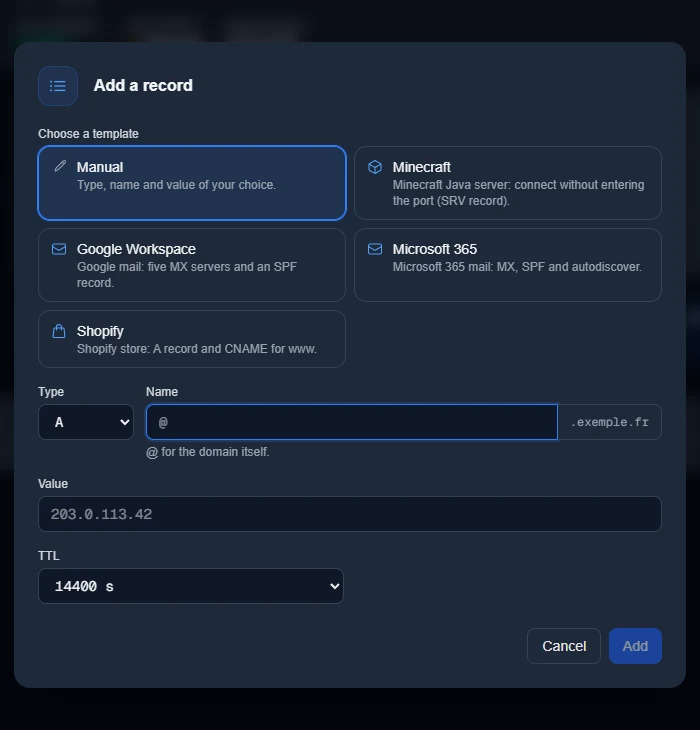
The Add a record window opens. Under Choose a template, keep Manual to enter everything yourself.
Pick the Type from the list (A by default), then fill in Name and Value.
Leave the suggested TTL unless you have a specific reason to change it.
Click Add. The Cancel button closes the window without saving anything.
In Name, enter @ for the domain itself. For a subdomain, type only the part before the domain, such as play or www. The domain name is already shown to the right of the field.
The default TTL is 14400 s, which is 4 hours. The list goes from 300 s (5 minutes) to 86400 s (24 hours). A short TTL is mostly useful just before a planned change.
The most common record types
| Type | Purpose | Example value |
|---|---|---|
| A | Points a name to an IPv4 address, such as a VPS or a web hosting plan. | 203.0.113.10 |
| CNAME | Makes a name an alias of another name. It cannot be set on the domain itself (@). | mysite.example.net |
| MX | Names the servers that receive the domain's email. | mx1.example.net |
| TXT | Holds text, such as an SPF rule or a verification code. | v=spf1 include:example.net ~all |
For a complete example with a CNAME pointing to a game server address, see Configure a domain on a Hytale server.
Ready-made templates
Under Choose a template, the window offers five templates. Manual, selected when the window opens, lets you choose the type, name and value. The other four add all the records for a common service in one go.
Minecraft, for a Minecraft Java server that players join without typing the port (SRV record).
Google Workspace, for Google email (five MX servers and an SPF record).
Microsoft 365, for Microsoft 365 email (MX, SPF and autodiscover).
Shopify, for a Shopify store (an A record and a CNAME for www).
Pick the template, complete the window, then click Add.
Edit or delete a record
In the Records card, click the pencil on a line to edit it, or its bin icon to delete it. Deleting asks for confirmation.
Take care with the A, MX and TXT records of the main domain. Your website and email depend on them. Anything that relies on a deleted record stops responding once the change has propagated.
Propagation time
A change does not show up everywhere at the same moment. The note below the list says a change usually propagates in under an hour, sometimes up to 48 hours depending on providers.
If dash shows "DNS zone not found"
This message appears when the domain uses other nameservers. The page shows the ones it uses under You currently have, and the OuiHeberg ones under Point your DNS servers to.
You have two options.
Keep managing DNS with your current provider. Nothing changes and you edit the records there.
Manage the zone here. Click Change name servers and replace them with
ns1.ouiheberg.com,ns2.ouiheberg.com,ns3.ouiheberg.comandns4.ouiheberg.com. Then come back to the DNS zone tab.
Before you switch nameservers, write down the records of the current zone, especially those for your website and email. You will need to create them again here. A nameserver change can take up to 48 hours to propagate.
If the domain already points to our nameservers but its zone does not exist yet, dash offers to create it with the Create the DNS zone button.
DNS zone of a web hosting plan
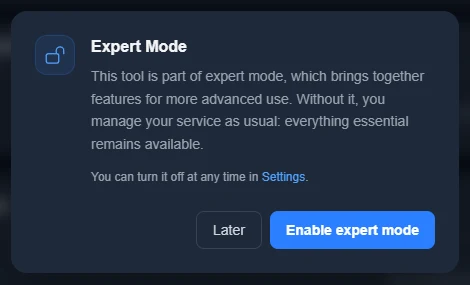
On a web hosting page, the DNS zone tab shows a padlock and the note Expert Mode required. The Edit the DNS zone shortcut in Quick actions leads to the same tool.
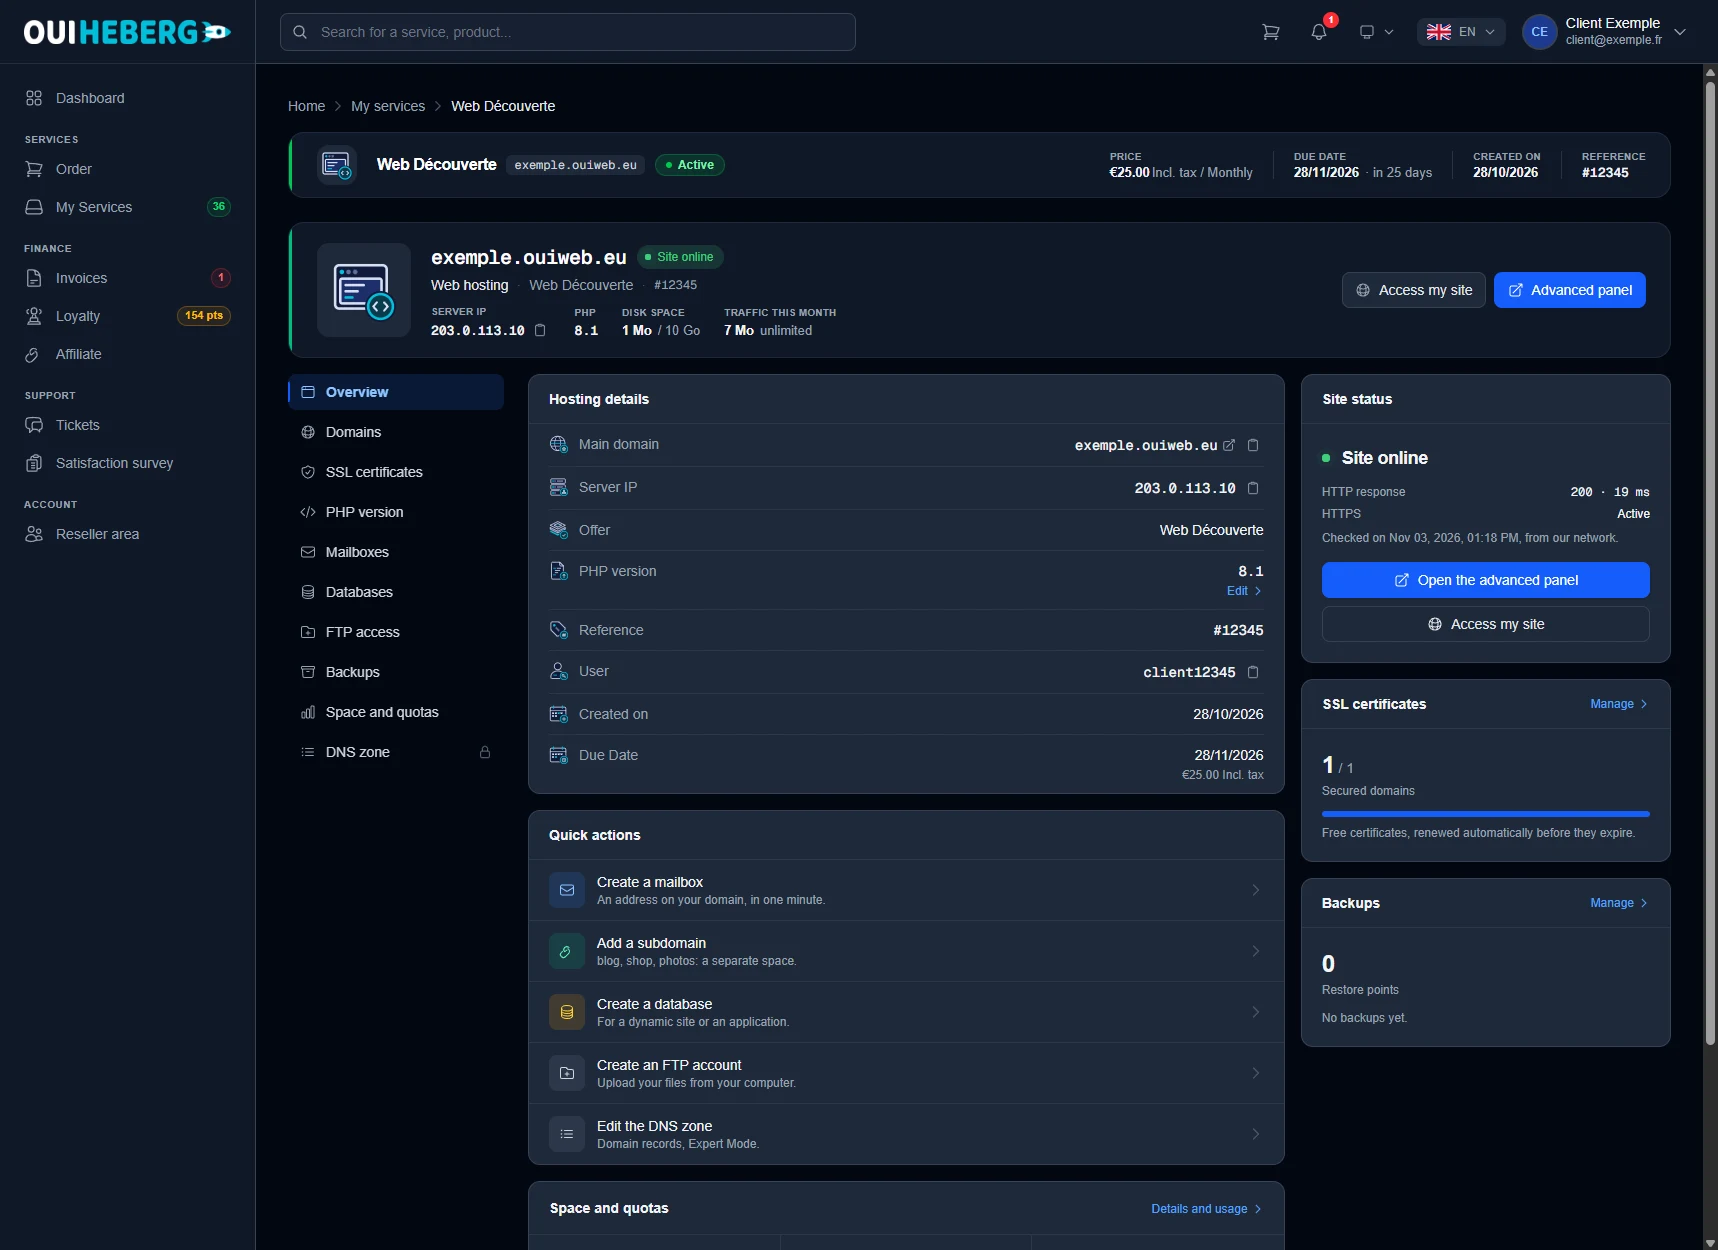
Clicking it opens the Expert Mode window. Click Enable expert mode to unlock the tool, or Later to close the window without changing anything. You can turn the mode off at any time in Settings, Expert Mode section. Settings open from the account menu at the top right, under My profile.
Here too, the zone only applies if the domain uses the OuiHeberg nameservers.
Need help?
Open a ticket from Tickets › Open a Ticket, or from the Contact support tile at the bottom of the domain page. The help card on the domain page also has an Open a ticket button. You can also ask your question on the OuiHeberg Discord.