
 Client area
VPS private network: connect your Linux and Windows servers
A private network connects your VPS to each other through a separate network interface, without going over the Internet. This guide shows how to enable it in the client area at dash.ouiheberg.com and connect your other VPS to it. It then explains how to give each VPS an address, on Linux and on Windows Server.
What the private network does
It connects the VPS in your account. Each private network is its own segment, kept apart from those of other customers.
It is free and needs no add-on.
Each connected VPS gets one more network interface, called the private interface. It comes on top of its public IPv4 and IPv6 addresses, and its speed goes up to 1 Gbit/s.
No address is assigned on this interface, and there is no DHCP. You give each VPS its own static address.
We do not filter anything on this interface. All traffic between your VPS gets through, and you can filter it inside the operating system if you want to.
Locations and plans
The private network is available in France (Marseille), Germany and the Netherlands (Amsterdam). It is not available in New York. Connected VPS must be in the same country, so a VPS in France cannot join the network of a VPS in Germany.
It covers KVM Linux and Windows VPS. LET plans, game servers on OuiPanel and older OVZ VPS do not have it. If the Private network card says "The private network is not included in this VPS plan.", your plan does not include it.
Enable the private network on a first VPS
In My Services, open the VPS page, then the Network and IP tab. The Private network card sits below the Network configuration card. It shows Not enabled and lists the three steps to follow.
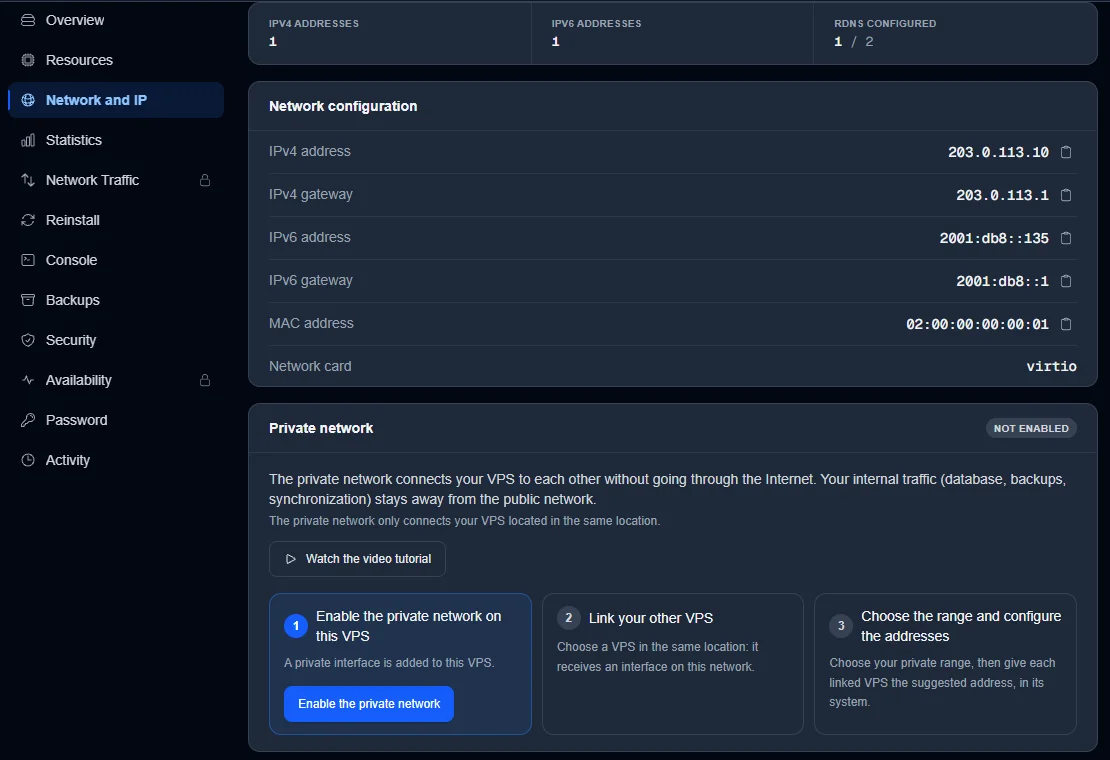
Click Enable the private network.
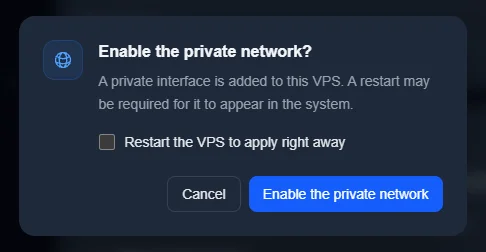
The Enable the private network? window opens. The Restart the VPS to apply right away box is unticked by default. Ticking it causes a short interruption. On Windows you do not need it, because the interface shows up without a restart.
Confirm with Enable the private network.
The card switches to Enabled. If the private interface does not appear in the VPS operating system, restart the VPS from its page.
Connect your other VPS
For now, connecting a Linux VPS that is already running needs some care. At its next boot, whether a restart, a shutdown followed by a start or a maintenance, the VPS may replay its initial setup (cloud-init). It then gets new SSH host keys, and your SSH client shows a "host key changed" warning. The
/root/.ssh/authorized_keysfile is emptied, and the root password goes back to the one shown in the Password tab of the VPS page.Before you connect a Linux VPS, keep that password at hand and plan to add your SSH key again, as explained in Set up an SSH key on a Linux VPS. On your computer,
ssh-keygen -Rfollowed by the VPS IP removes the old host key. The VPS that creates the network is not affected, and nothing like this has been seen on Windows.
In the Private network card of the first VPS, click Connect another of my VPS.
In the Connect a VPS to the private network window, pick the VPS from the VPS to connect list. Only your active VPS in the same location are listed.
Click Connect.
Repeat for each VPS. They appear in the Connected VPS list with the Connected status. You can also start from the other VPS's page. Its Private network card then offers a Join the private network button.
Choose the address range
In the Your private range part of the card, dash suggests a range. Keep it or enter your own, then click Save range. This range applies to all your connected VPS.
dash then shows a Suggested address next to each VPS. It is not set on the VPS. You configure it inside the operating system, as shown in the Linux and Windows sections below.
This guide uses the 192.168.10.0/24 range and three VPS as an example.
| VPS | Operating system | Private address |
|---|---|---|
| VPS 1 | Windows Server | 192.168.10.1 |
| VPS 2 | Ubuntu or Debian | 192.168.10.2 |
| VPS 3 | AlmaLinux or Rocky Linux | 192.168.10.3 |
dash accepts the 10.0.0.0/8, 172.16.0.0/12 and 192.168.0.0/16 ranges, in CIDR format. Pick a range that does not overlap one already in use on your VPS.
Docker uses 172.17.0.0/16 and the ranges after it.
OpenVPN often uses 10.8.0.0/24.
Many WireGuard setups use 10.0.0.0/24.
Two rules to follow
Never set a gateway or DNS servers on the private interface. The default route must stay on the public interface, or the VPS loses Internet access.
Set the MTU to 1450 on every connected VPS. With 1500, ping and SSH work, but large transfers hang.
Configure the private interface on Linux
The Configure this VPS's private address part of dash gives commands ready to copy. The address they set is lost on restart. The methods below keep it.
Do not edit the files created by cloud-init, such as
/etc/netplan/50-cloud-init.yamlor/etc/network/interfaces.d/50-cloud-init. A VPS whose file had been edited has already ended up without a default route after an IP change. Always write your settings to a separate file.
Find the private interface
ip -br link
ip -br addr
The private interface is the one with no address. It is often called ens19 or eth2. The next command shows its MAC address, after link/ether, and its MTU of 1450.
ip link show ens19This MAC address is also the one shown for the Private interface under This VPS in dash. To pick the right method, list the /etc/netplan folder with ls /etc/netplan. If it contains files, follow the netplan method. Otherwise, follow the one for your distribution.
Recent Ubuntu and Debian (netplan)
Create a separate file.
sudo nano /etc/netplan/60-reseau-prive.yamlPaste this content. Replace the MAC address with your interface's and the address with the VPS's.
network:
  version: 2
  ethernets:
    prive:
      match:
        macaddress: "xx:xx:xx:xx:xx:xx"
      addresses: [192.168.10.2/24]
      mtu: 1450
      dhcp4: false
      dhcp6: false
Restrict the file permissions, then test the settings.
sudo chmod 600 /etc/netplan/60-reseau-prive.yaml
sudo netplan try
netplan try applies the settings and waits for your go-ahead. Press Enter to keep them. If the connection drops, it rolls back on its own after 2 minutes.
Debian with /etc/network/interfaces (ifupdown)
Create the /etc/network/interfaces.d/reseau-prive file with this content, replacing ens19 with your interface's name.
auto ens19
iface ens19 inet static
    address 192.168.10.2/24
    mtu 1450
This folder is read when /etc/network/interfaces contains the line source /etc/network/interfaces.d/*. Then bring the interface up.
sudo ifup ens19AlmaLinux and Rocky Linux (NetworkManager)
Replace eth2 with your interface's name, then run these two commands. The ipv4.never-default yes option stops the private interface from taking the default route.
sudo nmcli con add type ethernet ifname eth2 con-name reseau-prive ipv4.method manual ipv4.addresses 192.168.10.3/24 ipv4.never-default yes ipv6.method disabled 802-3-ethernet.mtu 1450
sudo nmcli con up reseau-prive
Check the link
From another connected VPS, ping the private address of a VPS that is already configured, for example 192.168.10.1.
ping 192.168.10.1Then test the largest packet a 1450 MTU allows. It must get through too.
ping -M do -s 1422 192.168.10.1Filter with ufw
If ufw is active on the VPS, it also blocks what arrives on the private interface. Allow the range to let your other VPS through.
sudo ufw allow from 192.168.10.0/24The guide UFW, configure the firewall of your Linux VPS covers the other rules.
Configure the private interface on Windows Server
These steps apply to Windows Server 2019, 2022 and 2025. The private interface appears as one more Ethernet adapter, for example "Ethernet 3". Until it is configured, it only has an automatic 169.254.x.x address.
With the graphical interface
Open the network settings, then Change adapter options. You can also type
ncpa.cplin the Run window (Windows + R).Right-click the new adapter, then click Properties.
Double-click Internet Protocol Version 4 (TCP/IPv4).
Select Use the following IP address. Enter the address, for example 192.168.10.1, and the subnet mask 255.255.255.0. Leave the default gateway and the DNS servers empty.
Confirm with OK.
Then set the MTU and the network profile with the Set-NetIPInterface and Set-NetConnectionProfile lines from the next section.
With PowerShell
Open PowerShell as administrator and find the name of the private interface.
Get-NetAdapterIts MacAddress column matches the MAC address shown in dash. Replace "Ethernet 3" with that name in the commands below.
New-NetIPAddress -InterfaceAlias "Ethernet 3" -IPAddress 192.168.10.1 -PrefixLength 24
Set-NetIPInterface -InterfaceAlias "Ethernet 3" -NlMtuBytes 1450
Set-NetConnectionProfile -InterfaceAlias "Ethernet 3" -NetworkCategory Private
New-NetFirewallRule -DisplayName "Ping reseau prive" -Protocol ICMPv4 -IcmpType 8 -RemoteAddress 192.168.10.0/24 -Action Allow
These four lines give the interface its address, set its MTU to 1450, switch its profile to Private and allow ping from the private range. You can also set the MTU with netsh.
netsh interface ipv4 set subinterface "Ethernet 3" mtu=1450 store=persistentNetwork profile and firewall
Windows puts the new interface in the "Public" or "Unidentified network" category. Its firewall then blocks all incoming traffic, including ping, file sharing and Remote Desktop. The Set-NetConnectionProfile line above switches the profile to Private. Then open the ports you need for the private range only, for example 3306 for MySQL.
New-NetFirewallRule -DisplayName "MySQL reseau prive" -Direction Inbound -Protocol TCP -LocalPort 3306 -RemoteAddress 192.168.10.0/24 -Action AllowTo go further, read Configure the Windows Server firewall on a VPS and Allow ping on a Windows Server VPS.
Check the link
As on Linux, send the largest allowed packet to a connected VPS. It must get through.
ping 192.168.10.2 -f -l 1422Remove a VPS from the private network
In the VPS's Private network card, click Remove next to the Private interface.
The VPS must be off. If it is running, the Remove the private interface? window offers a Shut down the VPS button. The shutdown is clean, but your services on this VPS stop.
Confirm with Remove, then start the VPS again from its page.
Need help?
Open a ticket from Tickets › Open a Ticket, or from the Contact support tile at the bottom of the VPS page. In the Related Service field, pick the VPS so the team saves time. You can also ask your question on the OuiHeberg Discord.