
 Client area
How to move a WordPress site to a new host
To move a WordPress site to a new host, you copy its files and its database, then point the domain to the new server. This guide shows three ways to transfer a WordPress site to your OuiHeberg web hosting: with a plugin, by hand, or from another cPanel. It also covers email, testing the site before the switch and the DNS change.
Would you rather not do it yourself? OuiHeberg can migrate your site for you. Open a "Migration" ticket with the access details of your current host. Each migration is reviewed case by case, and a standard site is moved within 24 to 48 hours of receiving the access details.
Moving from shared hosting to a VPS? Follow the guide How to migrate from shared hosting to a VPS instead.
Prepare the move
Start by listing everything that has to follow the site.
The site files, usually the
public_htmlfolder (sometimeswwworhtdocs).The database. Its name, user and password are in the
wp-config.phpfile.The email addresses of the domain and their forwarders.
Any special DNS records in the current zone, such as an MX record for an external mail service or a TXT verification record.
Keep the old hosting active until the end. The site keeps running there while you prepare the new one. Nothing changes for your visitors until the DNS switch.
The main domain of the hosting is the one chosen when you ordered. To move another site, first add its domain in the Domains tab of the hosting page, with Add a domain. The guide How to add a domain on cPanel explains the steps. The number of sites depends on your plan, as shown on the website hosting page.
Also check the domain's PHP version in the PHP version tab. Choose the one used by the old host, or a newer one if your theme and plugins support it. The guide How to change the PHP version on cPanel explains the setting. WordPress recommends PHP 8.3 or later and MariaDB 10.11 or later, according to its requirements page. The server runs MariaDB 10.11.
Create the database in the client area
The manual method, Duplicator and the restore from another cPanel all need an empty database on the hosting.
Log in to dash.ouiheberg.com. In the left-hand menu, click My Services, then your hosting plan.
Open the Databases tab. In the Users card, click Add and create the user. Write down its password.
Click Create a database. Enter the Database name, choose the User with all privileges, then click Create.
The database name and the user name both start with your cPanel username, followed by an underscore. A database called wordpress becomes, for example, user_wordpress. Write down these full names. The database server is localhost.
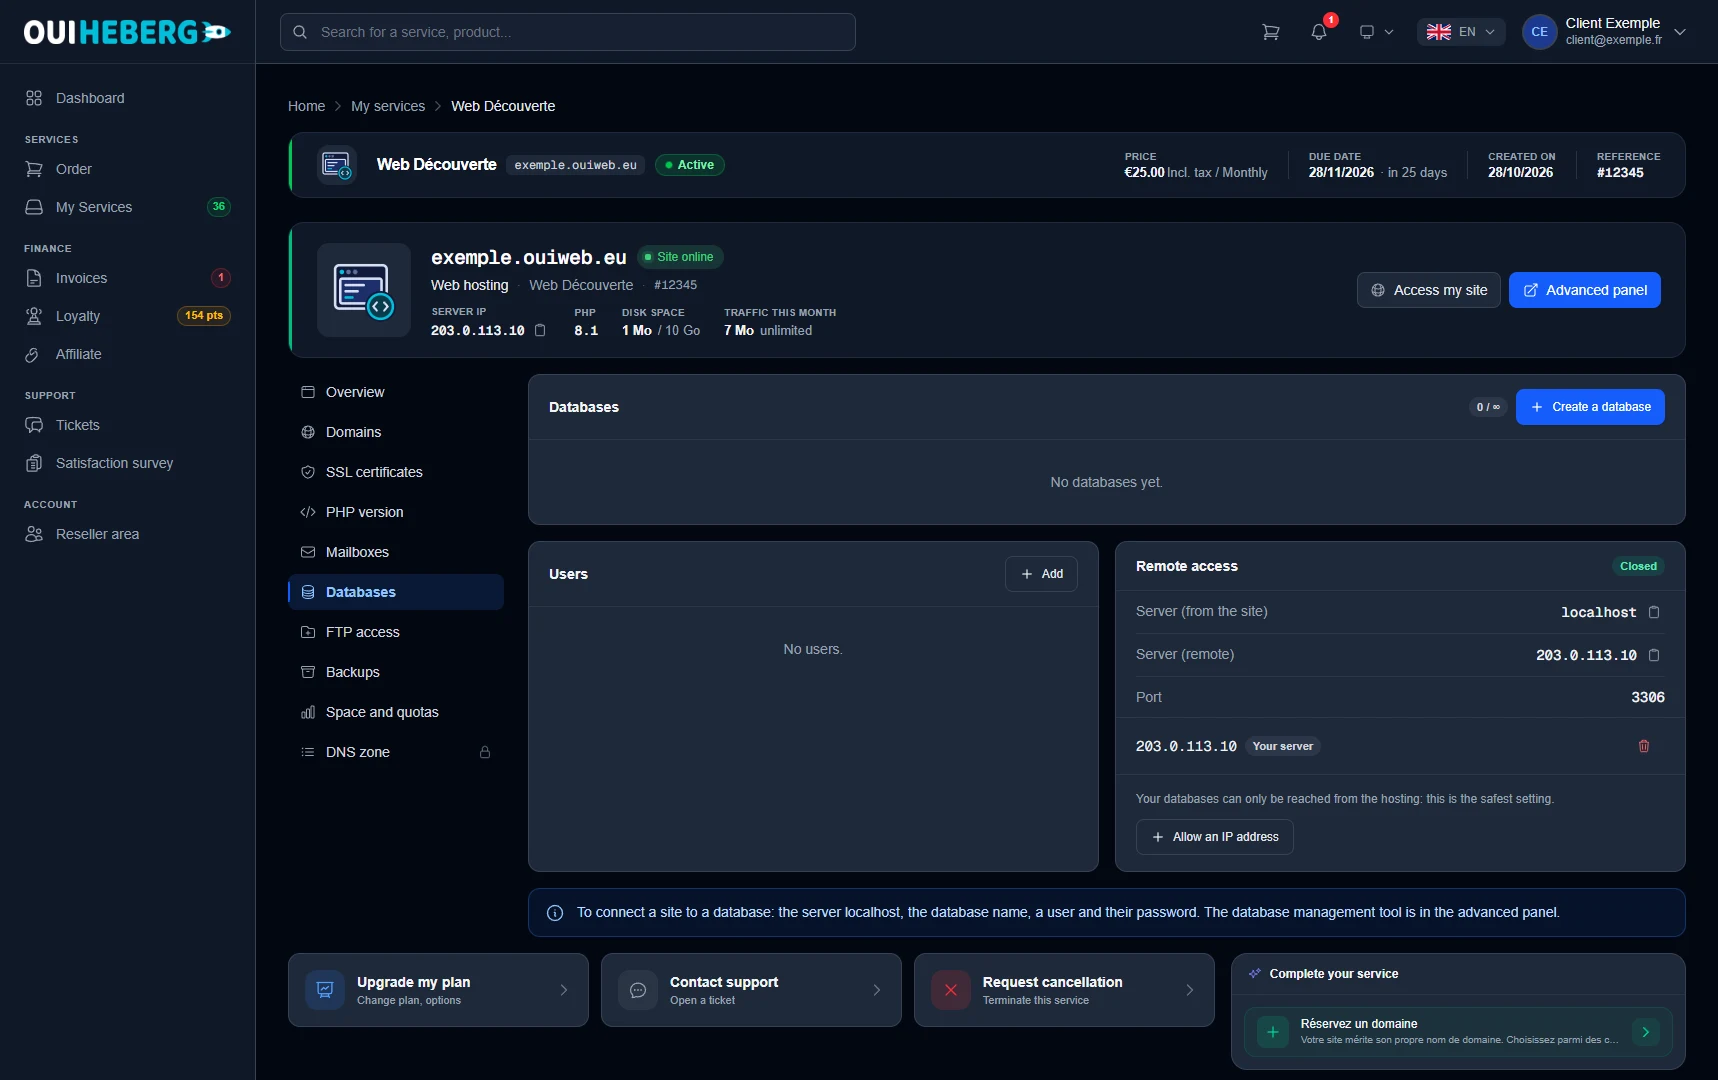
To create the database in cPanel or set privileges, follow the guide cPanel MySQL database. The other tabs of the hosting page are covered in Access cPanel and manage your OuiHeberg web hosting.
Test the site before changing DNS
Until the DNS changes, your domain still leads to the old host. The hosts file on your computer sends it to OuiHeberg, for you alone. You use it to run a plugin's installer, then to check the site before the switch.
First, you need the IP address of the hosting. Click Advanced panel at the top right of the hosting page. cPanel opens straight away, with no login details to type. On its home page, the General Information block shows the address on the Shared IP Address line. The same address appears in the Hosting details card of the client area.
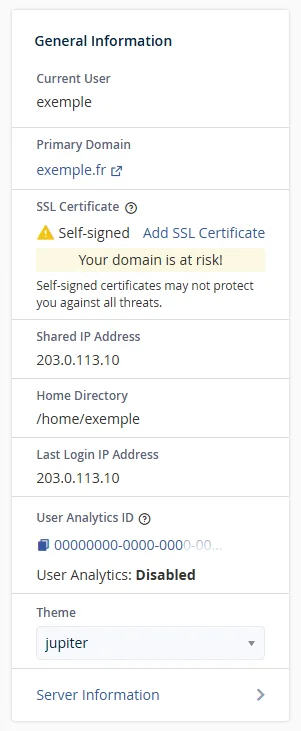
Then add a line to the hosts file with this address, followed by the domain with and without www.
203.0.113.10 mysite.com www.mysite.com
| System | File | To edit it | To clear the DNS cache |
|---|---|---|---|
| Windows | C:\Windows\System32\drivers\etc\hosts | Notepad, opened with Run as administrator | ipconfig /flushdns |
| macOS | /etc/hosts | sudo nano /etc/hosts in Terminal | sudo dscacheutil -flushcache; sudo killall -HUP mDNSResponder |
| Linux | /etc/hosts | sudo nano /etc/hosts | sudo resolvectl flush-caches |
Save the file, clear the DNS cache, then open the site in a private browser window. You now see the copy hosted at OuiHeberg. The browser may show a certificate warning, because the final certificate is only created after the switch. For this test, you can skip past it.
Remove the line from the
hostsfile once testing is over. Otherwise your computer will keep ignoring DNS for this domain.
Move WordPress with a plugin
A migration plugin bundles the files and the database of the old site, then puts them back in place on the new hosting. Two free plugins are widely used, Duplicator and All-in-One WP Migration. WordPress Management, the WordPress tool in cPanel, has no migration feature. Here it is only used to install the blank WordPress that All-in-One WP Migration needs.
With Duplicator
Duplicator does not need WordPress to be installed on the new hosting.
On the old site, install the Duplicator plugin. Create a backup from its menu, then download the two files it produces, the archive and
installer.php.Create an empty database and its user in the client area, as explained above.
Upload both files to the site folder,
public_htmlfor the main domain, with File Manager or over FTP. Do not extract the archive. The folder must not contain WordPress or any other site.With the
hostsfile in place, openhttps://mysite.com/installer.phpin your browser.In the installer, enter the server
localhost, the database name, the user and its password. Validate, then follow the steps to the end.Log in to the site and check it. Then delete
installer.phpand the archive from the server.
If the site's address changes, the installer replaces it in the database along the way.
Give the installer an empty database created for this site. Its Remove All Data action deletes every table in the database you connect to.
With All-in-One WP Migration
All-in-One WP Migration imports into a WordPress already installed on the hosting.
On the old site, install All-in-One WP Migration and export the site to a file. You get a
.wpressfile.In cPanel, in the Domains section, open WordPress Management. Click Install WordPress and choose the site's domain. Write down the administrator's username and password.
With the
hostsfile in place, log in to this new WordPress athttps://mysite.com/wp-admin.Install All-in-One WP Migration, open its import screen and upload the
.wpressfile. Confirm the overwrite.
The plugin restores the database, themes, plugins and media of the old site. The blank WordPress therefore takes on its content, user accounts included. Log in again with your usual credentials. If the site's address changes, the plugin updates it.
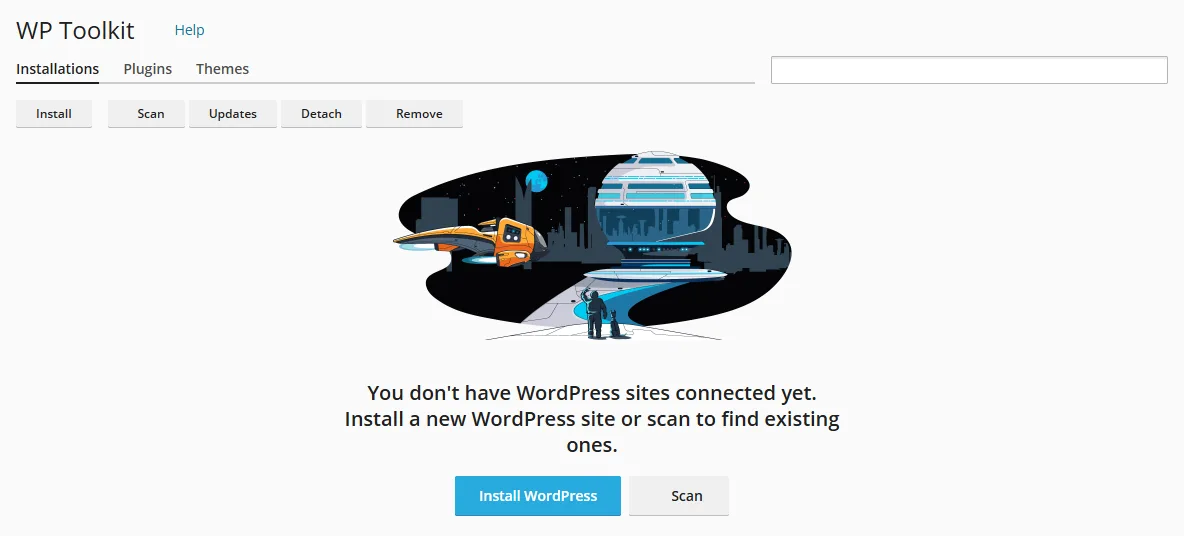
The import screen shows the maximum size accepted. According to the plugin's developer, the host sets this limit, not the plugin. It depends in particular on the PHP settings upload_max_filesize and post_max_size, which you can raise in the PHP version tab of the client area, within the allowed range. The guide How to modify PHP settings (php.ini) on cPanel covers these settings.
A multisite network needs the paid version of both plugins. Without it, use the manual method.
Move WordPress manually
The manual method works whatever the old host. It copies the database with phpMyAdmin, and the files with File Manager or over FTP. It also works for other PHP sites, such as PrestaShop or Joomla. Only the configuration file changes, and the guide cPanel MySQL database gives examples.
Export the old site's database
On the old host, open phpMyAdmin from its control panel.
In the left-hand column, click the site's database. Its name is in
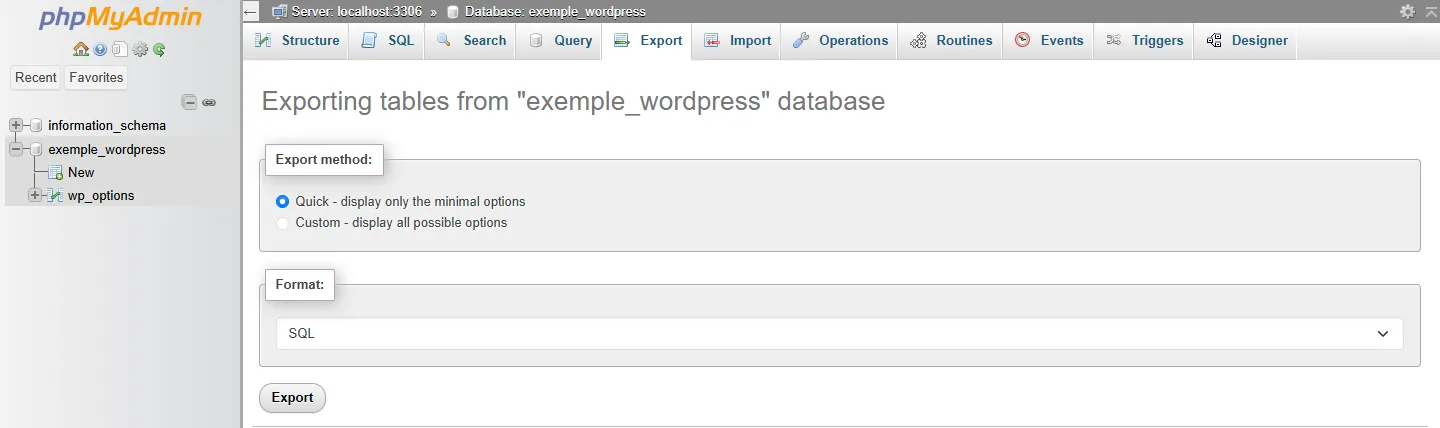
wp-config.php, on theDB_NAMEline.Open the Export tab. Keep the Quick method and the SQL format, then click Export.
You get a .sql file. The screen below is phpMyAdmin at OuiHeberg. It looks the same at other hosts, apart from the version.
Download the site files
Download the whole content of the site folder, hidden files included, such as .htaccess.
Over FTP, connect with the old host's access details, in a client such as FileZilla. The guide How to create an FTP account in cPanel shows the FileZilla settings.
If the old host runs cPanel, an archive is faster. In its File Manager, open
public_html, click Select All, then Compress, in Zip format. Then download the archive with Download.
Compress the content of the folder, not the folder itself. Otherwise the files will end up in a subfolder once extracted.
Import the database with phpMyAdmin
In cPanel, in the Databases section, click phpMyAdmin.
In the left-hand column, click the database created in the client area.
Open the Import tab and choose the
.sqlfile. A file compressed as.gzor.zipis accepted too.Click Import at the bottom of the page.
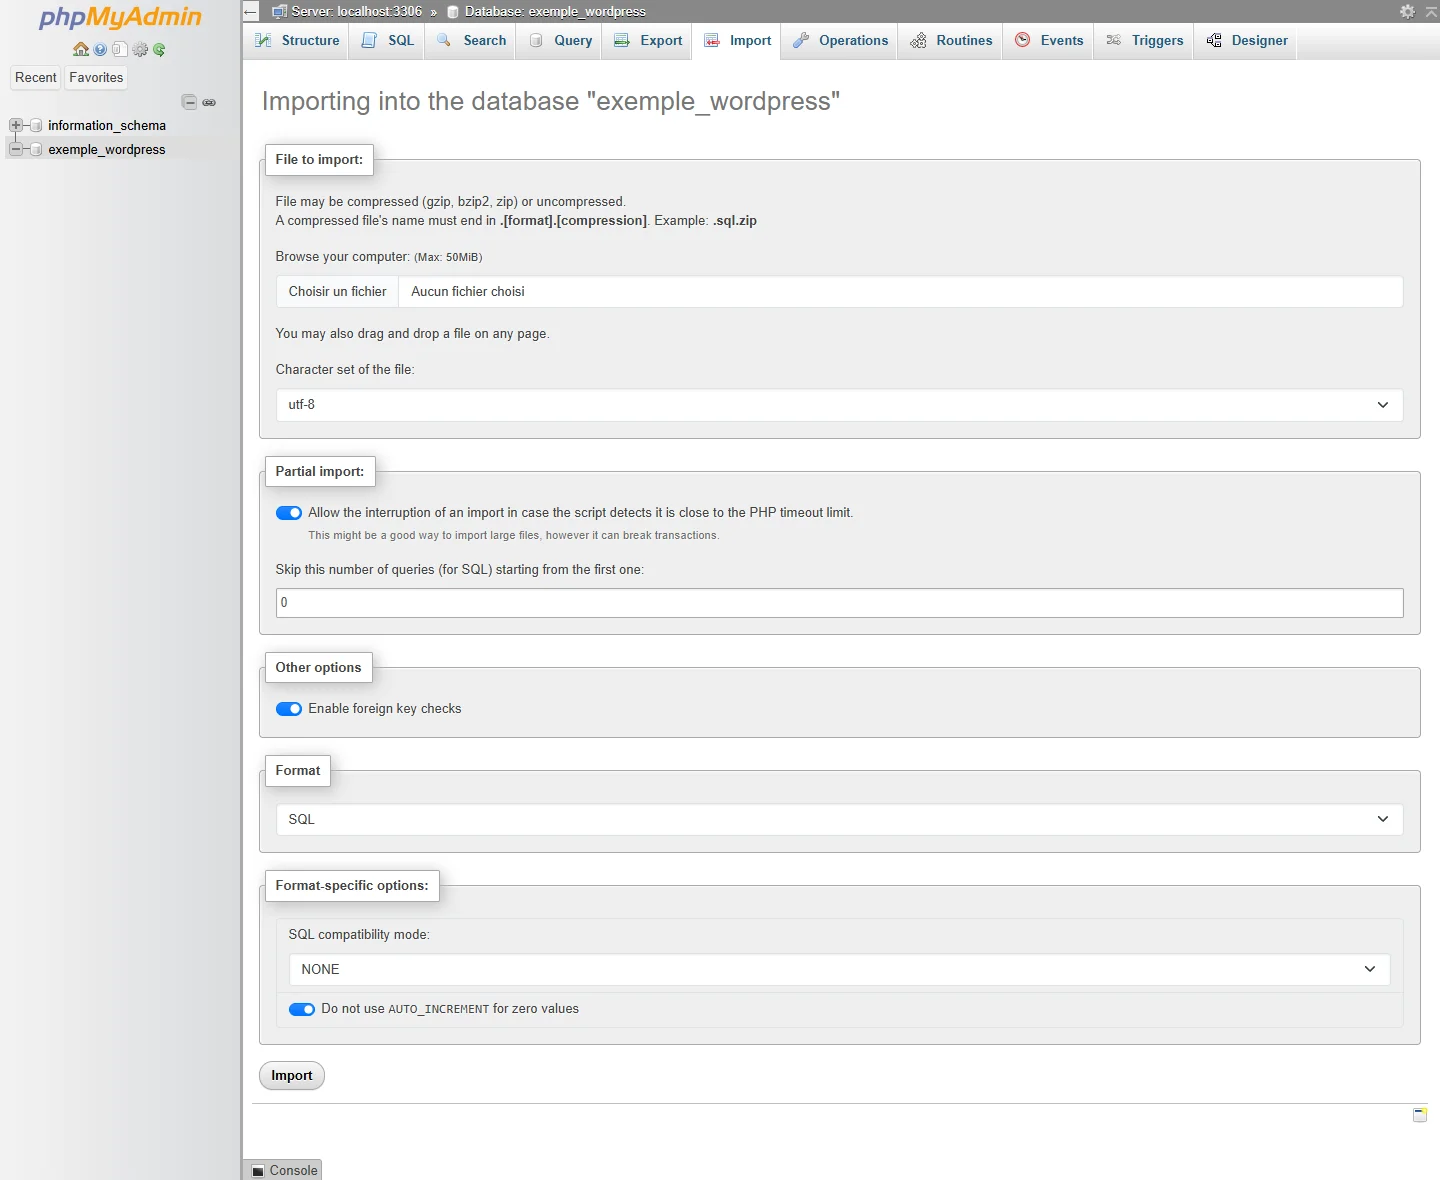
phpMyAdmin accepts files of 50 MiB at most, as the page states ("Max: 50MiB"). Once compressed, a file often fits under this limit. Beyond that, split the database into several files and import them one after the other, or open a ticket. SSH is also available on request, on every plan, to import from the command line.
Upload the files to the hosting
In cPanel, in the Files section, click File Manager. It opens in a new tab.
Open
public_html, the folder of the main domain. An addon domain has its own folder, named after the domain by default.Click Upload in the toolbar.
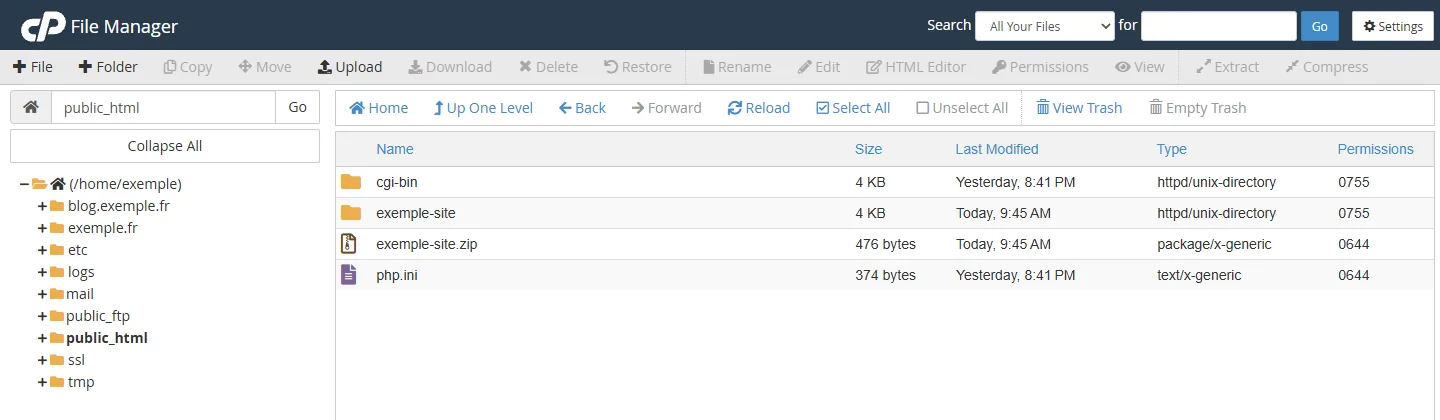
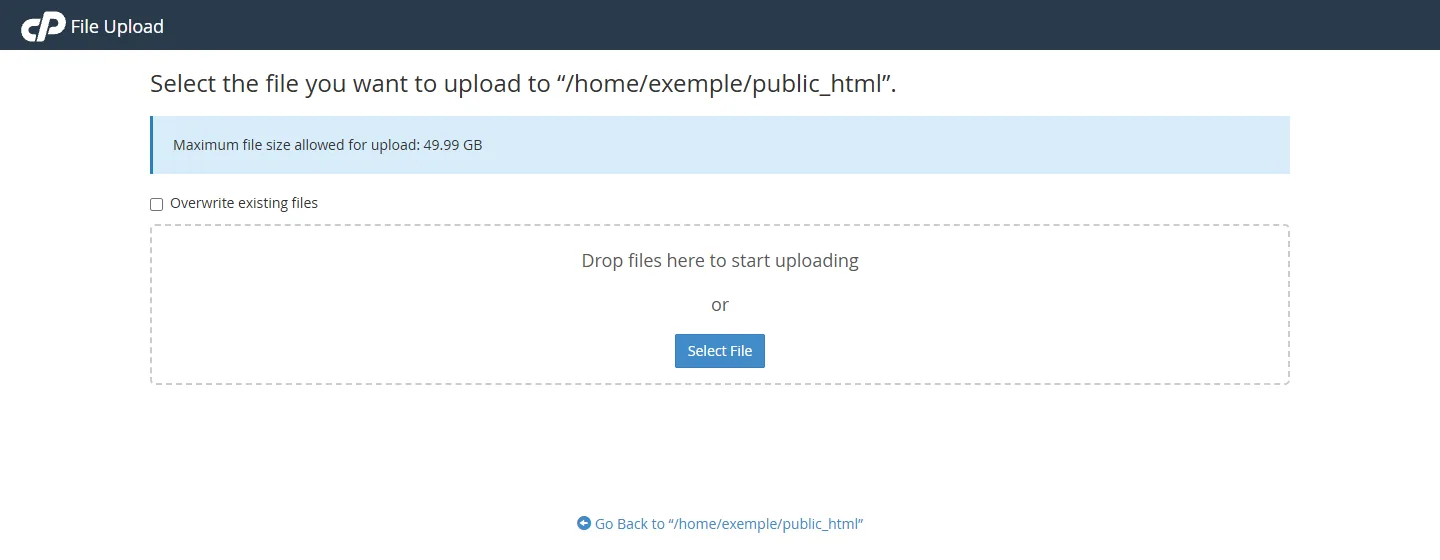
On the File Upload page, click Select File and choose the Zip archive. Wait for the upload to finish.
The page shows the maximum file size allowed. It is not a fixed limit, but the disk space left on your hosting. Leave room for both the archive and the extracted files.
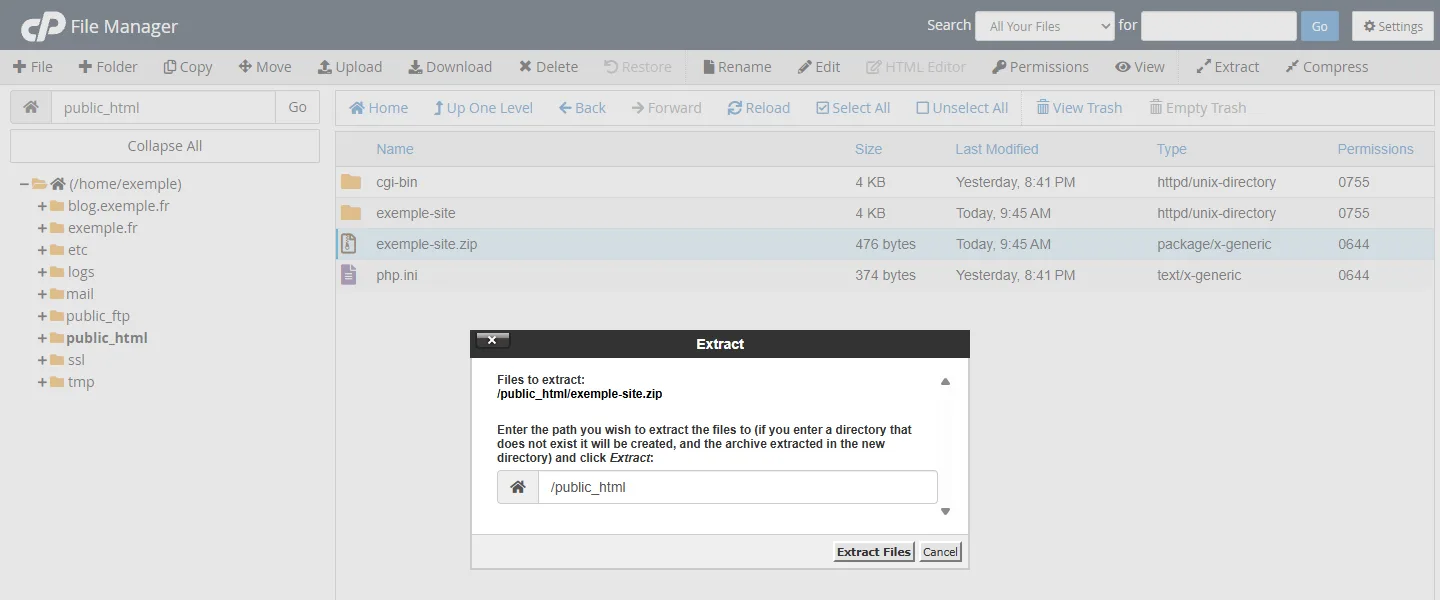
Go back to File Manager and click Reload. Click the archive, then Extract.
Check the suggested path,
/public_html, then click Extract Files.Once the files are extracted, select the archive and click Delete.
For a large site, uploading over FTP is still an option. An FTP client resumes interrupted transfers.
Edit wp-config.php
The wp-config.php file still holds the old database details. In File Manager, click wp-config.php, then Edit. Replace the four values with those of the new database.
/** Database name, with the prefix */
define( 'DB_NAME', 'user_wordpress' );

/** Database user, with the prefix */
define( 'DB_USER', 'user_wpuser' );

/** User password */
define( 'DB_PASSWORD', 'your_password' );

/** Database server */
define( 'DB_HOST', 'localhost' );

/** Table prefix, keep it as it is */
$table_prefix = 'wp_';
Leave $table_prefix alone. It must stay the same as on the old site, or WordPress will no longer find its tables. Save, then test the site with the hosts file.
To manage this site from WordPress Management (updates, plugins, themes), open the tool in cPanel and click Scan. It finds WordPress sites copied by hand and adds them to its list.
If the domain name changes
WordPress stores its address in many places in the database. Do not change it with an SQL REPLACE query. Some values are serialized together with their length, and a raw replacement breaks them. The WordPress documentation recommends a plugin such as Better Search Replace.
To open the dashboard under the new address, add these two lines to
wp-config.php, below theDB_HOSTline.
define( 'WP_HOME', 'https://mysite.com' );
define( 'WP_SITEURL', 'https://mysite.com' );
Log in, install Better Search Replace and open Tools › Better Search Replace.
Search for the old address, for example
https://example.com, and replace it withhttps://mysite.com. Select all tables.Run a dry run first, which counts the fields to change without changing anything. Then run the replacement.
Remove the two lines you added to
wp-config.php.
Export the database before the replacement, which cannot be undone. Leave the GUID replacement off, since WordPress says this column must never be changed.
Restore a site from another cPanel
If your old host also uses cPanel, its Backup page, in the Files section, downloads the account in parts. The same page exists on your OuiHeberg hosting to put them back. Do not confuse it with Backup Wizard or JetBackup 5, in the same section.
The Download a Full Account Backup button creates a full backup. It cannot be restored from cPanel, and the button's page says so: "You cannot restore full backups through your cPanel interface." To have a full backup restored, open a "Migration" ticket.
Partial backups, however, can be restored from the Backup page of your hosting.
| Download at the old host | Restore at OuiHeberg |
|---|---|
| Download a Home Directory Backup | Restore a Home Directory Backup |
| Download a Database Backup | Restore a Database Backup |
| Download Email Forwarders | Restore Email Forwarders |
| Download Email Filters | Restore Email Filters |
In each restore block, choose the file, then click Upload.
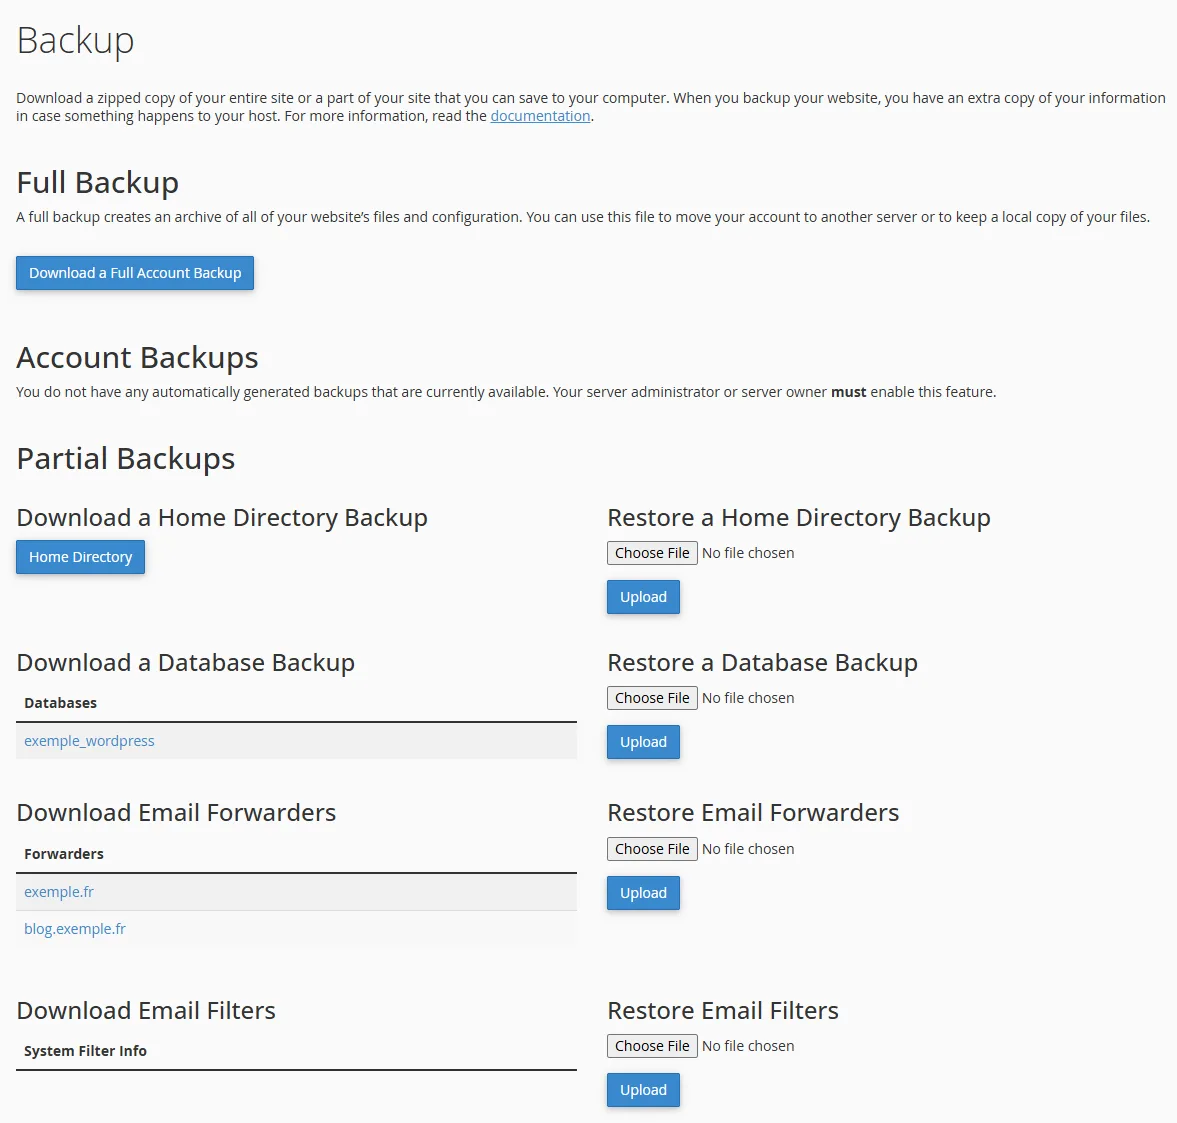
Restoring the home directory overwrites files with the same name on the hosting. Create an archive in the Backups tab of the client area first.
The home directory backup contains the whole directory of the old account, not just the site. To bring over the site only, open the archive on your computer and upload the content of its public_html folder, as in the manual method. Likewise, if the old account had a different username, its databases carry a different prefix. In that case, import them with phpMyAdmin into a database created in the client area, then edit wp-config.php.
Move your email
Recreate every address before changing the DNS. In the Mailboxes tab of the client area, click Create a mailbox. Forwarders, filters and autoresponders are set in cPanel, as shown in the guide Manage emails on cPanel.
To copy old messages, use an email client over IMAP, such as Thunderbird or Outlook.
Add the old account, with the old host's IMAP settings.
Add the new account, with the server shown in the Connection settings card of the Mailboxes tab, over IMAP on port
993with SSL.Drag the folders and messages from the old account to the new one.
Make this copy after the switch, once propagation is complete. That way you also get the last messages that reached the old server. With many mailboxes, the "Migration" ticket is another option.
Refer to each server by its own name, not by
mail.mysite.com. That name moves to the other server at the moment of the switch.
Point the domain to the hosting
Once the site is tested, all that is left is the DNS change. There are two ways to do it.
Change the nameservers
This is the recommended option. The site, the email and the SSL certificate all move to the hosting together. Replace the domain's nameservers with the OuiHeberg ones, ns1.ouiheberg.com to ns4.ouiheberg.com.
If the domain is registered with OuiHeberg, open its page in My Services, Nameservers tab. The guide How to transfer a domain to or from OuiHeberg shows where. It also explains how to bring a domain registered elsewhere over to us.
If it is registered elsewhere, make the change at your registrar, in the domain's nameserver (or DNS server) settings.
Before the change, recreate the special records of the old zone in the hosting's zone. The zone is edited in the DNS zone tab of the hosting page, once Expert Mode is enabled. The guide How to edit the DNS records of your domain describes the tool.
Change only the A record
Keeping the DNS zone with your current provider? Change the A record of the domain (@) and the one for www, if there is one, to the hosting's IP address (203.0.113.10 in our example). Email stays wherever your MX records point. To receive email on the hosting, change the nameservers instead.
The day before, lower the TTL of these records at your provider. The change will then spread faster.
Either way, the change propagates within a few hours, sometimes up to 48 hours. Our DNS lookup tool shows where the domain points.
The SSL certificate
AutoSSL creates the SSL certificate as soon as the domain points to the hosting. It is free and renewed automatically. Track its status in the SSL certificates tab of the hosting page. If it stays in error, the certificate section of the guide How to add a domain on cPanel helps find the cause.
If the browser still shows "Not secure" once the certificate is active, some images probably load over http://. Replace those addresses with Better Search Replace, as for a domain change.
After the switch
Remove the line you added to the hosts file. Then check the site as a visitor would, for example from a phone on mobile data.
Pages, images and internal links display correctly.
Logging in to the WordPress dashboard works.
Forms send their messages.
A shop accepts a test order.
The browser shows the site over HTTPS, with no warning.
Delete the migration files left on the server, such as the Zip archive, the .sql file or the Duplicator files. Once everything is confirmed, create an archive in the Backups tab of the client area, with Create an archive.
Keep the old hosting for a few more days. Cancel it only once the DNS has propagated and the last emails are copied.
Fix common errors
Database connection error
WordPress cannot reach its database. In wp-config.php, check the full names, with the prefix, and the password. DB_HOST must be localhost. Also check that the user has privileges on the database, as shown in the guide cPanel MySQL database.
500 error
The
.htaccessfile copied from the old host may contain lines specific to its server, such asphp_value,php_flagorAddHandler. Remove them. PHP settings are made in the PHP version tab of the client area.The PHP version does not suit the site. Change it in the same tab.
The permissions are wrong. Set
755on folders and644on files.
The .htaccess file is hidden. To see it in File Manager, show hidden files from Settings, at the top right.
Internal pages return a 404 error
The .htaccess file, or its rewrite rules, is missing. In the WordPress dashboard, open Settings › Permalinks and click Save Changes without changing anything. WordPress then rewrites its rules.
Need help?
Open a ticket from Tickets › Open a ticket (dash.ouiheberg.com/tickets/new), or click the Contact support tile at the bottom of your hosting page. You can also ask your question on our Discord.
cPanel hosting with email accounts and databases, managed from the OuiHeberg client area.
View plans →